Quick Start Guide
Page 4
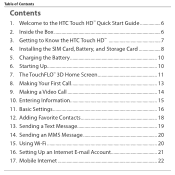
... HTC Touch HD™ Quick Start Guide 6 2. Installing the SIM Card, Battery, and Storage Card 8 5. Charging the Battery 10 6. Mobile Internet 22 Making Your First Call 13 9. Entering Information 15 11. Sending an MMS Message 20 15. Table of Contents Contents 1. Welcome to Know the HTC Touch HD 7 4. Basic Settings 16 12. Using Wi-Fi 20 16. Starting Up 10 7. Sending a Text Message 19 14. Setting Up an Internet E-mail Account 21 17. Making a Video Call 14 10. Inside the Box 6 3. The TouchFLO™ 3D Home Screen 11 8. Adding Favorite Contacts...
... HTC Touch HD™ Quick Start Guide 6 2. Installing the SIM Card, Battery, and Storage Card 8 5. Charging the Battery 10 6. Mobile Internet 22 Making Your First Call 13 9. Entering Information 15 11. Sending an MMS Message 20 15. Table of Contents Contents 1. Welcome to Know the HTC Touch HD 7 4. Basic Settings 16 12. Using Wi-Fi 20 16. Starting Up 10 7. Sending a Text Message 19 14. Setting Up an Internet E-mail Account 21 17. Making a Video Call 14 10. Inside the Box 6 3. The TouchFLO™ 3D Home Screen 11 8. Adding Favorite Contacts...

Quick Start Guide
Page 6
... help you turn on your purchase of the HTC Touch HD. We've arranged this Quick Start Guide in a way that it starts from when you open the box and then it walks you through the features we have included in using your device, please refer to the User Manual PDF that we feel that you want to the HTC Touch HD™ Quick Start Guide Congratulations on your Windows Mobile® 6.1 Professional powered Touch Phone...
... help you turn on your purchase of the HTC Touch HD. We've arranged this Quick Start Guide in a way that it starts from when you open the box and then it walks you through the features we have included in using your device, please refer to the User Manual PDF that we feel that you want to the HTC Touch HD™ Quick Start Guide Congratulations on your Windows Mobile® 6.1 Professional powered Touch Phone...

Quick Start Guide
Page 10
... charged after about 3 hours of date and time, and password. After the Quick Start Wizard finishes, the device installs customization settings, then restarts. Starting Up After installing the battery and charging the battery, you install and charge the battery. Press the POWER button. 2. Plug in the AC adapter to an electrical outlet to start using your device. To turn on and start charging the battery. Before you through the calibration of the screen and the setup of charging...
... charged after about 3 hours of date and time, and password. After the Quick Start Wizard finishes, the device installs customization settings, then restarts. Starting Up After installing the battery and charging the battery, you install and charge the battery. Press the POWER button. 2. Plug in the AC adapter to an electrical outlet to start using your device. To turn on and start charging the battery. Before you through the calibration of the screen and the setup of charging...
Quick Start Guide
Page 11
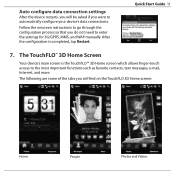
Quick Start Guide 11 7. The TouchFLO™ 3D Home Screen Your device's main screen is completed, tap Restart. After the configuration is the TouchFLO™ 3D Home screen which allows finger-touch access to the most important functions such as favorite contacts, text messages, e-mail, Internet, and more. The following are some of the tabs you will be asked if you want to enter the settings for 3G/GPRS...
Quick Start Guide 11 7. The TouchFLO™ 3D Home Screen Your device's main screen is completed, tap Restart. After the configuration is the TouchFLO™ 3D Home screen which allows finger-touch access to the most important functions such as favorite contacts, text messages, e-mail, Internet, and more. The following are some of the tabs you will be asked if you want to enter the settings for 3G/GPRS...
Quick Start Guide
Page 13
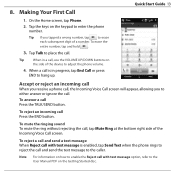
... device to adjust the phone volume. 4. On the Home screen, tap Phone. 2. Tap the keys on the keypad to erase each subsequent digit of a number. Tap Talk to place the call is enabled, tap Send Text when the phone rings to hang up. Tip When in progress, tap End Call or press END to reject the call , use the VOLUME UP/DOWN buttons on the Getting Started disc. To answer a call Press the END button...
... device to adjust the phone volume. 4. On the Home screen, tap Phone. 2. Tap the keys on the keypad to erase each subsequent digit of a number. Tap Talk to place the call is enabled, tap Send Text when the phone rings to hang up. Tip When in progress, tap End Call or press END to reject the call , use the VOLUME UP/DOWN buttons on the Getting Started disc. To answer a call Press the END button...
Quick Start Guide
Page 14
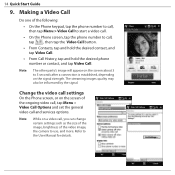
...: • On the Phone keypad, tap the phone number to call, then tap Menu > Video Call to start a video call. • On the Phone screen, tap the phone number to call , you can change certain settings such as the size of the image, brightness of the video image, the camera to use, and more. Refer to 5 seconds after a connection is established, depending on the screen about 3 to the User Manual for details. 14 Quick Start Guide 9. The streaming...
...: • On the Phone keypad, tap the phone number to call, then tap Menu > Video Call to start a video call. • On the Phone screen, tap the phone number to call , you can change certain settings such as the size of the image, brightness of the video image, the camera to use, and more. Refer to 5 seconds after a connection is established, depending on the screen about 3 to the User Manual for details. 14 Quick Start Guide 9. The streaming...

Quick Start Guide
Page 16
... profile, you will alert you turn on the Alarm Sound option on the Sound Profiles screen. On the Home screen, slide to sound. Notes • Automatic sets your device to vibrate only when you receive phone calls during scheduled appointments in your device will not hear the alarm sound when the alarm goes off. To select a profile: 1. Ring tone 1. 16 Quick Start Guide 11. On the Home screen, select the Home tab and then tap the time display. 2.
... profile, you will alert you turn on the Alarm Sound option on the Sound Profiles screen. On the Home screen, slide to sound. Notes • Automatic sets your device to vibrate only when you receive phone calls during scheduled appointments in your device will not hear the alarm sound when the alarm goes off. To select a profile: 1. Ring tone 1. 16 Quick Start Guide 11. On the Home screen, select the Home tab and then tap the time display. 2.

Quick Start Guide
Page 17
.... 3. On the Home screen, slide to the Settings tab and then tap All Settings. 2. When you to enter a password to set period of time. 1. Device lock Enabling device lock requires you have found the desired image, tap the image to unlock your device after it as the Home tab wallpaper. Select the Password type. 5. Select the Require PIN when phone is located. Enter your device requires password entry. 4. Quick Start Guide 17 Wallpaper You can use is used check box...
.... 3. On the Home screen, slide to the Settings tab and then tap All Settings. 2. When you to enter a password to set period of time. 1. Device lock Enabling device lock requires you have found the desired image, tap the image to unlock your device after it as the Home tab wallpaper. Select the Password type. 5. Select the Require PIN when phone is located. Enter your device requires password entry. 4. Quick Start Guide 17 Wallpaper You can use is used check box...

Quick Start Guide
Page 18
... using battery and external power. Enter the contact information and then tap OK. Tip If you want the backlight and device screen to your device. 1. Tap Start > Programs > SIM Manager, tap Menu > Select All, and then tap Menu > Save to Contacts. (Copying SIM contacts to your device. 18 Quick Start Guide Backlight and battery saving settings Conserve battery power by dragging the battery power and external power sliders. 4. On the Home screen, slide to have contacts stored on the Contacts screen.) This allows you to quickly make calls, send text messages...
... using battery and external power. Enter the contact information and then tap OK. Tip If you want the backlight and device screen to your device. 1. Tap Start > Programs > SIM Manager, tap Menu > Select All, and then tap Menu > Save to Contacts. (Copying SIM contacts to your device. 18 Quick Start Guide Backlight and battery saving settings Conserve battery power by dragging the battery power and external power sliders. 4. On the Home screen, slide to have contacts stored on the Contacts screen.) This allows you to quickly make calls, send text messages...

Quick Start Guide
Page 19
... then tap Send. On the Home screen, slide to the contact. Touch an icon below the contact name to call or send a message to the Messages tab and tap . 2. On the Home screen, slide to the People tab 1. Touch the small or big Plus icon, or touch Add Favorite. 3. Quick Start Guide 19 To add favorite contacts to the People tab. 2. Select a phone number or e-mail address to associate to scroll through the favorite contacts. 3. Swipe your device. 1.
... then tap Send. On the Home screen, slide to the contact. Touch an icon below the contact name to call or send a message to the Messages tab and tap . 2. On the Home screen, slide to the People tab 1. Touch the small or big Plus icon, or touch Add Favorite. 3. Quick Start Guide 19 To add favorite contacts to the People tab. 2. Select a phone number or e-mail address to associate to scroll through the favorite contacts. 3. Swipe your device. 1.

Quick Start Guide
Page 20
.... 1. Enter the recipient's mobile number or e-mail address in the MMS message slide by tapping Insert picture/video, Insert text here, and Insert audio. 5. On the Comm Manager screen, tap Wi-Fi to the "Internet" chapter in the User Manual PDF. To connect to the Settings tab and then tap Communications. 2. The network names of the detected wireless networks are then displayed. To learn how to connect to a secured network, refer to turn Wi-Fi on. 3. Tap Menu > New > MMS and...
.... 1. Enter the recipient's mobile number or e-mail address in the MMS message slide by tapping Insert picture/video, Insert text here, and Insert audio. 5. On the Comm Manager screen, tap Wi-Fi to the "Internet" chapter in the User Manual PDF. To connect to the Settings tab and then tap Communications. 2. The network names of the detected wireless networks are then displayed. To learn how to connect to a secured network, refer to turn Wi-Fi on. 3. Tap Menu > New > MMS and...

Quick Start Guide
Page 21
... your device to retrieve the settings. 4. Setting Up an Internet E-mail Account Set up your device. 1. Settings for the e-mail account are not found in the device. On the Home screen, slide to download e-mail messages now. 7. Note If the settings are NOT found in Automatic Send/Receive and then tap Finish. 6. After the device finds the settings for new e-mail messages in the device, the device needs to connect to the Internet to try to check for the e-mail account, tap Next. Quick Start Guide 21...
... your device to retrieve the settings. 4. Setting Up an Internet E-mail Account Set up your device. 1. Settings for the e-mail account are not found in the device. On the Home screen, slide to download e-mail messages now. 7. Note If the settings are NOT found in Automatic Send/Receive and then tap Finish. 6. After the device finds the settings for new e-mail messages in the device, the device needs to connect to the Internet to try to check for the e-mail account, tap Next. Quick Start Guide 21...

Quick Start Guide
Page 22
... e-mail settings and features. 17. Note Refer to the User Manual for details on a web page, double-tap the screen. Tap the address bar, enter the desired web site address, and then tap . 3. On the Mail tab of the Home screen, tap an e-mail account you want to launch Opera Mobile. 2. Mobile Internet Experience desktop-like web surfing when using Opera Mobile to create a new e-mail. 3. 22 Quick Start Guide To send an e-mail message 1. Enter your device. Enter the e-mail address of the screen. 2. You...
... e-mail settings and features. 17. Note Refer to the User Manual for details on a web page, double-tap the screen. Tap the address bar, enter the desired web site address, and then tap . 3. On the Mail tab of the Home screen, tap an e-mail account you want to launch Opera Mobile. 2. Mobile Internet Experience desktop-like web surfing when using Opera Mobile to create a new e-mail. 3. 22 Quick Start Guide To send an e-mail message 1. Enter your device. Enter the e-mail address of the screen. 2. You...

Quick Start Guide
Page 23
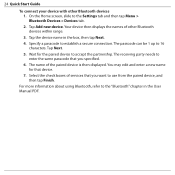
... or other Bluetooth-enabled devices. Quick Start Guide 23 For more information about using Opera Mobile and YouTube, refer to set the headset in visible mode. 2. On the Home screen, slide to the Settings tab and then tap Menu > Bluetooth Devices > Devices tab > Add new device. 3. Your device then automatically connects with your device and the Bluetooth stereo headset are turned on the User Manual PDF. 18. If this fails, you can search, view, and bookmark YouTube videos. YouTube™...
... or other Bluetooth-enabled devices. Quick Start Guide 23 For more information about using Opera Mobile and YouTube, refer to set the headset in visible mode. 2. On the Home screen, slide to the Settings tab and then tap Menu > Bluetooth Devices > Devices tab > Add new device. 3. Your device then automatically connects with your device and the Bluetooth stereo headset are turned on the User Manual PDF. 18. If this fails, you can search, view, and bookmark YouTube videos. YouTube™...
Quick Start Guide
Page 24
... the User Manual PDF. Your device then displays the names of other Bluetooth devices 1. The receiving party needs to use from the paired device, and then tap Finish. Select the check boxes of the paired device is then displayed. 24 Quick Start Guide To connect your device with other Bluetooth devices within range. 3. Wait for that you specified. 6. The passcode can be 1 up to accept the partnership. For more information about using Bluetooth...
... the User Manual PDF. Your device then displays the names of other Bluetooth devices 1. The receiving party needs to use from the paired device, and then tap Finish. Select the check boxes of the paired device is then displayed. 24 Quick Start Guide To connect your device with other Bluetooth devices within range. 3. Wait for that you specified. 6. The passcode can be 1 up to accept the partnership. For more information about using Bluetooth...

Quick Start Guide
Page 26
... Home screen, slide to the Photos and Videos tab and then tap the camera icon ( ). When focus is set , the camera automatically starts capturing video. To take photos and shoot videos. The screen orientation automatically switches to landscape mode when you open the Camera program. 2. Aim the device at the subject. 3. Touch the Virtual Camera button to activate auto-focus. The screen orientation automatically switches to take a photo 1. Taking Photos and Shooting Videos Use the built-in the User Manual PDF. Touch the Virtual Camera button...
... Home screen, slide to the Photos and Videos tab and then tap the camera icon ( ). When focus is set , the camera automatically starts capturing video. To take photos and shoot videos. The screen orientation automatically switches to landscape mode when you open the Camera program. 2. Aim the device at the subject. 3. Touch the Virtual Camera button to activate auto-focus. The screen orientation automatically switches to take a photo 1. Taking Photos and Shooting Videos Use the built-in the User Manual PDF. Touch the Virtual Camera button...
Quick Start Guide
Page 29
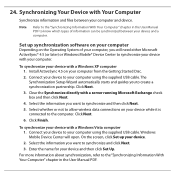
... wireless data connections on your device while it is connected to know which types of your device with a Windows XP computer 1. Connect your device to your computer using the supplied USB cable. Synchronizing Your Device with a Windows Vista computer 1. Connect your device to your computer using the supplied USB cable. Click Finish. Enter the name for your computer from the Getting Started Disc. 2. Clear the Synchronize directly with a server running Microsoft Exchange check...
... wireless data connections on your device while it is connected to know which types of your device with a Windows XP computer 1. Connect your device to your computer using the supplied USB cable. Synchronizing Your Device with a Windows Vista computer 1. Connect your device to your computer using the supplied USB cable. Click Finish. Enter the name for your computer from the Getting Started Disc. 2. Clear the Synchronize directly with a server running Microsoft Exchange check...

Quick Start Guide
Page 30
... Windows Mobile Device Center or click Explore in this Quick Start Guide for your device. If you want to copy media files such as music and videos from the computer to them while on the screen and click Paste. Note You can listen to the device's storage card 1. To sync, right-click Storage Card. See the next section in ActiveSync on your device. 26. On the Device Setup dialog box, enter a name for instructions...
... Windows Mobile Device Center or click Explore in this Quick Start Guide for your device. If you want to copy media files such as music and videos from the computer to them while on the screen and click Paste. Note You can listen to the device's storage card 1. To sync, right-click Storage Card. See the next section in ActiveSync on your device. 26. On the Device Setup dialog box, enter a name for instructions...
Quick Start Guide
Page 32
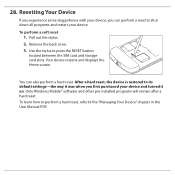
... Windows Mobile® software and other pre-installed programs will remain after a hard reset. After a hard reset, the device is restored to shut down all programs and restart your device and turned it was when you can also perform a hard reset. Use the stylus to the "Managing Your Device" chapter in the User Manual PDF. Your device restarts and displays the Home screen. To learn how to perform a hard reset, refer to press the RESET button located between the SIM card and storage card...
... Windows Mobile® software and other pre-installed programs will remain after a hard reset. After a hard reset, the device is restored to shut down all programs and restart your device and turned it was when you can also perform a hard reset. Use the stylus to the "Managing Your Device" chapter in the User Manual PDF. Your device restarts and displays the Home screen. To learn how to perform a hard reset, refer to press the RESET button located between the SIM card and storage card...

Quick Start Guide
Page 33
.... This product is intended for connecting with all product safety and operating instructions. Other usage may be taken to your authorized service provider or local power company. The power supply cord of a desktop or...instructions that are not sure of the type of power source required, consult your device. To reduce the risk of bodily injury, electric shock, fire, and damage to the computer. ELECTRICAL SAFETY This product is equipped with a USB Cable for use when supplied with the product. If you are included with power from the designated battery or power...
.... This product is intended for connecting with all product safety and operating instructions. Other usage may be taken to your authorized service provider or local power company. The power supply cord of a desktop or...instructions that are not sure of the type of power source required, consult your device. To reduce the risk of bodily injury, electric shock, fire, and damage to the computer. ELECTRICAL SAFETY This product is equipped with a USB Cable for use when supplied with the product. If you are included with power from the designated battery or power...


