User Manual
Page 11
...to Know Your Device and Accessories 16 1.2 Installing the USIM/SIM Card, Battery, and Storage Card 20 1.3 Starting Up 23 1.4 The Today Screen 25 1.5 The Start Menu 26 1.6 Quick Menu 27 1.7 QuickTasks 28 1.8 HTC Home 28 1.9 TouchFLO 33 1.10 Status Icons 40 1.11 ...Programs 42 1.12 Settings 45 Chapter 2 Entering and Searching Information 49 2.1 Entering Information 50 2.2 Using the 20-key QWERTY Hardware Keyboard 52 2.3 Using the Onscreen Keyboard 54 2.4 Using Touch Keyboard 54 2.5 Using Touch Keypad...
...to Know Your Device and Accessories 16 1.2 Installing the USIM/SIM Card, Battery, and Storage Card 20 1.3 Starting Up 23 1.4 The Today Screen 25 1.5 The Start Menu 26 1.6 Quick Menu 27 1.7 QuickTasks 28 1.8 HTC Home 28 1.9 TouchFLO 33 1.10 Status Icons 40 1.11 ...Programs 42 1.12 Settings 45 Chapter 2 Entering and Searching Information 49 2.1 Entering Information 50 2.2 Using the 20-key QWERTY Hardware Keyboard 52 2.3 Using the Onscreen Keyboard 54 2.4 Using Touch Keyboard 54 2.5 Using Touch Keypad...

User Manual
Page 12
... 5.4 Synchronizing With Your Computer 86 5.5 Synchronizing via Bluetooth 87 5.6 Synchronizing Music and Video 88 Chapter 6 Organizing Contacts, Appointments, Tasks, and Other Information 89 6.1 Contacts 90 6.2 SIM Manager 94 6.3 Calendar 96 6.4 Tasks...99 6.5 Notes 101 6.6 Voice Recorder 103 Chapter 7 Exchanging Messages 105 7.1 Messaging 106 7.2 Text Messages 107 7.3 MMS...111 7.4 Types of E-mail...
... 5.4 Synchronizing With Your Computer 86 5.5 Synchronizing via Bluetooth 87 5.6 Synchronizing Music and Video 88 Chapter 6 Organizing Contacts, Appointments, Tasks, and Other Information 89 6.1 Contacts 90 6.2 SIM Manager 94 6.3 Calendar 96 6.4 Tasks...99 6.5 Notes 101 6.6 Voice Recorder 103 Chapter 7 Exchanging Messages 105 7.1 Messaging 106 7.2 Text Messages 107 7.3 MMS...111 7.4 Types of E-mail...
User Manual
Page 15
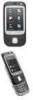
Chapter 1 Getting Started 1.1 Getting to Know Your Device and Accessories 1.2 Installing the USIM/SIM Card, Battery, and Storage Card 1.3 Starting Up 1.4 The Today Screen 1.5 The Start Menu 1.6 Quick Menu 1.7 QuickTasks 1.8 HTC Home™ 1.9 TouchFLO™ 1.10 Status Icons 1.11 Programs 1.12 Settings
Chapter 1 Getting Started 1.1 Getting to Know Your Device and Accessories 1.2 Installing the USIM/SIM Card, Battery, and Storage Card 1.3 Starting Up 1.4 The Today Screen 1.5 The Start Menu 1.6 Quick Menu 1.7 QuickTasks 1.8 HTC Home™ 1.9 TouchFLO™ 1.10 Status Icons 1.11 Programs 1.12 Settings

User Manual
Page 18
... for hands-free conversation or for details. Back Cover Remove to soft-reset your device. With the stylus, press the RESET button to install the SIM card and battery. Speaker Self-portrait Mirror Use it when taking self-portrait shots. Bottom panel RESET Open the rubber cover to recharge the battery...
... for hands-free conversation or for details. Back Cover Remove to soft-reset your device. With the stylus, press the RESET button to install the SIM card and battery. Speaker Self-portrait Mirror Use it when taking self-portrait shots. Bottom panel RESET Open the rubber cover to recharge the battery...
User Manual
Page 20
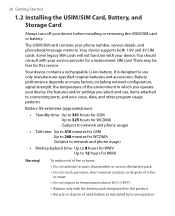
... to network and phone usage) • Talk time: Up to 410 minutes for GSM Up to 268 minutes for WCDMA (Subject to network and phone usage) • Media playback time: Up to 8 hours for WMV Up to use , items attached to temperatures above 60oC (140oF). &#... connecting ports, and your phone number, service details, and phonebook/message memory. Some legacy SIM cards will not function with your device before installing or removing the USIM/SIM card or battery. Your device supports both 1.8V and 3V SIM cards. There may be fees for this product. • Recycle or dispose of...
... to network and phone usage) • Talk time: Up to 410 minutes for GSM Up to 268 minutes for WCDMA (Subject to network and phone usage) • Media playback time: Up to 8 hours for WMV Up to use , items attached to temperatures above 60oC (140oF). &#... connecting ports, and your phone number, service details, and phonebook/message memory. Some legacy SIM cards will not function with your device before installing or removing the USIM/SIM card or battery. Your device supports both 1.8V and 3V SIM cards. There may be fees for this product. • Recycle or dispose of...

User Manual
Page 21
Hold open the cover that houses the SIM card slot. Close the slot cover. SIM Note To remove the USIM/SIM card, press it to pry open the slot cover with its gold contacts facing down and its cut-off corner facing toward the inside of ... illustration. Make sure your thumb or finger to pop it open the slot cover easier, pry it out of the slot. 4. Insert the USIM/SIM card with one hand. 3. To install the USIM/SIM card 1. Getting Started 21 To remove the back cover Before installing the USIM...
Hold open the cover that houses the SIM card slot. Close the slot cover. SIM Note To remove the USIM/SIM card, press it to pry open the slot cover with its gold contacts facing down and its cut-off corner facing toward the inside of ... illustration. Make sure your thumb or finger to pop it open the slot cover easier, pry it out of the slot. 4. Insert the USIM/SIM card with one hand. 3. To install the USIM/SIM card 1. Getting Started 21 To remove the back cover Before installing the USIM...
User Manual
Page 23
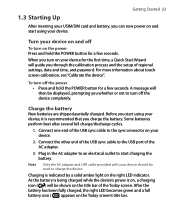
...'s title bar. To turn on and start using your device. A message will guide you whether or not to charge the device. For more information about touch screen calibration, see "Calibrate the device". Before you start charging the battery. Getting Started 23 1.3 Starting Up After inserting your USIM...
...'s title bar. To turn on and start using your device. A message will guide you whether or not to charge the device. For more information about touch screen calibration, see "Calibrate the device". Before you start charging the battery. Getting Started 23 1.3 Starting Up After inserting your USIM...
User Manual
Page 34
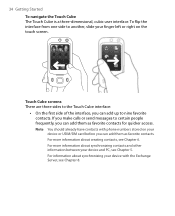
...For more information about synchronizing contacts and other information between your device with phone numbers stored on your finger left or right on the touch screen. For more information about synchronizing your device and PC, see Chapter 6. For information about creating contacts, see Chapter 5. To...one side to another, slide your device or USIM/SIM card before you can add up to nine favorite contacts. 34 Getting Started To navigate the Touch Cube The Touch Cube is a three-dimensional, cubic user interface. Touch Cube screens There are three sides to certain people ...
...For more information about synchronizing contacts and other information between your device with phone numbers stored on your finger left or right on the touch screen. For more information about synchronizing your device and PC, see Chapter 6. For information about creating contacts, see Chapter 5. To...one side to another, slide your device or USIM/SIM card before you can add up to nine favorite contacts. 34 Getting Started To navigate the Touch Cube The Touch Cube is a three-dimensional, cubic user interface. Touch Cube screens There are three sides to certain people ...
User Manual
Page 41
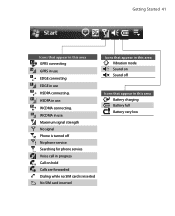
HSDPA in use HSDPA connecting. Getting Started 41 Icons that appear in this area GPRS connecting GPRS in use EDGE connecting EDGE in use. Searching for phone service Voice call in progress Call on Sound off No phone service. WCDMA in this area Vibration mode Sound on hold Calls are forwarded Dialing while no SIM card is turned off Icons that appear in this area Battery charging Battery full Battery very low WCDMA connecting. Maximum signal strength No signal Phone is inserted No SIM card inserted Icons that appear in use.
HSDPA in use HSDPA connecting. Getting Started 41 Icons that appear in this area GPRS connecting GPRS in use EDGE connecting EDGE in use. Searching for phone service Voice call in progress Call on Sound off No phone service. WCDMA in this area Vibration mode Sound on hold Calls are forwarded Dialing while no SIM card is turned off Icons that appear in this area Battery charging Battery full Battery very low WCDMA connecting. Maximum signal strength No signal Phone is inserted No SIM card inserted Icons that appear in use.
User Manual
Page 44
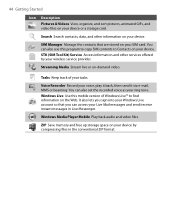
...Windows Live Use this program to copy SIM contents to find information on -demand video. Windows Media Player Mobile Play back audio and video files. SIM Manager Manage the contacts that you sign into your Windows Live account so that are stored on your SIM card. Streaming Media Stream live or on... the Web. STK (SIM Tool Kit) Service Access information and other information on your wireless service provider. ZIP Save memory and free up storage space...
...Windows Live Use this program to copy SIM contents to find information on -demand video. Windows Media Player Mobile Play back audio and video files. SIM Manager Manage the contacts that you sign into your Windows Live account so that are stored on your SIM card. Streaming Media Stream live or on... the Web. STK (SIM Tool Kit) Service Access information and other information on your wireless service provider. ZIP Save memory and free up storage space...
User Manual
Page 45
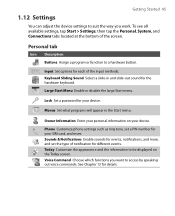
... of the screen. Keyboard Sliding Sound Select a slide-in the Start menu. Menus Set what programs will appear in and slide-out sound for your SIM card, and more , and set a PIN number for the hardware keyboard. Large Start Menu Enable or disable the large Start menu. Sounds & Notifications Enable sounds...
... of the screen. Keyboard Sliding Sound Select a slide-in the Start menu. Menus Set what programs will appear in and slide-out sound for your SIM card, and more , and set a PIN number for the hardware keyboard. Large Start Menu Enable or disable the large Start menu. Sounds & Notifications Enable sounds...

User Manual
Page 62
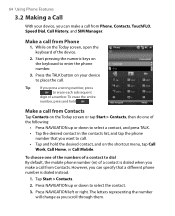
... PIN (personal identification number) that is activated. The Phone screen From the Phone screen, you can use your PIN is entered incorrectly three times, the SIM card will be blocked. Tap Start > Settings > Connections tab > Comm Manager. 2. To open button the keyboard and then press a numeric key. ...If this happens, you are preset with the PUK (PIN Unblocking Key) obtained from your SIM card to enable or disable the phone function. 62 Using Phone Features 3.1 Using the Phone Like a standard mobile phone, you can access Call ...
... PIN (personal identification number) that is activated. The Phone screen From the Phone screen, you can use your PIN is entered incorrectly three times, the SIM card will be blocked. Tap Start > Settings > Connections tab > Comm Manager. 2. To open button the keyboard and then press a numeric key. ...If this happens, you are preset with the PUK (PIN Unblocking Key) obtained from your SIM card to enable or disable the phone function. 62 Using Phone Features 3.1 Using the Phone Like a standard mobile phone, you can access Call ...
User Manual
Page 64
... on your device, you scroll through them. Press NAVIGATION up or down to place the call from Phone, Contacts, TouchFLO, Speed Dial, Call History, and SIM Manager. Tip If you press a wrong number, press to call. • Tap and hold . To erase the entire number, press and hold the desired contact...
... on your device, you scroll through them. Press NAVIGATION up or down to place the call from Phone, Contacts, TouchFLO, Speed Dial, Call History, and SIM Manager. Tip If you press a wrong number, press to call. • Tap and hold . To erase the entire number, press and hold the desired contact...

User Manual
Page 66
... allows you to view the contents of the person you want to add to Contacts on your SIM card. Tap Menu > New. 3. Tap Start > Programs > SIM Manager. In the Location box, select an available key to call , and tap Call. Select the phone number that is already occupied, the new number ... to place a phone number in a position that is already there. • To create a Speed Dial entry from your device, and make a call from Contacts or SIM card contacts, tap the contact, select the number you want to Speed Dial. • To delete a Speed Dial entry, in the Speed Dial list, tap...
... allows you to view the contents of the person you want to add to Contacts on your SIM card. Tap Menu > New. 3. Tap Start > Programs > SIM Manager. In the Location box, select an available key to call , and tap Call. Select the phone number that is already occupied, the new number ... to place a phone number in a position that is already there. • To create a Speed Dial entry from your device, and make a call from Contacts or SIM card contacts, tap the contact, select the number you want to Speed Dial. • To delete a Speed Dial entry, in the Speed Dial list, tap...

User Manual
Page 70
... Dial will be narrowed down the search further, enter another letter. For example, if you continue to tap "3" which is associated with [a, b, and c] on the SIM card, in Contacts, and the phone numbers in a contact name. Using the same example above, if you tap number "2" on the onscreen phone keypad, which...
... Dial will be narrowed down the search further, enter another letter. For example, if you continue to tap "3" which is associated with [a, b, and c] on the SIM card, in Contacts, and the phone numbers in a contact name. Using the same example above, if you tap number "2" on the onscreen phone keypad, which...

User Manual
Page 71
In the Smart Dial panel, browse the list by sliding your SIM card. Tip Additional emergency numbers may be included in your finger or the stylus up or down or by pressing NAVIGATION up or down. 4. Make ...
In the Smart Dial panel, browse the list by sliding your SIM card. Tip Additional emergency numbers may be included in your finger or the stylus up or down or by pressing NAVIGATION up or down. 4. Make ...

User Manual
Page 79
To change the PIN at any time, without requiring a PIN. For more information about creating tasks on your SIM card from unauthorized use by your wireless service provider. Using Windows Explorer on your PC, navigate to the /Windows/Start Menu folder of your device, ... be placed at any of the following: • Under Display number of, select the type of the items you want . 4.3 Protecting Your Device Protect your SIM card with a PIN You can also create folders and shortcuts to appear in the Start menu. 1. Setting Up Your Device 79 4. Customize the Start menu...
To change the PIN at any time, without requiring a PIN. For more information about creating tasks on your SIM card from unauthorized use by your wireless service provider. Using Windows Explorer on your PC, navigate to the /Windows/Start Menu folder of your device, ... be placed at any of the following: • Under Display number of, select the type of the items you want . 4.3 Protecting Your Device Protect your SIM card with a PIN You can also create folders and shortcuts to appear in the Start menu. 1. Setting Up Your Device 79 4. Customize the Start menu...

User Manual
Page 89
Chapter 6 Organizing Contacts, Appointments, Tasks, and Other Information 6.1 Contacts 6.2 SIM Manager 6.3 Calendar 6.4 Tasks 6.5 Notes 6.6 Voice Recorder
Chapter 6 Organizing Contacts, Appointments, Tasks, and Other Information 6.1 Contacts 6.2 SIM Manager 6.3 Calendar 6.4 Tasks 6.5 Notes 6.6 Voice Recorder

User Manual
Page 90
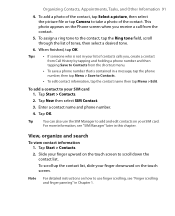
... contacts, you can create the following types of contacts on your device or synchronized with your PC or the Exchange Server. • SIM contacts. For more information, see "Add Windows Live contacts" in the contact list. You can also enter complete information for each entry... the contact information. 3. Contacts that are stored on your device 1. Tap Start > Contacts. 2. Add new contacts To add a contact on the SIM card. Only the name and a phone number can be stored for a Windows Live contact. 90 Organizing Contacts, Appointments, Tasks, and Other Information 6.1...
... contacts, you can create the following types of contacts on your device or synchronized with your PC or the Exchange Server. • SIM contacts. For more information, see "Add Windows Live contacts" in the contact list. You can also enter complete information for each entry... the contact information. 3. Contacts that are stored on your device 1. Tap Start > Contacts. 2. Add new contacts To add a contact on the SIM card. Only the name and a phone number can be stored for a Windows Live contact. 90 Organizing Contacts, Appointments, Tasks, and Other Information 6.1...
User Manual
Page 91
... contact from Call History by tapping and holding a phone number and then tapping Save to Contacts from the contact. 5. This photo appears on the touch screen to Contacts. • To edit contact information, tap the contact name then tap Menu > Edit. Tips • If someone who is ... down the contact list. Note For detailed instructions on how to use the SIM Manager to your SIM card. Tap OK. Slide your finger downward on your SIM card 1. To add a contact to add and edit contacts on the touch screen. Tap Start > Contacts. 2. When finished, tap OK....
... contact from Call History by tapping and holding a phone number and then tapping Save to Contacts from the contact. 5. This photo appears on the touch screen to Contacts. • To edit contact information, tap the contact name then tap Menu > Edit. Tips • If someone who is ... down the contact list. Note For detailed instructions on how to use the SIM Manager to your SIM card. Tap OK. Slide your finger downward on your SIM card 1. To add a contact to add and edit contacts on the touch screen. Tap Start > Contacts. 2. When finished, tap OK....


