Unique Features Introduction
Page 1
The software setup menus are for reference only. Unique Features BIOS Update Utilities...2 1-1 Updating the BIOS with the Q-Flash Utility 2 1-2 Updating the BIOS with the @BIOS Utility 5 1-3 Using Q-Flash Plus...6 APP Center...7 2-1 3D OSD...8 2-2 AutoGreen...9 2-3 Cloud Station...10 2-4 EasyTune...15 2-5 Easy RAID...16 2-6 Fast Boot...18 2-7 Game Boost...19 2-8 Platform Power ...
The software setup menus are for reference only. Unique Features BIOS Update Utilities...2 1-1 Updating the BIOS with the Q-Flash Utility 2 1-2 Updating the BIOS with the @BIOS Utility 5 1-3 Using Q-Flash Plus...6 APP Center...7 2-1 3D OSD...8 2-2 AutoGreen...9 2-3 Cloud Station...10 2-4 EasyTune...15 2-5 Easy RAID...16 2-6 Fast Boot...18 2-7 Game Boost...19 2-8 Platform Power ...

Unique Features Introduction
Page 2
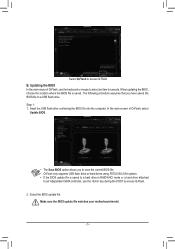
... potentially risky, please do it with the Q-Flash Utility A. Before You Begin 1. Inadequate BIOS flashing may result in BIOS Setup. From GIGABYTE's website, download the latest compressed BIOS update file that support DualBIOS have two BIOS onboard, a main BIOS and a backup BIOS. GIGABYTE Q-Flash and @BIOS are easy-to-use FAT32/16/12 file system. 3. For the sake of...
... potentially risky, please do it with the Q-Flash Utility A. Before You Begin 1. Inadequate BIOS flashing may result in BIOS Setup. From GIGABYTE's website, download the latest compressed BIOS update file that support DualBIOS have two BIOS onboard, a main BIOS and a backup BIOS. GIGABYTE Q-Flash and @BIOS are easy-to-use FAT32/16/12 file system. 3. For the sake of...
Unique Features Introduction
Page 3
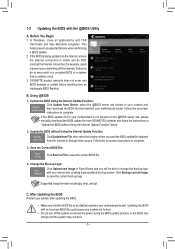
... file matches your motherboard model. - 3 - Select Q-Flash to a USB flash drive. Step 1: 1. When updating the BIOS, choose the location where the BIOS file is saved to a hard drive in RAID/AHCI mode or a hard drive attached to an independent SATA controller, use the keyboard or mouse ...to select an item to access Q-Flash. 2. Insert the USB flash drive containing the BIOS file into the computer. In the main screen of Q-Flash, use the key during the POST to execute. The following procedure assumes that you to...
... file matches your motherboard model. - 3 - Select Q-Flash to a USB flash drive. Step 1: 1. When updating the BIOS, choose the location where the BIOS file is saved to a hard drive in RAID/AHCI mode or a hard drive attached to an independent SATA controller, use the keyboard or mouse ...to select an item to access Q-Flash. 2. Insert the USB flash drive containing the BIOS file into the computer. In the main screen of Q-Flash, use the key during the POST to execute. The following procedure assumes that you to...

Unique Features Introduction
Page 4
...;• Do not remove the USB flash drive or hard drive when the system is updating the BIOS. Select Yes to CMOS and exit BIOS Setup. Step 2: The screen will show that you reload BIOS defaults. The screen will restart after the update process is being read from your USB flash drive. System... will re-detect all peripheral devices after the system restarts. - 4 - And then select Yes to save settings to load BIOS defaults Step 5: Select Save & Exit Setup and press . Select Load Optimized Defaults on the Save & Exit screen and press to enter...
...;• Do not remove the USB flash drive or hard drive when the system is updating the BIOS. Select Yes to CMOS and exit BIOS Setup. Step 2: The screen will show that you reload BIOS defaults. The screen will restart after the update process is being read from your USB flash drive. System... will re-detect all peripheral devices after the system restarts. - 4 - And then select Yes to save settings to load BIOS defaults Step 5: Select Save & Exit Setup and press . Select Load Optimized Defaults on the Save & Exit screen and press to enter...
Unique Features Introduction
Page 5
...Internet connection is not present on the @BIOS server site, please manually download the BIOS update file from GIGABYTE's website and follow the instructions in Face-Wizard and you save the current BIOS file. 4. Using @BIOS 1. Save the Current BIOS File: Click Save to File to do...up Logo: Click Upload new image in "Update the BIOS without Using the Internet Update Function: Click Update from an inadequate BIOS flashing. 1-2 Updating the BIOS with the @BIOS Utility A. GIGABYTE product warranty does not cover any BIOS damage or system failure resulting from File, then select the...
...Internet connection is not present on the @BIOS server site, please manually download the BIOS update file from GIGABYTE's website and follow the instructions in Face-Wizard and you save the current BIOS file. 4. Using @BIOS 1. Save the Current BIOS File: Click Save to File to do...up Logo: Click Upload new image in "Update the BIOS without Using the Internet Update Function: Click Update from an inadequate BIOS flashing. 1-2 Updating the BIOS with the @BIOS Utility A. GIGABYTE product warranty does not cover any BIOS damage or system failure resulting from File, then select the...

Unique Features Introduction
Page 6
... your USB flash drive, and rename it to GIGABYTE.bin. B. After completion, the system will stop flashing when the main BIOS flashing is flashed, the system will reboot automatically and then DualBIOS™ will flash when the BIOS matching and flashing activities start. Uncompress the downloaded BIOS file, save it must be a USB 2.0 flash...
... your USB flash drive, and rename it to GIGABYTE.bin. B. After completion, the system will stop flashing when the main BIOS flashing is flashed, the system will reboot automatically and then DualBIOS™ will flash when the BIOS matching and flashing activities start. Uncompress the downloaded BIOS file, save it must be a USB 2.0 flash...
Unique Features Introduction
Page 7
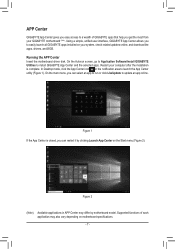
...to easily launch all GIGABYTE apps installed on your computer after the installation is closed, you can select an app to run or click LiveUpdate to update an app online. Restart your system, check related updates online, and download the apps, drivers, and BIOS. Figure 1 If the... App Center is complete. Figure 2 (Note) Available applications in the notification area to install GIGABYTE App Center and the selected apps. Running the APP Center Insert the motherboard driver disk....
...to easily launch all GIGABYTE apps installed on your computer after the installation is closed, you can select an app to run or click LiveUpdate to update an app online. Restart your system, check related updates online, and download the apps, drivers, and BIOS. Figure 1 If the... App Center is complete. Figure 2 (Note) Available applications in the notification area to install GIGABYTE App Center and the selected apps. Running the APP Center Insert the motherboard driver disk....

Unique Features Introduction
Page 18
... Fast.) After you click the Enter BIOS Setup Now button, the system will take effect on next boot. It allows you can enable or change the Fast Boot or Next Boot After AC Power Loss setting right in the operating system. 2-6 Fast Boot Through the simple GIGABYTE Fast Boot interface, you to... enable or disable the fast boot function to shorten OS boot time. •• Next Boot After AC Power Loss: This option is the same as the Fast Boot option (Note) in BIOS Setup.
... Fast.) After you click the Enter BIOS Setup Now button, the system will take effect on next boot. It allows you can enable or change the Fast Boot or Next Boot After AC Power Loss setting right in the operating system. 2-6 Fast Boot Through the simple GIGABYTE Fast Boot interface, you to... enable or disable the fast boot function to shorten OS boot time. •• Next Boot After AC Power Loss: This option is the same as the Fast Boot option (Note) in BIOS Setup.

Unique Features Introduction
Page 20
... Chipset side of the DMI link. (Note) PEG ASPM, PCH ASPM, DMI ASPM Control are configurable only when Platform Power Management is set to the BIOS.
... Chipset side of the DMI link. (Note) PEG ASPM, PCH ASPM, DMI ASPM Control are configurable only when Platform Power Management is set to the BIOS.

Unique Features Introduction
Page 24
... Lock Mode on the bottom left corner and enter the password . (Note) Set the time when a user can set the User Password in the system BIOS Setup program to effectively manage computer or Internet usage time with simple rules and options. An alert will shutdown right away. (Note) You can or... time arrives, or the computer will appear 15 minutes and 1 minute prior to turn off the computer or only close the alert. 2-10 Smart TimeLock GIGABYTE Smart TimeLock allows you to prevent the system time being changed by other users. - 24 -
... Lock Mode on the bottom left corner and enter the password . (Note) Set the time when a user can set the User Password in the system BIOS Setup program to effectively manage computer or Internet usage time with simple rules and options. An alert will shutdown right away. (Note) You can or... time arrives, or the computer will appear 15 minutes and 1 minute prior to turn off the computer or only close the alert. 2-10 Smart TimeLock GIGABYTE Smart TimeLock allows you to prevent the system time being changed by other users. - 24 -
Unique Features Introduction
Page 29
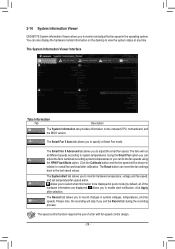
... to overall fan workload after selection. You can also display the hardware monitor information on the installed CPU, motherboard, and the BIOS version. Click the Calibrate button and the fan speed will be displayed in the operating system. allows you to select what information... information are displayed); The Reset button can fix the fan speeds using the RPM Fixed Mode option. 2-14 System Information Viewer GIGABYTE System Information Viewer allows you to the last saved values. The System Information Viewer Interface Tabs Information Tab Description The System Information ...
... to overall fan workload after selection. You can also display the hardware monitor information on the installed CPU, motherboard, and the BIOS version. Click the Calibrate button and the fan speed will be displayed in the operating system. allows you to select what information... information are displayed); The Reset button can fix the fan speeds using the RPM Fixed Mode option. 2-14 System Information Viewer GIGABYTE System Information Viewer allows you to the last saved values. The System Information Viewer Interface Tabs Information Tab Description The System Information ...

Unique Features Introduction
Page 32
After the system restarts, the settings will be synchronized with the BIOS settings. 2-17 USB DAC-UP 2 GIGABYTE USB DAC-UP 2 allows you want to adjust the voltage and choose an option. Then click Apply. The USB DAC-UP 2 Interface Using USB DAC-...
After the system restarts, the settings will be synchronized with the BIOS settings. 2-17 USB DAC-UP 2 GIGABYTE USB DAC-UP 2 allows you want to adjust the voltage and choose an option. Then click Apply. The USB DAC-UP 2 Interface Using USB DAC-...

RAID Setup Guide
Page 2
... system. Before you do not want to create RAID array on the motherboard. Configure SATA controller mode in RAID BIOS. (Note 1) D. Then connect the power connectors from your computer. Configure a RAID array in BIOS Setup. RAID Levels RAID 0 Minimum Number of Hard ≥2 Drives Array Capacity Number of hard drives * Size of...
... system. Before you do not want to create RAID array on the motherboard. Configure SATA controller mode in RAID BIOS. (Note 1) D. Then connect the power connectors from your computer. Configure a RAID array in BIOS Setup. RAID Levels RAID 0 Minimum Number of Hard ≥2 Drives Array Capacity Number of hard drives * Size of...
RAID Setup Guide
Page 3
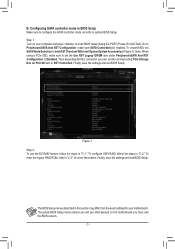
... to Peripherals\SATA And RST Configuration, make sure to set SATA Mode Selection to Disabled. Then depending the M.2 connector you have and the BIOS version. - 3 - To create RAID, set the Use RST Legacy OROM item under Peripherals\SATA And RST Configuration to Intel RST Premium ...settings for more information. Note: When using a PCIe SSD, make sure SATA Controller(s) is enabled. Finally, save the settings and exit BIOS Setup. The actual BIOS Setup menu options you will see shall depend on the motherboard you use the EZ RAID feature, follow the steps in "C-1." B. Step ...
... to Peripherals\SATA And RST Configuration, make sure to set SATA Mode Selection to Disabled. Then depending the M.2 connector you have and the BIOS version. - 3 - To create RAID, set the Use RST Legacy OROM item under Peripherals\SATA And RST Configuration to Intel RST Premium ...settings for more information. Note: When using a PCIe SSD, make sure SATA Controller(s) is enabled. Finally, save the settings and exit BIOS Setup. The actual BIOS Setup menu options you will see shall depend on the motherboard you use the EZ RAID feature, follow the steps in "C-1." B. Step ...
RAID Setup Guide
Page 4
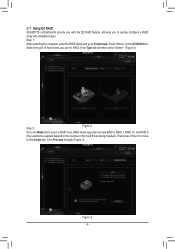
Press on the number of hard drives you to the Create tab. Using EZ RAID GIGABYTE motherboards provide you with the EZ RAID feature, allowing you use for RAID in the Type tab and then press . (Figure 2) Step 2: Figure 2 Go to ... 1, RAID 10, and RAID 5 (the selections available depend on the EZ RAID item. Click Proceed to Peripherals. Figure 3 - 4 - Step 1: After restarting the computer, enter the BIOS Setup and go to begin (Figure 3). Then press to move to quickly configure a RAID array with simplified steps. Select the type of the hard drives...
Press on the number of hard drives you to the Create tab. Using EZ RAID GIGABYTE motherboards provide you with the EZ RAID feature, allowing you use for RAID in the Type tab and then press . (Figure 2) Step 2: Figure 2 Go to ... 1, RAID 10, and RAID 5 (the selections available depend on the EZ RAID item. Click Proceed to Peripherals. Figure 3 - 4 - Step 1: After restarting the computer, enter the BIOS Setup and go to begin (Figure 3). Then press to move to quickly configure a RAID array with simplified steps. Select the type of the hard drives...

RAID Setup Guide
Page 6
Figure 6 Step 2: After the system reboot, enter BIOS Setup again. Then enter the Peripherals\Intel(R) Rapid Storage Technology sub-menu (Figure 7). C-2. Save the changes and exit BIOS Setup. Figure 7 - 6 - UEFI RAID Configuration Step 1: In BIOS Setup, go to BIOS and set CSM Support to Disabled (Figure 6).
Figure 6 Step 2: After the system reboot, enter BIOS Setup again. Then enter the Peripherals\Intel(R) Rapid Storage Technology sub-menu (Figure 7). C-2. Save the changes and exit BIOS Setup. Figure 7 - 6 - UEFI RAID Configuration Step 1: In BIOS Setup, go to BIOS and set CSM Support to Disabled (Figure 6).

RAID Setup Guide
Page 10
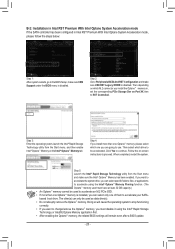
... to Enabled and Storage Boot Option Control to Enabled. Intel(R) Rapid Storage Technology - All Rights Reserved. 1. Next, go to BIOS and set to Legacy. Option ROM - 16.5.0.348 Copyright (C) Intel Corporation. RAID Volumes : None defined. Delete RAID Volume 3....2: Figure 13 After you want to enter Configuration Utility" (Figure 13). Configuring Legacy RAID ROM Enter the Intel® legacy RAID BIOS setup utility to enter Configuration Utility... Recovery Volume Options 5. Physical Devices : ID Device Model 1 TOSHIBA DT01ACA1 2 TOSHIBA DT01ACA1 Serial ...
... to Enabled and Storage Boot Option Control to Enabled. Intel(R) Rapid Storage Technology - All Rights Reserved. 1. Next, go to BIOS and set to Legacy. Option ROM - 16.5.0.348 Copyright (C) Intel Corporation. RAID Volumes : None defined. Delete RAID Volume 3....2: Figure 13 After you want to enter Configuration Utility" (Figure 13). Configuring Legacy RAID ROM Enter the Intel® legacy RAID BIOS setup utility to enter Configuration Utility... Recovery Volume Options 5. Physical Devices : ID Device Model 1 TOSHIBA DT01ACA1 2 TOSHIBA DT01ACA1 Serial ...

RAID Setup Guide
Page 12
... Bootable Yes Type/Status(Vol ID) Non-RAID Disk Non-RAID Disk [hi]-Select [ESC]-Exit Figure 18 [ENTER]-Select Menu To exit the RAID BIOS utility, press or select 6. Option ROM - 16.5.0.348 Copyright (C) Intel Corporation. Create RAID Volume 2. Reset Disks to begin creating the RAID array. Exit in the...
... Bootable Yes Type/Status(Vol ID) Non-RAID Disk Non-RAID Disk [hi]-Select [ESC]-Exit Figure 18 [ENTER]-Select Menu To exit the RAID BIOS utility, press or select 6. Option ROM - 16.5.0.348 Copyright (C) Intel Corporation. Create RAID Volume 2. Reset Disks to begin creating the RAID array. Exit in the...
RAID Setup Guide
Page 16
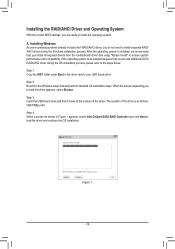
... Windows setup disk and perform standard OS installation steps. The location of the driver. Installing the RAID/AHCI Driver and Operating System With the correct BIOS settings, you provide additional SATA RAID/AHCI driver during the OS installation process, please refer to the steps below: Step 1: Copy the IRST folder under...
... Windows setup disk and perform standard OS installation steps. The location of the driver. Installing the RAID/AHCI Driver and Operating System With the correct BIOS settings, you provide additional SATA RAID/AHCI driver during the OS installation process, please refer to the steps below: Step 1: Copy the IRST folder under...
RAID Setup Guide
Page 20
... Intel® Rapid Storage Technology or Intel(R) Optane Memory application first. •• After enabling the Optane™ memory, the related BIOS settings will cause the operating system to stop functioning correctly. •• If you want to accelerate the system drive, you can only...one Optane™ memory is installed, you can select specific folders, files, or applications to the BIOS Setup, make sure CSM Support under the BIOS menu is disabled. Doing so will remain even after a BIOS update. - 20 - When completed, restart the system. Step 5: Launch the Intel® ...
... Intel® Rapid Storage Technology or Intel(R) Optane Memory application first. •• After enabling the Optane™ memory, the related BIOS settings will cause the operating system to stop functioning correctly. •• If you want to accelerate the system drive, you can only...one Optane™ memory is installed, you can select specific folders, files, or applications to the BIOS Setup, make sure CSM Support under the BIOS menu is disabled. Doing so will remain even after a BIOS update. - 20 - When completed, restart the system. Step 5: Launch the Intel® ...


