User Manual
Page 3
...that it is placed on a level surface with at least 10 cm of clearance around the air vents, which is provided with the power specification in the country where you are located. ● When using an extension cord, please make sure that you carefully follow the battery installation ...to the notebook. ● Do note press or touch the display panel. ● Only use the AC Adaptor that is recommended by GIGABYTE or an authorized GIGABYTE Service Centre. ● Before connecting the notebook to make sure that could cause a fire hazard. Doing this is compatible with the ...
...that it is placed on a level surface with at least 10 cm of clearance around the air vents, which is provided with the power specification in the country where you are located. ● When using an extension cord, please make sure that you carefully follow the battery installation ...to the notebook. ● Do note press or touch the display panel. ● Only use the AC Adaptor that is recommended by GIGABYTE or an authorized GIGABYTE Service Centre. ● Before connecting the notebook to make sure that could cause a fire hazard. Doing this is compatible with the ...
User Manual
Page 10
... Started 2.1 Power Sources 7 2.2 Recharging the Battery 8 2.3 Starting Your Notebook 9 2.4 Status LED Indicators 9 2.5 Using Function Keys 10 2.6 Using the Touch Pad 11 Q2006 SERIES USER'S MANUAL Chapter 3 GIGABYTE Smart Recovery 3.1 GIGABYTE Smart Recovery 13 VIII Chapter 4 Troubleshooting 4.1 Identifying the Problem 15 4.2 GIGABYTE Service Information 15 Appendix Q2006 Specifications 17 International Country Voltage 18 Plug Type 22 English
... Started 2.1 Power Sources 7 2.2 Recharging the Battery 8 2.3 Starting Your Notebook 9 2.4 Status LED Indicators 9 2.5 Using Function Keys 10 2.6 Using the Touch Pad 11 Q2006 SERIES USER'S MANUAL Chapter 3 GIGABYTE Smart Recovery 3.1 GIGABYTE Smart Recovery 13 VIII Chapter 4 Troubleshooting 4.1 Identifying the Problem 15 4.2 GIGABYTE Service Information 15 Appendix Q2006 Specifications 17 International Country Voltage 18 Plug Type 22 English
User Manual
Page 13
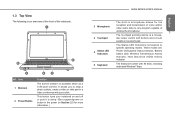
...Activity Indicator 6 Keyboard The keyboard comes with buttons and a touch sensitive movement pad. 5 Status LED Indicators The Status LED Indicators correspond to specific operating modes. 1.3 Top View The following is an overview of the front of utilizing the microphone. 3 The touchpad pointing device is available either... on and off or puts it to sleep. (See suspend/power on button in the power on Section 2.3 for more information.) Q2006 SERIES USER'S MANUAL The built-in microphone allows for the 3 Microphone reception and transmission of voice and/or other audio data to ...
...Activity Indicator 6 Keyboard The keyboard comes with buttons and a touch sensitive movement pad. 5 Status LED Indicators The Status LED Indicators correspond to specific operating modes. 1.3 Top View The following is an overview of the front of utilizing the microphone. 3 The touchpad pointing device is available either... on and off or puts it to sleep. (See suspend/power on button in the power on Section 2.3 for more information.) Q2006 SERIES USER'S MANUAL The built-in microphone allows for the 3 Microphone reception and transmission of voice and/or other audio data to ...
User Manual
Page 19
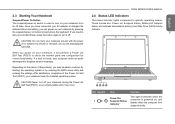
... revising the settings. English When you may occur. If a fault is found, your notebook loads the installed operating system. Q2006 SERIES USER'S MANUAL 2.4 Status LED Indicators The status indicator lights correspond to specific operating modes. If you need to take an extended break, press the button again to turn on your notebook...
... revising the settings. English When you may occur. If a fault is found, your notebook loads the installed operating system. Q2006 SERIES USER'S MANUAL 2.4 Status LED Indicators The status indicator lights correspond to specific operating modes. If you need to take an extended break, press the button again to turn on your notebook...
User Manual
Page 27
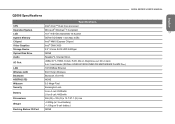
Q2006 SERIES USER'S MANUAL Q2006 Specifications English Specifications CPU Intel® Atom™ Dual Core processor Operation System Microsoft® Windows® 7 Compliant LCD 10.1" WSVGA(1024x600) 16:9 panel 17 System Memory Chipset ...
Q2006 SERIES USER'S MANUAL Q2006 Specifications English Specifications CPU Intel® Atom™ Dual Core processor Operation System Microsoft® Windows® 7 Compliant LCD 10.1" WSVGA(1024x600) 16:9 panel 17 System Memory Chipset ...