User Manual
Page 2
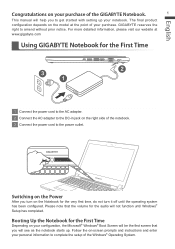
...Windows® Operating System. Please note that you will see as the notebook starts up your notebook. English Congratulations on your purchase of the GIGABYTE Notebook. 1 This manual will help you to get started with setting up . GIGABYTE reserves the right to amend without prior notice. The final product configuration ...depends on the model at www.gigabyte.com Using GIGABYTE Notebook for the First Time Depending on your configuration, the Microsoft® Windows® Boot Screen will be the first screen ...
...Windows® Operating System. Please note that you will see as the notebook starts up your notebook. English Congratulations on your purchase of the GIGABYTE Notebook. 1 This manual will help you to get started with setting up . GIGABYTE reserves the right to amend without prior notice. The final product configuration ...depends on the model at www.gigabyte.com Using GIGABYTE Notebook for the First Time Depending on your configuration, the Microsoft® Windows® Boot Screen will be the first screen ...
User Manual
Page 3
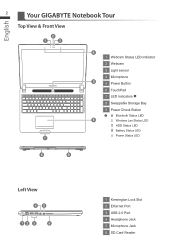
English 2 Your GIGABYTE Notebook Tour Top View & Front View 2 1 3 4 1 Webcam Status LED Indicator 2 Webcam 3 Light sensor 4 Microphone 5 5 Power Button 6 TouchPad 7 LED Indicators 8 Swappable Storage Bay 9 Power Check Button Bluetooth Status LED 6 Wireless Lan Status LED HDD Status LED Battery Status LED Power Status LED 7 8 9 Left View 45 12 3 6 1 Kensington Lock Slot 2 Ethernet Port 3 USB 2.0 Port 4 Headphone Jack 5 Microphone Jack 6 SD Card Reader
English 2 Your GIGABYTE Notebook Tour Top View & Front View 2 1 3 4 1 Webcam Status LED Indicator 2 Webcam 3 Light sensor 4 Microphone 5 5 Power Button 6 TouchPad 7 LED Indicators 8 Swappable Storage Bay 9 Power Check Button Bluetooth Status LED 6 Wireless Lan Status LED HDD Status LED Battery Status LED Power Status LED 7 8 9 Left View 45 12 3 6 1 Kensington Lock Slot 2 Ethernet Port 3 USB 2.0 Port 4 Headphone Jack 5 Microphone Jack 6 SD Card Reader
User Manual
Page 9
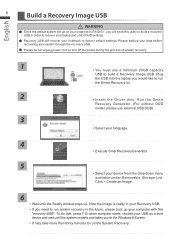
... USB. Click > Create an Image. 6 • Wait until the system restarts and takes you would like to run the Smart Recovery on your notebook is ready in your notebook to run system recovery in the future, please boot up . Now the Image is RAID 0/1, you need this "recovery USB". Please backup your...
... USB. Click > Create an Image. 6 • Wait until the system restarts and takes you would like to run the Smart Recovery on your notebook is ready in your notebook to run system recovery in the future, please boot up . Now the Image is RAID 0/1, you need this "recovery USB". Please backup your...


