
Manual
Page 2
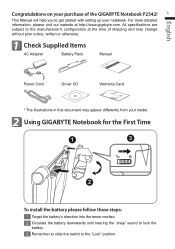
All specifications are subject to the manufacturer's configuration at http://www.gigabyte.com. English Congratulations on your notebook. For more detailed information, please visit our website at the time of shipping and may change without prior ... Supplied Items AC Adapter Battery Pack Manual Power Cord Driver CD Warranty Card * The illustrations in this document may appear differently from your model. 2 Using GIGABYTE Notebook for the First Time 1 3 2 To install the battery please follow these steps: 1 Target the battery's direction into the tenon-mortise. 2 Circulate the ...
All specifications are subject to the manufacturer's configuration at http://www.gigabyte.com. English Congratulations on your notebook. For more detailed information, please visit our website at the time of shipping and may change without prior ... Supplied Items AC Adapter Battery Pack Manual Power Cord Driver CD Warranty Card * The illustrations in this document may appear differently from your model. 2 Using GIGABYTE Notebook for the First Time 1 3 2 To install the battery please follow these steps: 1 Target the battery's direction into the tenon-mortise. 2 Circulate the ...
Manual
Page 3
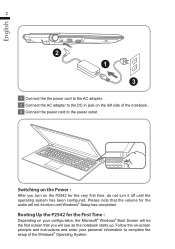
Please note that you turn on the P2542 for the First Time : Depending on your personal information to the power outlet. Follow the on-screen prompts and instructions and enter your configuration, the Microsoft® Windows® Boot Screen will be the first screen that the volume for the audio will see as the notebook starts up. Switching on the Power : After you will not function until the operating system has been configured. Booting Up the P2542 for the very first time, do not turn it off until Windows® Setup has completed. English 2 2 1 3 1 Connect the the ...
Please note that you turn on the P2542 for the First Time : Depending on your personal information to the power outlet. Follow the on-screen prompts and instructions and enter your configuration, the Microsoft® Windows® Boot Screen will be the first screen that the volume for the audio will see as the notebook starts up. Switching on the Power : After you will not function until the operating system has been configured. Booting Up the P2542 for the very first time, do not turn it off until Windows® Setup has completed. English 2 2 1 3 1 Connect the the ...

Manual
Page 4
... Recovery in the setup menu. ● Smart Manager: In Windows® Mode Press "Smart+" button to enter "smart setup" menu in power off mode. 3 Your GIGABYTE Notebook Tour 3 English Top View 11 10 9 Left View 12 - + 87 1 Webcam 2 Microphone 3 Power Button 4 Smart+ Button 5 Volume Setting or Stereoscopic 3 Depth Setting ...
... Recovery in the setup menu. ● Smart Manager: In Windows® Mode Press "Smart+" button to enter "smart setup" menu in power off mode. 3 Your GIGABYTE Notebook Tour 3 English Top View 11 10 9 Left View 12 - + 87 1 Webcam 2 Microphone 3 Power Button 4 Smart+ Button 5 Volume Setting or Stereoscopic 3 Depth Setting ...
Manual
Page 6
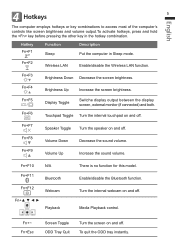
Brightness Up Increase the screen brightness. Turn the internal webcam on and off . English 4 Hotkeys 5 The computer employs hotkeys or key combinations to access most of the computer's controls like screen brightness and volume output.To activate hotkeys, press and hold the key before pressing the other key in Sleep mode. Fn+F2 Wireless LAN Enable/disable the Wireless LAN function. Enable/disable the Bluetooth function. Fn+F7 Speaker Toggle Turn the speaker on and off . Fn+F8 Volume Down Decrease the sound volume. To quit the ODD tray instantly. Fn+F5 Fn+...
Brightness Up Increase the screen brightness. Turn the internal webcam on and off . English 4 Hotkeys 5 The computer employs hotkeys or key combinations to access most of the computer's controls like screen brightness and volume output.To activate hotkeys, press and hold the key before pressing the other key in Sleep mode. Fn+F2 Wireless LAN Enable/disable the Wireless LAN function. Enable/disable the Bluetooth function. Fn+F7 Speaker Toggle Turn the speaker on and off . Fn+F8 Volume Down Decrease the sound volume. To quit the ODD tray instantly. Fn+F5 Fn+...
Manual
Page 7
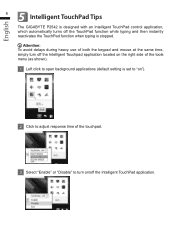
... TouchPad function when typing is designed with an Intelligent TouchPad control application, which automatically turns off the Intelligent TouchPad application. English 5 6 Intelligent TouchPad Tips The GIGABYTE P2542 is stopped.
... TouchPad function when typing is designed with an Intelligent TouchPad control application, which automatically turns off the Intelligent TouchPad application. English 5 6 Intelligent TouchPad Tips The GIGABYTE P2542 is stopped.
Manual
Page 8
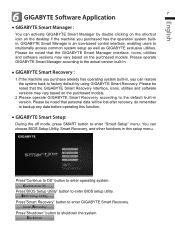
...to backup any data before operating this setup menu. English 6 GIGABYTE Software Application 7 ● GIGABYTE Smart Manager : You can activate GIGABYTE Smart Manager by using GIGABYTE Smart Recovery. Please be noted that the GIGABYTE Smart Manager interface, icons, utilities and software versions may vary based... on the purchased models. Press"Shutdown" button to enter BIOS setup utility. Please operate GIGABYTE Smart Manager according to enter "Smart Setup" menu. Press"BIOS Setup Utility" button to shutdown the system You can ...
...to backup any data before operating this setup menu. English 6 GIGABYTE Software Application 7 ● GIGABYTE Smart Manager : You can activate GIGABYTE Smart Manager by using GIGABYTE Smart Recovery. Please be noted that the GIGABYTE Smart Manager interface, icons, utilities and software versions may vary based... on the purchased models. Press"Shutdown" button to enter BIOS setup utility. Please operate GIGABYTE Smart Manager according to enter "Smart Setup" menu. Press"BIOS Setup Utility" button to shutdown the system You can ...
Manual
Page 9
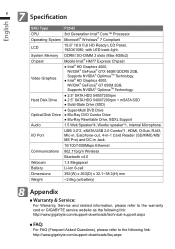
...) 8 Appendix ■ Warranty & Service: For Warranty, Service and related information, please refer to the warranty card or GIGABYTE service website as the following link: http://www.gigabyte.com/support-downloads/technical-support.aspx ■ FAQ: For FAQ (Frequent Asked Questions), please refer to the following link: ...http://www.gigabyte.com/support-downloads/faq.aspx DDRIII SO-DIMM 2 slots (Max 8GBx2) Mobile Intel® HM77 Express Chipset ● Intel®...
...) 8 Appendix ■ Warranty & Service: For Warranty, Service and related information, please refer to the warranty card or GIGABYTE service website as the following link: http://www.gigabyte.com/support-downloads/technical-support.aspx ■ FAQ: For FAQ (Frequent Asked Questions), please refer to the following link: ...http://www.gigabyte.com/support-downloads/faq.aspx DDRIII SO-DIMM 2 slots (Max 8GBx2) Mobile Intel® HM77 Express Chipset ● Intel®...
