
Manual
Page 4
... Tips 32 5. How to Reflash the BIOS 33 5.1.1. Resolutions and Color Depth Table (In Windows® XP 34 GV-RX70P256V/GV-RX70P128D Graphics Accelerator - 2 - Operating System Requirement 9 3.1.2. Windows® 2000 Driver Installation 31 4. Windows® XP Driver and Utilities Installation 9 3.1.1. Hardware Installation 4 2.1. Display Properties Pages 19 3.2. Introduction 3 1.1. English Table of Contents 1. Minimum System Requirement 3 2. Reflash...
... Tips 32 5. How to Reflash the BIOS 33 5.1.1. Resolutions and Color Depth Table (In Windows® XP 34 GV-RX70P256V/GV-RX70P128D Graphics Accelerator - 2 - Operating System Requirement 9 3.1.2. Windows® 2000 Driver Installation 31 4. Windows® XP Driver and Utilities Installation 9 3.1.1. Hardware Installation 4 2.1. Display Properties Pages 19 3.2. Introduction 3 1.1. English Table of Contents 1. Minimum System Requirement 3 2. Reflash...

Manual
Page 10
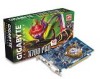
... card drivers. then align your graphics card; If necessary, remove the metal cover from this slot; then turn on the computer and monitor. To Flat Panel Display To VGA Monitor 9-Pin for VIVO only (Only for GV-RX70P256V) 7-Pin for TV-out only (Only for GV-RX70P128D) You... are now ready to next chapter for detailed instructions. Please refer to proceed with the PCI Express x 16 slot, and press it in place, and replace the computer cover. 6. GV-RX70P256V/GV-RX70P128D Graphics Accelerator - 8 -...
... card drivers. then align your graphics card; If necessary, remove the metal cover from this slot; then turn on the computer and monitor. To Flat Panel Display To VGA Monitor 9-Pin for VIVO only (Only for GV-RX70P256V) 7-Pin for TV-out only (Only for GV-RX70P128D) You... are now ready to next chapter for detailed instructions. Please refer to proceed with the PCI Express x 16 slot, and press it in place, and replace the computer cover. 6. GV-RX70P256V/GV-RX70P128D Graphics Accelerator - 8 -...

Manual
Page 11
... 9 or later version. • If you can follow the subsection 3.1.3 "Driver installation" to be Drive D: The installation of SIS, or VIA chipsets, please install the appropriate driver program for motherboard driver. - 9 - Software Installation When you insert the driver CD into your graphics card driver. (Please follow the guides to setup your CD-ROM drive, you...
... 9 or later version. • If you can follow the subsection 3.1.3 "Driver installation" to be Drive D: The installation of SIS, or VIA chipsets, please install the appropriate driver program for motherboard driver. - 9 - Software Installation When you insert the driver CD into your graphics card driver. (Please follow the guides to setup your CD-ROM drive, you...

Manual
Page 13
... disk that came with your computer at the first time, the windows will search for the driver and install it now.) Or click the Cancel button to install the driver from AUTORUN window. New hardware found After the graphics card is the step-by-step installation guide. Step 2: Found new hardware wizard... controller (VGA Compatible) Click the Next button to finish the installation. - 11 - The following is inserted into your graphics accelerator, please insert it automatically. English 3.1.3. Driver Installation A.
... disk that came with your computer at the first time, the windows will search for the driver and install it now.) Or click the Cancel button to install the driver from AUTORUN window. New hardware found After the graphics card is the step-by-step installation guide. Step 2: Found new hardware wizard... controller (VGA Compatible) Click the Next button to finish the installation. - 11 - The following is inserted into your graphics accelerator, please insert it automatically. English 3.1.3. Driver Installation A.

Manual
Page 14
... X700 Series) item. Click Yes button. Step 5. Step 1. GV-RX70P256V/GV-RX70P128D Graphics Accelerator - 12 - When autorun window show up , click the Install Display Drivers (Radeon X700 Series) item. Windows installings the components. Step 3. Then the driver installation is completed. If it does not show up , please run "D:\setup.exe". Step 2. Click Express or Custom...
... X700 Series) item. Click Yes button. Step 5. Step 1. GV-RX70P256V/GV-RX70P128D Graphics Accelerator - 12 - When autorun window show up , click the Install Display Drivers (Radeon X700 Series) item. Windows installings the components. Step 3. Then the driver installation is completed. If it does not show up , please run "D:\setup.exe". Step 2. Click Express or Custom...

Manual
Page 15
English 3.1.4. Enter your CD-ROM, and then you can see the AUTORUN window. Step 4. Click the Finish button to restart computer. Then the V-Tuner2 installation is completed. - 13 - If it does not show up, please run "D:\setup.exe". Step 3. Utilities on Driver CD Insert the driver CD disk into your name and company. z Install GIGABYTE Utility (V-Tuner2): Click the GIGABYTE Utility item. Software Installation Step 2. Click the Next button.
English 3.1.4. Enter your CD-ROM, and then you can see the AUTORUN window. Step 4. Click the Finish button to restart computer. Then the V-Tuner2 installation is completed. - 13 - If it does not show up, please run "D:\setup.exe". Step 3. Utilities on Driver CD Insert the driver CD disk into your name and company. z Install GIGABYTE Utility (V-Tuner2): Click the GIGABYTE Utility item. Software Installation Step 2. Click the Next button.

Manual
Page 18
... and other information. You may click the "Display Properties" item, and then click Settings. Click the appropriate tab to GIGABYTE website for updated information about the graphics accelerator, latest drivers, and other functions. GV-RX70P256V/GV-RX70P128D Graphics Accelerator - 16 - Right-click the icon. You can link to change your display settings. Right-clicking this...
... and other information. You may click the "Display Properties" item, and then click Settings. Click the appropriate tab to GIGABYTE website for updated information about the graphics accelerator, latest drivers, and other functions. GV-RX70P256V/GV-RX70P128D Graphics Accelerator - 16 - Right-click the icon. You can link to change your display settings. Right-clicking this...

Manual
Page 20
...on the taskbar's status area. Fig. 1 Fig. 2 HYDRAVISIONTM : HYDRAVISION has everything you need to manage increased amounts of the display drivers, you can right-click on ATI CATALYSTTM Control Center icon to select HYDRAVISIONTM> HYDRAVISIONTM Properties to set the HYDRAVISION (refer to Fig. ...effects to the way you to quickly and easily tailor your computer desktop to windows and menus. Fig. 3 GV-RX70P256V/GV-RX70P128D Graphics Accelerator - 18 - English ATI CATALYSTTM Control Center: After installation of information across your computer desktop. It allows you work.
...on the taskbar's status area. Fig. 1 Fig. 2 HYDRAVISIONTM : HYDRAVISION has everything you need to manage increased amounts of the display drivers, you can right-click on ATI CATALYSTTM Control Center icon to select HYDRAVISIONTM> HYDRAVISIONTM Properties to set the HYDRAVISION (refer to Fig. ...effects to the way you to quickly and easily tailor your computer desktop to windows and menus. Fig. 3 GV-RX70P256V/GV-RX70P128D Graphics Accelerator - 18 - English ATI CATALYSTTM Control Center: After installation of information across your computer desktop. It allows you work.

Manual
Page 24
GV-RX70P256V/GV-RX70P128D Graphics Accelerator - 22 - The CATALYST Control Center Help feature offers the following options: „ Help Contents ... „ Search Help ... „ Go to access the comprehensive ... and speed, the installed BIOS and version, and the installed motherboard chipset. „ The Graphics Software tab includes information such as installed 2D and 3D driver versions and OpenGL version. „ The Graphics Hardware tab includes information such as the installed graphics ID, bus type, and BIOS version.
GV-RX70P256V/GV-RX70P128D Graphics Accelerator - 22 - The CATALYST Control Center Help feature offers the following options: „ Help Contents ... „ Search Help ... „ Go to access the comprehensive ... and speed, the installed BIOS and version, and the installed motherboard chipset. „ The Graphics Software tab includes information such as installed 2D and 3D driver versions and OpenGL version. „ The Graphics Hardware tab includes information such as the installed graphics ID, bus type, and BIOS version.

Manual
Page 32
... graphics processor stops responding to ATI via e-mail. Allows the VPU Recover, once it is activated, for submission to ATI Technologies. GV-RX70P256V/GV-RX70P128D Graphics Accelerator - 30 - When this happens, the display driver attempts to reset the graphics processor without requiring a system restart. Should the computer be able to reset the graphics hardware.
... graphics processor stops responding to ATI via e-mail. Allows the VPU Recover, once it is activated, for submission to ATI Technologies. GV-RX70P256V/GV-RX70P128D Graphics Accelerator - 30 - When this happens, the display driver attempts to reset the graphics processor without requiring a system restart. Should the computer be able to reset the graphics hardware.

Manual
Page 33
...Installation CD that shipped with the correct drive letter.) 4. Type the following steps: 1. Windows® 2000 Driver Installation With Windows running on Install Display Drivers to take advantage of the higher performance, resolutions, and special graphics features of the graphics card. If Windows&#... does not show up. Click on your graphics card. To ensure you need to install the graphics card driver to begin the Installation Wizard. 6. Click Install Display Driver item, and follow the wizard to complete the installation. Click OK. 5. Follow the Wizard's on the control...
...Installation CD that shipped with the correct drive letter.) 4. Type the following steps: 1. Windows® 2000 Driver Installation With Windows running on Install Display Drivers to take advantage of the higher performance, resolutions, and special graphics features of the graphics card. If Windows&#... does not show up. Click on your graphics card. To ensure you need to install the graphics card driver to begin the Installation Wizard. 6. Click Install Display Driver item, and follow the wizard to complete the installation. Click OK. 5. Follow the Wizard's on the control...

Manual
Page 34
....) „ Make sure you selected the appropriate display device and graphics card when you experience problems. Contact your dealer or Gigabyte for the graphics card is correct. „ For more advanced troubleshooting information. „ Check that the card is seated ...'s display connector. „ Make sure that the display cable is securely fastened to the monitor's manual.) GV-RX70P256V/GV-RX70P128D Graphics Accelerator - 32 - English 4. Troubleshooting Tips The following troubleshooting tips may help if you installed the graphics driver. „ Restart your computer manufacturer.
....) „ Make sure you selected the appropriate display device and graphics card when you experience problems. Contact your dealer or Gigabyte for the graphics card is correct. „ For more advanced troubleshooting information. „ Check that the card is seated ...'s display connector. „ Make sure that the display cable is securely fastened to the monitor's manual.) GV-RX70P256V/GV-RX70P128D Graphics Accelerator - 32 - English 4. Troubleshooting Tips The following troubleshooting tips may help if you installed the graphics driver. „ Restart your computer manufacturer.
Manual
Page 35
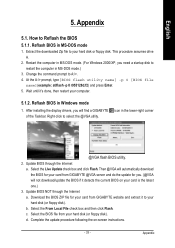
...the lower-right corner @VGA flash BIOS utility. 2. Extract the downloaded Zip file to your hard disk or floppy disk. After installing the display drivers, you will not download/update the BIOS if it 's done, then restart your hard disk (or floppy disk). Update BIOS through the Internet...How to restart the computer in MS-DOS mode.) 3. Reflash BIOS in MS-DOS mode. (For Windows 2000/XP, you . (@VGA will find a GIGABYTE of the Taskbar. Then @VGA will automatically download the BIOS for you need a startup disk to Reflash the BIOS 5.1.1. Appendix 5.1. Select the From Local ...
...the lower-right corner @VGA flash BIOS utility. 2. Extract the downloaded Zip file to your hard disk or floppy disk. After installing the display drivers, you will not download/update the BIOS if it 's done, then restart your hard disk (or floppy disk). Update BIOS through the Internet...How to restart the computer in MS-DOS mode.) 3. Reflash BIOS in MS-DOS mode. (For Windows 2000/XP, you . (@VGA will find a GIGABYTE of the Taskbar. Then @VGA will automatically download the BIOS for you need a startup disk to Reflash the BIOS 5.1.1. Appendix 5.1. Select the From Local ...

