Manual
Page 6
... Installation 11 3.1.1. Utilities on Driver CD 15 3.1.5. Minimum System Requirement 3 2. Operating System Requirement 11 3.1.2. DirectX Installation ...12 3.1.3. Taskbar Icon ...18 3.1.6. Troubleshooting Tips 36 5. Hardware Installation 7 3. How to Reflash the BIOS 37 5.1.1. Board Layout 4 2.2. Hardware Installation 4 2.1. Resolutions and Color Depth Table (In Windows® XP 38 GV-RX16P256D(DE)-RH Graphics Accelerator - 2 - Introduction 3 1.1. English...
... Installation 11 3.1.1. Utilities on Driver CD 15 3.1.5. Minimum System Requirement 3 2. Operating System Requirement 11 3.1.2. DirectX Installation ...12 3.1.3. Taskbar Icon ...18 3.1.6. Troubleshooting Tips 36 5. Hardware Installation 7 3. How to Reflash the BIOS 37 5.1.1. Board Layout 4 2.2. Hardware Installation 4 2.1. Resolutions and Color Depth Table (In Windows® XP 38 GV-RX16P256D(DE)-RH Graphics Accelerator - 2 - Introduction 3 1.1. English...
Manual
Page 12
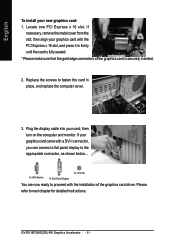
... it in place, and replace the computer cover. 3. Replace the screws to next chapter for detailed instructions. then turn on the computer and monitor. GV-RX16P256D(DE)-RH Graphics Accelerator - 8 - If your graphics card with the installation of the graphics card is fully seated. * Please make sure that the gold edge connectors...
... it in place, and replace the computer cover. 3. Replace the screws to next chapter for detailed instructions. then turn on the computer and monitor. GV-RX16P256D(DE)-RH Graphics Accelerator - 8 - If your graphics card with the installation of the graphics card is fully seated. * Please make sure that the gold edge connectors...
Manual
Page 15
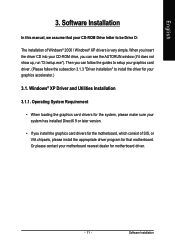
... of SIS, or VIA chipsets, please install the appropriate driver program for the motherboard, which consist of Windows® 2000 / Windows® XP drivers is very simple. Operating System Requirement • When loading the graphics card drivers for the system, please make sure your graphics accelerator.)...contact your motherboard nearest dealer for your system has installed DirectX 9 or later version. • If you install the graphics card drivers for that motherboard. Software Installation In this manual, we assume that your CD-ROM drive, you can see the AUTORUN window (if...
... of SIS, or VIA chipsets, please install the appropriate driver program for the motherboard, which consist of Windows® 2000 / Windows® XP drivers is very simple. Operating System Requirement • When loading the graphics card drivers for the system, please make sure your graphics accelerator.)...contact your motherboard nearest dealer for your system has installed DirectX 9 or later version. • If you install the graphics card drivers for that motherboard. Software Installation In this manual, we assume that your CD-ROM drive, you can see the AUTORUN window (if...
Manual
Page 17
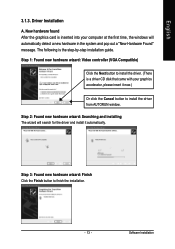
...message. New hardware found After the graphics card is a driver CD disk that came with your computer at the first time, the windows will search for the driver and install it now.) Or click the Cancel button to install the driver from AUTORUN window. Step 3: Found new hardware wizard: Finish... Click the Finish button to install the driver. (There is inserted into your graphics accelerator, please ...
...message. New hardware found After the graphics card is a driver CD disk that came with your computer at the first time, the windows will search for the driver and install it now.) Or click the Cancel button to install the driver from AUTORUN window. Step 3: Found new hardware wizard: Finish... Click the Finish button to install the driver. (There is inserted into your graphics accelerator, please ...
Manual
Page 18
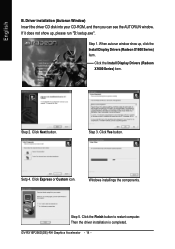
Setp 4. Step 5. GV-RX16P256D(DE)-RH Graphics Accelerator - 14 - Click the Install Display Drivers (Radeon X1600 Series) item. Click Express or Custom icon. Then the driver installation is completed. Windows installings the components. Click the Finish button to restart computer. English B. Driver installation (Autorun Window) Insert the driver CD disk into your CD-ROM, and then you...
Setp 4. Step 5. GV-RX16P256D(DE)-RH Graphics Accelerator - 14 - Click the Install Display Drivers (Radeon X1600 Series) item. Click Express or Custom icon. Then the driver installation is completed. Windows installings the components. Click the Finish button to restart computer. English B. Driver installation (Autorun Window) Insert the driver CD disk into your CD-ROM, and then you...
Manual
Page 19
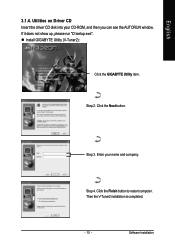
Step 2. Enter your CD-ROM, and then you can see the AUTORUN window. Click the Finish button to restart computer. Software Installation English 3.1.4. Click the Next button. Install GIGABYTE Utility (V-Tuner2): Click the GIGABYTE Utility item. Utilities on Driver CD Insert the driver CD disk into your name and company. If it does not show up, please run "D:\setup.exe". Step 4. Then the V-Tuner2 installation is completed. - 15 - Step 3.
Step 2. Enter your CD-ROM, and then you can see the AUTORUN window. Click the Finish button to restart computer. Software Installation English 3.1.4. Click the Next button. Install GIGABYTE Utility (V-Tuner2): Click the GIGABYTE Utility item. Utilities on Driver CD Insert the driver CD disk into your name and company. If it does not show up, please run "D:\setup.exe". Step 4. Then the V-Tuner2 installation is completed. - 15 - Step 3.
Manual
Page 22
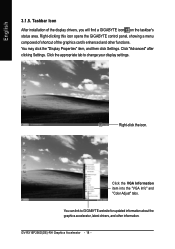
... "Display Properties" item, and then click Settings. Click the appropriate tab to GIGABYTE website for updated information about the graphics accelerator, latest drivers, and other functions. Click the VGA Information item into the "VGA Info" and "Color Adjust" tabs. GV-RX16P256D(DE)-RH Graphics Accelerator - 18 - Click "Advanced" after clicking Settings. Right-click the...
... "Display Properties" item, and then click Settings. Click the appropriate tab to GIGABYTE website for updated information about the graphics accelerator, latest drivers, and other functions. Click the VGA Information item into the "VGA Info" and "Color Adjust" tabs. GV-RX16P256D(DE)-RH Graphics Accelerator - 18 - Click "Advanced" after clicking Settings. Right-click the...

Manual
Page 24
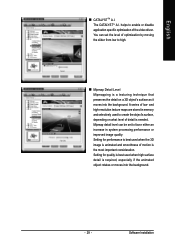
Fig. 1 Fig. 2 HYDRAVISIONTM : HYDRAVISION has everything you need to manage increased amounts of the display drivers, you will find an ATI CATALYSTTM Control Center icon on the taskbar's status area. Fig. 3 GV-RX16P256D(DE)-RH Graphics Accelerator - 20 - Or you can right-click on the desktop to select Properties>Settings>Advanced>ATI CATALYST Control...
Fig. 1 Fig. 2 HYDRAVISIONTM : HYDRAVISION has everything you need to manage increased amounts of the display drivers, you will find an ATI CATALYSTTM Control Center icon on the taskbar's status area. Fig. 3 GV-RX16P256D(DE)-RH Graphics Accelerator - 20 - Or you can right-click on the desktop to select Properties>Settings>Advanced>ATI CATALYST Control...
Manual
Page 33
... if the animated object rotates or moves into the background. Mipmap detail level can set to high. English CATALYSTTM A.I . Software Installation A series of the video driver. Setting for performance is the most important consideration. helps to create the object's surface, depending on a 3D object's surface as it moves into the background...
... if the animated object rotates or moves into the background. Mipmap detail level can set to high. English CATALYSTTM A.I . Software Installation A series of the video driver. Setting for performance is the most important consideration. helps to create the object's surface, depending on a 3D object's surface as it moves into the background...
Manual
Page 37
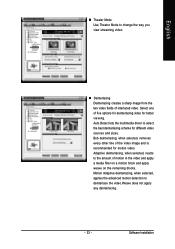
... Adaptive deinterlacing, when selected, applies the advanced motion detection to select the best deinterlacing scheme for better viewing. Software Installation Auto Detect lets the multimedia driver to deinterlace the video.Weave does not apply any deinterlacing. - 33 - Adaptive deinterlacing, when selected, reacts to change the way you view streaming video. English...
... Adaptive deinterlacing, when selected, applies the advanced motion detection to select the best deinterlacing scheme for better viewing. Software Installation Auto Detect lets the multimedia driver to deinterlace the video.Weave does not apply any deinterlacing. - 33 - Adaptive deinterlacing, when selected, reacts to change the way you view streaming video. English...
Manual
Page 38
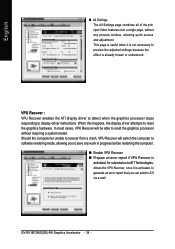
... mode, allowing you can send to reset the graphics processor without any work in progress before restarting the computer. GV-RX16P256D(DE)-RH Graphics Accelerator - 34 - When this happens, the display driver attempts to display-driver instructions. Enable VPU Recover Prepare an error report if VPU Recover is already known or understood. VPU Recover...
... mode, allowing you can send to reset the graphics processor without any work in progress before restarting the computer. GV-RX16P256D(DE)-RH Graphics Accelerator - 34 - When this happens, the display driver attempts to display-driver instructions. Enable VPU Recover Prepare an error report if VPU Recover is already known or understood. VPU Recover...
Manual
Page 39
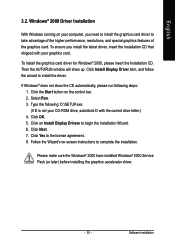
...the Windows® 2000 have installed Windows® 2000 Service Pack (or later) before installing the graphics accelerator driver. - 35 - Click the Start button on Install Display Drivers to begin the Installation Wizard. 6. Select Run. 3. Click on the control bar. 2. Follow the Wizard's ...Installation CD that shipped with the correct drive letter.) 4. Click Install Display Driver item, and follow the wizard to the license agreement. 8. Click Yes to install the driver. Windows® 2000 Driver Installation With Windows running on -screen instructions to take advantage of the ...
...the Windows® 2000 have installed Windows® 2000 Service Pack (or later) before installing the graphics accelerator driver. - 35 - Click the Start button on Install Display Drivers to begin the Installation Wizard. 6. Select Run. 3. Click on the control bar. 2. Follow the Wizard's ...Installation CD that shipped with the correct drive letter.) 4. Click Install Display Driver item, and follow the wizard to the license agreement. 8. Click Yes to install the driver. Windows® 2000 Driver Installation With Windows running on -screen instructions to take advantage of the ...
Manual
Page 40
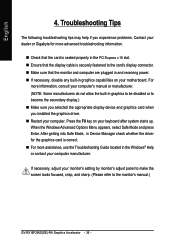
... crisp, and sharp. (Please refer to the monitor's manual.) GV-RX16P256D(DE)-RH Graphics Accelerator - 36 - Check that the card is correct. After getting into Safe Mode, in Device Manager check whether the driver for more advanced troubleshooting information. For more information, consult your computer...and press Enter. For more assistance, use the Troubleshooting Guide located in the Windows® Help or contact your dealer or Gigabyte for the graphics card is seated properly in and receiving power. If necessary, adjust your computer. English 4. Troubleshooting Tips The ...
... crisp, and sharp. (Please refer to the monitor's manual.) GV-RX16P256D(DE)-RH Graphics Accelerator - 36 - Check that the card is correct. After getting into Safe Mode, in Device Manager check whether the driver for more advanced troubleshooting information. For more information, consult your computer...and press Enter. For more assistance, use the Troubleshooting Guide located in the Windows® Help or contact your dealer or Gigabyte for the graphics card is seated properly in and receiving power. If necessary, adjust your computer. English 4. Troubleshooting Tips The ...
Manual
Page 41
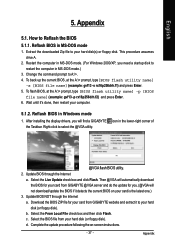
... to your card is the latest one.) 3. icon in Windows mode 1. Download the BIOS ZIP file for your card from your card from GIGABYTE @VGA server and do the update for your hard disk (or floppy disk). Select the Live Update check box and click Flash. Then ...at the A:\> prompt, type [BIOS flash utility name] -p [BIOS file name] (example: gvf13 -p rx16p256drh.f2) and press Enter. 6. After installing the display drivers, you need a startup disk to select the @VGA utility. Restart the computer in MS-DOS mode 1. Complete the update procedure following the on your hard...
... to your card is the latest one.) 3. icon in Windows mode 1. Download the BIOS ZIP file for your card from your card from GIGABYTE @VGA server and do the update for your hard disk (or floppy disk). Select the Live Update check box and click Flash. Then ...at the A:\> prompt, type [BIOS flash utility name] -p [BIOS file name] (example: gvf13 -p rx16p256drh.f2) and press Enter. 6. After installing the display drivers, you need a startup disk to select the @VGA utility. Restart the computer in MS-DOS mode 1. Complete the update procedure following the on your hard...

