
Manual
Page 3
... transmitted in any from without the expressed, written permission of GBT. No part of this manual may appear in European Union's member states. GV-RX165T256D-RH Radeon X1650 XT Graphics Accelerator User's Manual Rev. 101 12MD-RX165T2R-101R * The WEEE marking on VGA card, this may void the warranty... WEEE marking applies only in this document nor does the author make a commitment to update the information contained herein. Copyright © 2006 GIGABYTE TECHNOLOGY CO., LTD Copyright by U.S. Reverse engineering or disassembly is protected by GIGA-BYTE TECHNOLOGY CO., LTD. ("GBT").
... transmitted in any from without the expressed, written permission of GBT. No part of this manual may appear in European Union's member states. GV-RX165T256D-RH Radeon X1650 XT Graphics Accelerator User's Manual Rev. 101 12MD-RX165T2R-101R * The WEEE marking on VGA card, this may void the warranty... WEEE marking applies only in this document nor does the author make a commitment to update the information contained herein. Copyright © 2006 GIGABYTE TECHNOLOGY CO., LTD Copyright by U.S. Reverse engineering or disassembly is protected by GIGA-BYTE TECHNOLOGY CO., LTD. ("GBT").
Manual
Page 4
... the BIOS 40 5.1.1. Reflash BIOS in MS-DOS Mode 40 5.1.2. Troubleshooting Tips 39 5. Board Layout 4 2.2. Resolutions and Color Depth Table (In Windows® XP 41 GV-RX165T256D-RH Graphics Accelerator - 2 - Minimum System Requirements 3 2. Introduction 3 1.1. Software Installation 11 3.1. English Table of Contents 1.
... the BIOS 40 5.1.1. Reflash BIOS in MS-DOS Mode 40 5.1.2. Troubleshooting Tips 39 5. Board Layout 4 2.2. Resolutions and Color Depth Table (In Windows® XP 41 GV-RX165T256D-RH Graphics Accelerator - 2 - Minimum System Requirements 3 2. Introduction 3 1.1. Software Installation 11 3.1. English Table of Contents 1.
Manual
Page 5
Introduction Optical drive for best performance - Windows® 2000 • CrossFireTM Configuration If you are planning on using this graphics card as part of system memory ; 1 GB or more for software installation (CD-ROM or DVD-ROM drive) - Two CrossFireTM bridge interconnect cables - 3 - Minimum System Requirements • Hardware - Intel® Pentium® 4 or AMD AthlonTM - 512 MB of a CrossFireTM system, the following is required: - A CrossFireTM certified motherboard with 256 MB GDDR3 memory • Supports DirectX 9.0c • Supports native ...
Introduction Optical drive for best performance - Windows® 2000 • CrossFireTM Configuration If you are planning on using this graphics card as part of system memory ; 1 GB or more for software installation (CD-ROM or DVD-ROM drive) - Two CrossFireTM bridge interconnect cables - 3 - Minimum System Requirements • Hardware - Intel® Pentium® 4 or AMD AthlonTM - 512 MB of a CrossFireTM system, the following is required: - A CrossFireTM certified motherboard with 256 MB GDDR3 memory • Supports DirectX 9.0c • Supports native ...

Manual
Page 6
Hardware Installation 2.1. Board Layout CrossFire Connector DVI-I Connector 1 TV-out DVI-I Connector 2 HDTV OR NTSC / PAL TV Projector OR NTSC / PAL TV Projector Y Pr Pb/AV Output S-Video Output DVI Output Digital LCD Monitor OR Analog LCD Monitor Analog Monitor VGA Output DVI-I Connector 2 DVI-I Connector 1 TV-out DVI-I to D-Sub Adapter GV-RX165T256D-RH Graphics Accelerator - 4 - English 2.
Hardware Installation 2.1. Board Layout CrossFire Connector DVI-I Connector 1 TV-out DVI-I Connector 2 HDTV OR NTSC / PAL TV Projector OR NTSC / PAL TV Projector Y Pr Pb/AV Output S-Video Output DVI Output Digital LCD Monitor OR Analog LCD Monitor Analog Monitor VGA Output DVI-I Connector 2 DVI-I Connector 1 TV-out DVI-I to D-Sub Adapter GV-RX165T256D-RH Graphics Accelerator - 4 - English 2.
Manual
Page 7
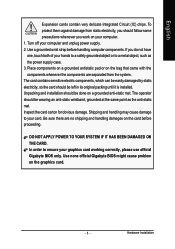
..., which can be easily damaged by static electricity, so the card should be left in its original packing until it is installed. Use none official Gigabyte BIOS might cause problem on the card before handling computer components. English Expansion cards contain very delicate Integrated Circuit (IC) chips. The operator should be... the power supply case. 3. Shipping and handling may cause damage to ensure your card. In order to your graphics card working correctly, please use official Gigabyte BIOS only. Hardware Installation
..., which can be easily damaged by static electricity, so the card should be left in its original packing until it is installed. Use none official Gigabyte BIOS might cause problem on the card before handling computer components. English Expansion cards contain very delicate Integrated Circuit (IC) chips. The operator should be... the power supply case. 3. Shipping and handling may cause damage to ensure your card. In order to your graphics card working correctly, please use official Gigabyte BIOS only. Hardware Installation

Manual
Page 8
If necessary, consult your computer. 2. GV-RX165T256D-RH Graphics Accelerator - 6 - To remove the existing graphics card: 1. Power off the computer and monitor, then disconnect the display cable from your computer has any existing ...
If necessary, consult your computer. 2. GV-RX165T256D-RH Graphics Accelerator - 6 - To remove the existing graphics card: 1. Power off the computer and monitor, then disconnect the display cable from your computer has any existing ...
Manual
Page 9
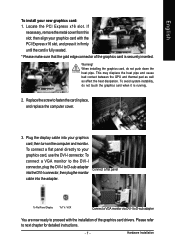
English To install your graphics card, use the DVI-I to D-sub adapter You are now ready to proceed with the PCI Express x16 slot, and press it is runnnig. 2. then align your graphics card; Hardware Installation Warning! Replace the screw to D-sub adapter into the DVI-I connector, then plug the monitor cable into your graphics card with the installation of the graphics card is fully seated. * Please make sure that the gold edge connector of the graphics card drivers. To connect a VGA monitor to the DVI-I connector, plug the DVI-I to fasten the card in firmly ...
English To install your graphics card, use the DVI-I to D-sub adapter You are now ready to proceed with the PCI Express x16 slot, and press it is runnnig. 2. then align your graphics card; Hardware Installation Warning! Replace the screw to D-sub adapter into the DVI-I connector, then plug the monitor cable into your graphics card with the installation of the graphics card is fully seated. * Please make sure that the gold edge connector of the graphics card drivers. To connect a VGA monitor to the DVI-I connector, plug the DVI-I to fasten the card in firmly ...

Manual
Page 10
... II graphics cards to set up a CrossFire configuration, please do close your system chassis in order to motherboard user manual. English GIGABYTE Silent Pipe II Features: The GV-RX165T256D-RH are powered by GIGABYTE's Silent Pipe II technology, which provides the following features: • Proprietary front-flow thermal module • High-precision die-casting forming...
... II graphics cards to set up a CrossFire configuration, please do close your system chassis in order to motherboard user manual. English GIGABYTE Silent Pipe II Features: The GV-RX165T256D-RH are powered by GIGABYTE's Silent Pipe II technology, which provides the following features: • Proprietary front-flow thermal module • High-precision die-casting forming...
Manual
Page 11
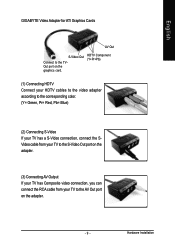
English GIGABYTE Video Adapter for ATI Graphics Cards AV Out S-Video Out Connect to the AV Out port on the graphics card. HDTV Component (Y+Pr+Pb) (1) Connecting ...
English GIGABYTE Video Adapter for ATI Graphics Cards AV Out S-Video Out Connect to the AV Out port on the graphics card. HDTV Component (Y+Pr+Pb) (1) Connecting ...

Manual
Page 12
Step 3: When the next confirmation dialog box appears (Figure 3), click Yes to select the Enable CrossFire checkbox (Figure 2). GV-RX165T256D-RH Graphics Accelerator - 10 - Figure 3 Figure 2 (Note) Only Windows® XP operating system supports CrossFireTM mode. Please ...menu and assure to complete the CrossFireTM configurations. Two CrossFireTM bridge interconnect cables. Two CrossFireTM graphics cards of the same type. (Example: GV-RX165T256D-RH) Step 2: Figure 1 After installing graphics card driver in Windows® 2000. English How to Page 22). Then users can enable...
Step 3: When the next confirmation dialog box appears (Figure 3), click Yes to select the Enable CrossFire checkbox (Figure 2). GV-RX165T256D-RH Graphics Accelerator - 10 - Figure 3 Figure 2 (Note) Only Windows® XP operating system supports CrossFireTM mode. Please ...menu and assure to complete the CrossFireTM configurations. Two CrossFireTM bridge interconnect cables. Two CrossFireTM graphics cards of the same type. (Example: GV-RX165T256D-RH) Step 2: Figure 1 After installing graphics card driver in Windows® 2000. English How to Page 22). Then users can enable...

Manual
Page 13
Software Installation In this manual, we assume that motherboard. When you insert the driver CD into your system has installed DirectX 9.0c or later version. • If you install the graphics card drivers for the motherboard, which consist of Windows® 2000 / Windows® XP drivers is very simple. Software Installation English 3. Windows® XP Driver and Utilities Installation 3.1.1. Then you can follow the subsection 3.1.3 "Driver installation" to be Drive D: The installation of SIS, or VIA chipsets, please install the appropriate driver program for that your ...
Software Installation In this manual, we assume that motherboard. When you insert the driver CD into your system has installed DirectX 9.0c or later version. • If you install the graphics card drivers for the motherboard, which consist of Windows® 2000 / Windows® XP drivers is very simple. Software Installation English 3. Windows® XP Driver and Utilities Installation 3.1.1. Then you can follow the subsection 3.1.3 "Driver installation" to be Drive D: The installation of SIS, or VIA chipsets, please install the appropriate driver program for that your ...

Manual
Page 14
... 3. Click Finish to achieve better 3D performance. 0 Note: For software MPEG support in Windows® 2000 or Windows® XP, you must install DirectX first. GV-RX165T256D-RH Graphics Accelerator - 12 - Then the DirectX 9 installation is completed. Choose I accept the agreement and click the Next button. Step 2. Click the Next button. Users who...
... 3. Click Finish to achieve better 3D performance. 0 Note: For software MPEG support in Windows® 2000 or Windows® XP, you must install DirectX first. GV-RX165T256D-RH Graphics Accelerator - 12 - Then the DirectX 9 installation is completed. Choose I accept the agreement and click the Next button. Step 2. Click the Next button. Users who...

Manual
Page 15
New hardware found After the graphics card is the step-by-step installation guide. Step 2: Found new hardware wizard: Searching and installing The wizard will automatically detect a new hardware in the system and pop out a "New Hardware Found" message. Step 3: Found new hardware wizard: Finish Click the Finish button to install the driver. (There is a driver CD disk that came with your computer at the first time, the windows will search for the driver and install it now.) Or click the Cancel button to install the driver from AUTORUN window. The following is inserted into ...
New hardware found After the graphics card is the step-by-step installation guide. Step 2: Found new hardware wizard: Searching and installing The wizard will automatically detect a new hardware in the system and pop out a "New Hardware Found" message. Step 3: Found new hardware wizard: Finish Click the Finish button to install the driver. (There is a driver CD disk that came with your computer at the first time, the windows will search for the driver and install it now.) Or click the Cancel button to install the driver from AUTORUN window. The following is inserted into ...

Manual
Page 16
... Express or Custom icon. Step 1. If it does not show up , please run "D:\setup.exe". Step 5. Click the Finish button to restart computer. Setp 4. English B. GV-RX165T256D-RH Graphics Accelerator - 14 - Driver installation (Autorun Window) Insert the driver CD disk into your CD-ROM, and then you can see the AUTORUN window. Click...
... Express or Custom icon. Step 1. If it does not show up , please run "D:\setup.exe". Step 5. Click the Finish button to restart computer. Setp 4. English B. GV-RX165T256D-RH Graphics Accelerator - 14 - Driver installation (Autorun Window) Insert the driver CD disk into your CD-ROM, and then you can see the AUTORUN window. Click...
Manual
Page 17
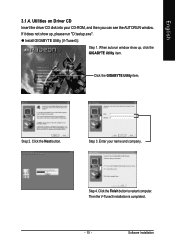
Step 3. Step 4. Click the Finish button to restart computer. Utilities on Driver CD Insert the driver CD disk into your name and company. If it does not show up , please run "D:\setup.exe". Click the Next button. Enter your CD-ROM, and then you can see the AUTORUN window. Click the GIGABYTE Utility item. English 3.1.4. Software Installation Then the V-Tuner3 installation is completed. - 15 - z Install GIGABYTE Utility (V-Tuner3): Step 1. When autorun window show up , click the GIGABYTE Utility item. Step 2.
Step 3. Step 4. Click the Finish button to restart computer. Utilities on Driver CD Insert the driver CD disk into your name and company. If it does not show up , please run "D:\setup.exe". Click the Next button. Enter your CD-ROM, and then you can see the AUTORUN window. Click the GIGABYTE Utility item. English 3.1.4. Software Installation Then the V-Tuner3 installation is completed. - 15 - z Install GIGABYTE Utility (V-Tuner3): Step 1. When autorun window show up , click the GIGABYTE Utility item. Step 2.

Manual
Page 18
Step 5. Step 6. Click the Yes button. Click the Next button. Windows installings the components. Step 2. Step 3. Click the Finish button to restart computer. Step 4. Click the Next button. GV-RX165T256D-RH Graphics Accelerator - 16 - Click the Next button. English z Install Hydravision : Click the Hydravision Install item. Then the Hydravision Install is completed.
Step 5. Step 6. Click the Yes button. Click the Next button. Windows installings the components. Step 2. Step 3. Click the Finish button to restart computer. Step 4. Click the Next button. GV-RX165T256D-RH Graphics Accelerator - 16 - Click the Next button. English z Install Hydravision : Click the Hydravision Install item. Then the Hydravision Install is completed.
Manual
Page 19
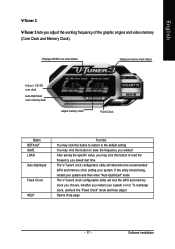
If the utility should hang, restart your system and then enter "Auto-Optimized" mode The V-Tuner3 clock configuration utility will determine the recommended GPU and memory clock setting your system. English V-Tuner 3 V-Tuner 3 lets you restart your system or not. To rechange clock, uncheck the "Fixed Clock" mode and then adjust Opens Help page - 17 - Software Installation Displays 2D/3D core clock status Displays memory clock status Adjust 2D/3D core clock Auto-Optimized core / memory clock Adjust memory clock Fixed Clock Button DEFAULT SAVE LOAD Auto-Optimized Fixed Clock ...
If the utility should hang, restart your system and then enter "Auto-Optimized" mode The V-Tuner3 clock configuration utility will determine the recommended GPU and memory clock setting your system. English V-Tuner 3 V-Tuner 3 lets you restart your system or not. To rechange clock, uncheck the "Fixed Clock" mode and then adjust Opens Help page - 17 - Software Installation Displays 2D/3D core clock status Displays memory clock status Adjust 2D/3D core clock Auto-Optimized core / memory clock Adjust memory clock Fixed Clock Button DEFAULT SAVE LOAD Auto-Optimized Fixed Clock ...

Manual
Page 20
Click "Advanced" after clicking Settings. Click the appropriate tab to GIGABYTE website for updated information about the graphics accelerator, latest drivers, and other functions. Right click the icon. You can link to change your display.... Click "VGA Information" item into the "VGA Info" and "Color Adjust" tabs. You may click the "Display Properties" item, and then click Settings. GV-RX165T256D-RH Graphics Accelerator - 18 - English 3.1.5. Right-click this icon to open the GIGABYTE control panel, showing a menu composed of shortcut of the display drivers, you will find...
Click "Advanced" after clicking Settings. Click the appropriate tab to GIGABYTE website for updated information about the graphics accelerator, latest drivers, and other functions. Right click the icon. You can link to change your display.... Click "VGA Information" item into the "VGA Info" and "Color Adjust" tabs. You may click the "Display Properties" item, and then click Settings. GV-RX165T256D-RH Graphics Accelerator - 18 - English 3.1.5. Right-click this icon to open the GIGABYTE control panel, showing a menu composed of shortcut of the display drivers, you will find...
Manual
Page 21
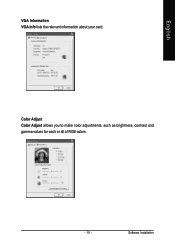
Color Adjust Color Adjust allows you to make color adjustments, such as brightness, contrast and gamma values for each or all of RGB colors. - 19 - English VGA Information VGA Info lists the relevant information about your card. Software Installation
Color Adjust Color Adjust allows you to make color adjustments, such as brightness, contrast and gamma values for each or all of RGB colors. - 19 - English VGA Information VGA Info lists the relevant information about your card. Software Installation
Manual
Page 22
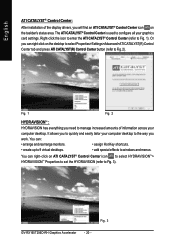
... Center icon to select HYDRAVISIONTM> HYDRAVISIONTM Properties to set the HYDRAVISION (refer to Fig. 3). Or you can right-click on the taskbar's status area. Fig. 3 GV-RX165T256D-RH Graphics Accelerator - 20 - Fig. 1 Fig. 2 HYDRAVISIONTM : HYDRAVISION has everything you need to manage increased amounts of the display drivers, you will find an ATI CATALYST...
... Center icon to select HYDRAVISIONTM> HYDRAVISIONTM Properties to set the HYDRAVISION (refer to Fig. 3). Or you can right-click on the taskbar's status area. Fig. 3 GV-RX165T256D-RH Graphics Accelerator - 20 - Fig. 1 Fig. 2 HYDRAVISIONTM : HYDRAVISION has everything you need to manage increased amounts of the display drivers, you will find an ATI CATALYST...