Manual
Page 3
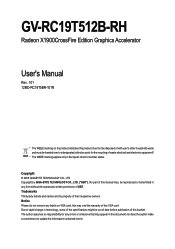
... applies only in this document nor does the author make a commitment to update the information contained herein. Copyright © 2005 GIGABYTE TECHNOLOGY CO., LTD Copyright by GIGA-BYTE TECHNOLOGY CO., LTD. ("GBT"). GV-RC19T512B-RH Radeon X1900CrossFire Edition Graphics Accelerator User's Manual Rev. 101 12MD-RC19T5BR-101R * The WEEE marking on VGA card, this...
... applies only in this document nor does the author make a commitment to update the information contained herein. Copyright © 2005 GIGABYTE TECHNOLOGY CO., LTD Copyright by GIGA-BYTE TECHNOLOGY CO., LTD. ("GBT"). GV-RC19T512B-RH Radeon X1900CrossFire Edition Graphics Accelerator User's Manual Rev. 101 12MD-RC19T5BR-101R * The WEEE marking on VGA card, this...
Manual
Page 4
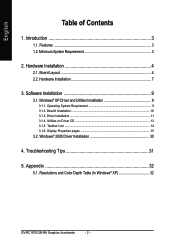
... Contents 1. Hardware Installation 4 2.1. Windows® XP Driver and Utilities Installation 9 3.1.1. Board Layout 4 2.2. DirectX Installation ...10 3.1.3. Resolutions and Color Depth Table (In Windows® XP 32 GV-RC19T512B-RH Graphics Accelerator - 2 - Taskbar Icon ...14 3.1.6. Introduction 3 1.1.
... Contents 1. Hardware Installation 4 2.1. Windows® XP Driver and Utilities Installation 9 3.1.1. Board Layout 4 2.2. DirectX Installation ...10 3.1.3. Resolutions and Color Depth Table (In Windows® XP 32 GV-RC19T512B-RH Graphics Accelerator - 2 - Taskbar Icon ...14 3.1.6. Introduction 3 1.1.

Manual
Page 5
Introduction Introduction 1.1. Minimum System Requirement • Hardware • Intel® Pentium® 4 or AMD Athlon® . • 512MB of system memory ; 1GB or more for best performance. • Optical drive for installation software (CD-ROM or DVD-ROM drive). • A 450watt power supply or above must be used. • Operating System • Windows® XP with Service Pack 2(SP2). • Windows® XP Professional x64 Edition. • Windows® 2000. • CrossFireTM Compatibility If you are planning on using this grpahics card as part of a CorssFireTM ...
Introduction Introduction 1.1. Minimum System Requirement • Hardware • Intel® Pentium® 4 or AMD Athlon® . • 512MB of system memory ; 1GB or more for best performance. • Optical drive for installation software (CD-ROM or DVD-ROM drive). • A 450watt power supply or above must be used. • Operating System • Windows® XP with Service Pack 2(SP2). • Windows® XP Professional x64 Edition. • Windows® 2000. • CrossFireTM Compatibility If you are planning on using this grpahics card as part of a CorssFireTM ...
Manual
Page 7
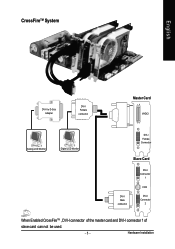
English CrossFireTM System DVI-I to D-Sub Adapter DVI-I Female connector Master Card VHDCI Analog LCD Monitor Digital LCD Monitor DVI-I Female Connector Slave Card DVI-I Male connector DVI-I Connector 1 VIVO DVI-I Connector 2 When Enabled CrossFireTM , DVI-I connector of the master card and DVI-I connector 1 of slave card can not be used. - 5 - Hardware Installation
English CrossFireTM System DVI-I to D-Sub Adapter DVI-I Female connector Master Card VHDCI Analog LCD Monitor Digital LCD Monitor DVI-I Female Connector Slave Card DVI-I Male connector DVI-I Connector 1 VIVO DVI-I Connector 2 When Enabled CrossFireTM , DVI-I connector of the master card and DVI-I connector 1 of slave card can not be used. - 5 - Hardware Installation
Manual
Page 8
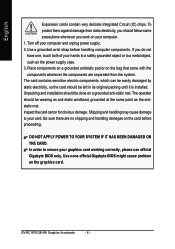
...mat. Inspect the card carton for obvious damage. Shipping and handling may cause damage to a metal object, such as the antistatic mat. GV-RC19T512B-RH Graphics Accelerator - 6 - The card contains sensitive electric components, which can be easily damaged by static electricity, so the card should ...installation should follow some precautions whenever you do not have one, touch both of your graphics card working correctly, please use official Gigabyte BIOS only. Use a grounded wrist strap before proceeding. Place components on a grounded antistatic pad or on the bag that came...
...mat. Inspect the card carton for obvious damage. Shipping and handling may cause damage to a metal object, such as the antistatic mat. GV-RC19T512B-RH Graphics Accelerator - 6 - The card contains sensitive electric components, which can be easily damaged by static electricity, so the card should ...installation should follow some precautions whenever you do not have one, touch both of your graphics card working correctly, please use official Gigabyte BIOS only. Use a grounded wrist strap before proceeding. Place components on a grounded antistatic pad or on the bag that came...

Manual
Page 9
Remove the computer cover. Hardware Installation Now that you have prepared your computer, you may need to disable it on -board graphics capability, you are ready to install your graphics accelerator card. Or, if your computer has any existing graphics card from the back of your computer. Hardware Installation English 2.2. Remove any on the motherboard. For more information, see your computer's manual for help in removing the cover. 3. Power off the computer and monitor, then disconnect the display cable from your computer. 2. To remove the existing graphics ...
Remove the computer cover. Hardware Installation Now that you have prepared your computer, you may need to disable it on -board graphics capability, you are ready to install your graphics accelerator card. Or, if your computer has any existing graphics card from the back of your computer. Hardware Installation English 2.2. Remove any on the motherboard. For more information, see your computer's manual for help in removing the cover. 3. Power off the computer and monitor, then disconnect the display cable from your computer. 2. To remove the existing graphics ...
Manual
Page 10
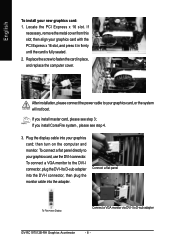
then align your graphics card, or the system will not boot. After installation, please connect the power cable to D-sub adapter GV-RC19T512B-RH Graphics Accelerator - 8 - then turn on the computer and monitor. Connect a flat panel To Flat Panel Display Connect a VGA monitor via DVI-I connector. If necessary, remove ...
then align your graphics card, or the system will not boot. After installation, please connect the power cable to D-sub adapter GV-RC19T512B-RH Graphics Accelerator - 8 - then turn on the computer and monitor. Connect a flat panel To Flat Panel Display Connect a VGA monitor via DVI-I connector. If necessary, remove ...

Manual
Page 11
Connect your LCD monitor to next chapter for detailed instructions. - 9 - DVI-I connector 2 of the graphics card drivers. Hardware Installation English 4. Attach the CrossFire cable (included with the CrossFire Edition graphics card) to the VHDCI connector of the master card and to the DVI-I connector 2 (Slave card) You are now ready to proceed with the installation of the slave card. VHDCI connector (Master card) 5. Please refer to the CrossFire cable or connect your VGA monitor via an adapter.
Connect your LCD monitor to next chapter for detailed instructions. - 9 - DVI-I connector 2 of the graphics card drivers. Hardware Installation English 4. Attach the CrossFire cable (included with the CrossFire Edition graphics card) to the VHDCI connector of the master card and to the DVI-I connector 2 (Slave card) You are now ready to proceed with the installation of the slave card. VHDCI connector (Master card) 5. Please refer to the CrossFire cable or connect your VGA monitor via an adapter.
Manual
Page 12
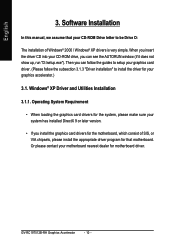
... card drivers for the motherboard, which consist of Windows® 2000 / Windows® XP drivers is very simple. Windows® XP Driver and Utilities Installation 3.1.1. GV-RC19T512B-RH Graphics Accelerator - 10 - When you insert the driver CD into your CD-ROM drive, you can see the AUTORUN window (if it does not show...
... card drivers for the motherboard, which consist of Windows® 2000 / Windows® XP drivers is very simple. Windows® XP Driver and Utilities Installation 3.1.1. GV-RC19T512B-RH Graphics Accelerator - 10 - When you insert the driver CD into your CD-ROM drive, you can see the AUTORUN window (if it does not show...

Manual
Page 13
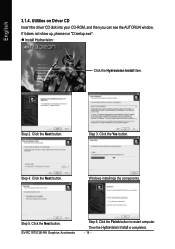
When autorun window show up, click the Install DirectX 9 item. Step 3. Software Installation Step 4. Users who run Windows XP with Service Pack 2 or above do not need to restart computer. Choose I accept the agreement and click the Next button. Installing the components. Step 1. Click Finish to install DirectX separately. Click the Install DirectX 9 item. Click the Next button. Then the DirectX 9 installation is completed. - 11 - Step 2. DirectX Installation Install Microsoft DirectX to enable 3D hardware acceleration support for Windows® 2000 or ...
When autorun window show up, click the Install DirectX 9 item. Step 3. Software Installation Step 4. Users who run Windows XP with Service Pack 2 or above do not need to restart computer. Choose I accept the agreement and click the Next button. Installing the components. Step 1. Click Finish to install DirectX separately. Click the Install DirectX 9 item. Click the Next button. Then the DirectX 9 installation is completed. - 11 - Step 2. DirectX Installation Install Microsoft DirectX to enable 3D hardware acceleration support for Windows® 2000 or ...
Manual
Page 14
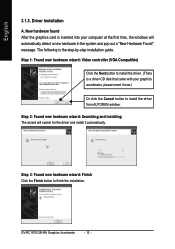
.... Step 2: Found new hardware wizard: Searching and installing The wizard will automatically detect a new hardware in the system and pop out a "New Hardware Found" message. GV-RC19T512B-RH Graphics Accelerator - 12 - Driver Installation A. New hardware found After the graphics card is the step-by-step installation guide. The following is inserted into your...
.... Step 2: Found new hardware wizard: Searching and installing The wizard will automatically detect a new hardware in the system and pop out a "New Hardware Found" message. GV-RC19T512B-RH Graphics Accelerator - 12 - Driver Installation A. New hardware found After the graphics card is the step-by-step installation guide. The following is inserted into your...
Manual
Page 15
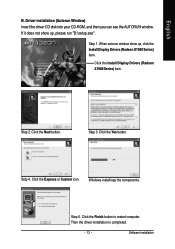
Setp 4. Windows installings the components. Software Installation Step 1. Click the Next button. Click the Express or Custom icon. Driver installation (Autorun Window) Insert the driver CD disk into your CD-ROM, and then you can see the AUTORUN window. Step 2. Click the Yes button. Then the driver installation is completed. - 13 - Step 5. When autorun window show up , click the Install Display Drivers (Radeon X1900 Series) item. Step 3. English B. If it does not show up , please run "D:\setup.exe". Click the Install Display Drivers (Radeon X1900 Series) ...
Setp 4. Windows installings the components. Software Installation Step 1. Click the Next button. Click the Express or Custom icon. Driver installation (Autorun Window) Insert the driver CD disk into your CD-ROM, and then you can see the AUTORUN window. Step 2. Click the Yes button. Then the driver installation is completed. - 13 - Step 5. When autorun window show up , click the Install Display Drivers (Radeon X1900 Series) item. Step 3. English B. If it does not show up , please run "D:\setup.exe". Click the Install Display Drivers (Radeon X1900 Series) ...
Manual
Page 16
Step 2. Step 3. Then the Hydravision Install is completed. - 14 - Utilities on Driver CD Insert the driver CD disk into your CD-ROM, and then you can see the AUTORUN window. z Install Hydravision : Click the Hydravision Install item. Click the Yes button. GV-RC19T512B-RH Graphics Accelerator Step 6. If it does not show up, please run "D:\setup.exe". Click the Next button. Click the Next button. Step 4. Windows installings the components. Step 5. Click the Next button. English 3.1.4. Click the Finish button to restart computer.
Step 2. Step 3. Then the Hydravision Install is completed. - 14 - Utilities on Driver CD Insert the driver CD disk into your CD-ROM, and then you can see the AUTORUN window. z Install Hydravision : Click the Hydravision Install item. Click the Yes button. GV-RC19T512B-RH Graphics Accelerator Step 6. If it does not show up, please run "D:\setup.exe". Click the Next button. Click the Next button. Step 4. Windows installings the components. Step 5. Click the Next button. English 3.1.4. Click the Finish button to restart computer.
Manual
Page 17
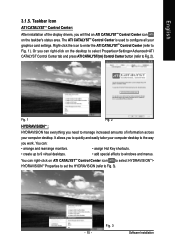
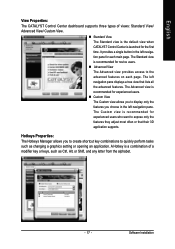
You can : • arrange and rearrange monitors. • assign Hot Key shortcuts. • create up to 9 virtual desktops. • add special effects to windows and menus. You can right-click on ATI CATALYSTTM Control Center icon to select HYDRAVISIONTM> HYDRAVISIONTM Properties to set the HYDRAVISION (refer to the way you will find an ATI CATALYSTTM Control Center icon on the desktop to select Properties>Settings>Advanced>ATI CATALYST Control Center tab and press ATI CATALYST(tm) Control Center button (refer to Fig. 1). The ATI CATALYSTTM Control Center is used to ...
You can : • arrange and rearrange monitors. • assign Hot Key shortcuts. • create up to 9 virtual desktops. • add special effects to windows and menus. You can right-click on ATI CATALYSTTM Control Center icon to select HYDRAVISIONTM> HYDRAVISIONTM Properties to set the HYDRAVISION (refer to the way you will find an ATI CATALYSTTM Control Center icon on the desktop to select Properties>Settings>Advanced>ATI CATALYST Control Center tab and press ATI CATALYST(tm) Control Center button (refer to Fig. 1). The ATI CATALYSTTM Control Center is used to ...
Manual
Page 18
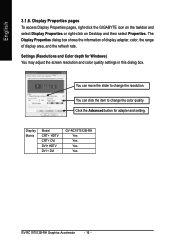
...GIGABYTE icon on the taskbar and select Display Properties or right-click on Desktop and then select Properties. Click the Advanced button for Windows) You may adjust the screen resolution and color quality settings in this dialog box. Display Matrix Model CRT+ HDTV CRT+ DVI DVI+ HDTV DVI + DVI GV-RC19T512B-RH... Yes Yes Yes Yes GV-RC19T512B-RH Graphics Accelerator - 16 - Settings (Resolutions and Color depth for adapter and setting. The Display Properties dialog box ...
...GIGABYTE icon on the taskbar and select Display Properties or right-click on Desktop and then select Properties. Click the Advanced button for Windows) You may adjust the screen resolution and color quality settings in this dialog box. Display Matrix Model CRT+ HDTV CRT+ DVI DVI+ HDTV DVI + DVI GV-RC19T512B-RH... Yes Yes Yes Yes GV-RC19T512B-RH Graphics Accelerator - 16 - Settings (Resolutions and Color depth for adapter and setting. The Display Properties dialog box ...
Manual
Page 19
The Advanced view is recommended for experienced users. „ Custom View The Custom view allows you to display only the features you to create shortcut key combinations to expose only the features they adjust most often or that lists all the advanced features. Software Installation The left navigation pane for the first time. The Standard view is recommended for novice users. „ Advanced View The Advanced view provides access to the advanced features on each main page. Hotkeys Properties: The Hotkeys Manager allows you choose in the left navigation pane displays a ...
The Advanced view is recommended for experienced users. „ Custom View The Custom view allows you to display only the features you to create shortcut key combinations to expose only the features they adjust most often or that lists all the advanced features. Software Installation The left navigation pane for the first time. The Standard view is recommended for novice users. „ Advanced View The Advanced view provides access to the advanced features on each main page. Hotkeys Properties: The Hotkeys Manager allows you choose in the left navigation pane displays a ...
Manual
Page 20
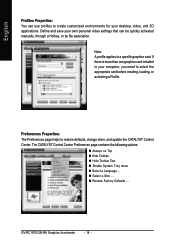
... settings that can use profiles to create customized environments for your computer, you need to select the appropriate card before creating, loading, or activating a Profile. GV-RC19T512B-RH Graphics Accelerator - 18 -
... settings that can use profiles to create customized environments for your computer, you need to select the appropriate card before creating, loading, or activating a Profile. GV-RC19T512B-RH Graphics Accelerator - 18 -
Manual
Page 21
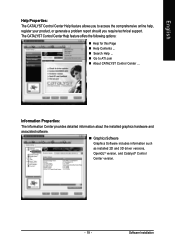
Information Properties: The Information Center provides detailed information about the installed graphics hardware and associated software. „ Graphics Software Graphics Software includes information such as installed 2D and 3D driver versions, OpenGL® version, and Catalyst® Control Center version. - 19 - English Help Properties: The CATALYST Control Center Help feature allows you to ATI.com „ About CATALYST Control Center ... Software Installation The CATALYST Control Center Help feature offers the following options: „ Help for this Page „ Help Contents ...
Information Properties: The Information Center provides detailed information about the installed graphics hardware and associated software. „ Graphics Software Graphics Software includes information such as installed 2D and 3D driver versions, OpenGL® version, and Catalyst® Control Center version. - 19 - English Help Properties: The CATALYST Control Center Help feature allows you to ATI.com „ About CATALYST Control Center ... Software Installation The CATALYST Control Center Help feature offers the following options: „ Help for this Page „ Help Contents ...
Manual
Page 22
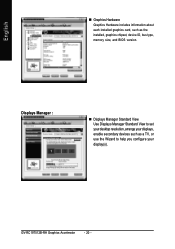
English „ Graphics Hardware Graphics Hardware includes information about each installed graphics card, such as a TV, or use the Wizard to set your desktop resolution, arrange your display(s). GV-RC19T512B-RH Graphics Accelerator - 20 - Displays Manager : „ Displays Manager Standard View Use Displays Manager Standard View to help you configure your displays, enable secondary devices such as the installed, graphics chipset, device ID, bus type, memory size, and BIOS version.
English „ Graphics Hardware Graphics Hardware includes information about each installed graphics card, such as a TV, or use the Wizard to set your desktop resolution, arrange your display(s). GV-RC19T512B-RH Graphics Accelerator - 20 - Displays Manager : „ Displays Manager Standard View Use Displays Manager Standard View to help you configure your displays, enable secondary devices such as the installed, graphics chipset, device ID, bus type, memory size, and BIOS version.

Manual
Page 23
Software Installation English „ Displays Manager Advanced View Use Display Manager Advanced View to set a refresh rate of your displays. When a TV is lower than optimal. • Choose one that has non-standard inputs that may not be supported. - 21 - However, some features that is detected using an older TV or one of OpenGL® and Direct 3D® applications. • Use 3D Refresh Rate Override to prevent screen flicker when detecting a display. • If you are using this method, it appears in the Displays Manager aspect and can be configured as extended ...
Software Installation English „ Displays Manager Advanced View Use Display Manager Advanced View to set a refresh rate of your displays. When a TV is lower than optimal. • Choose one that has non-standard inputs that may not be supported. - 21 - However, some features that is detected using an older TV or one of OpenGL® and Direct 3D® applications. • Use 3D Refresh Rate Override to prevent screen flicker when detecting a display. • If you are using this method, it appears in the Displays Manager aspect and can be configured as extended ...