Manual
Page 5
... FEATURES 4 2. Win® XP driver and utilities installation 9 3.1.1. Driver Installation ...12 3.1.4. BOARD LAYOUT 6 2.3. Operating system requirement 9 3.1.2. Troubleshooting Tips 32 5. HARDWARE INSTALLATION 7 3. Display Properties pages 22 3.2. SOFTWARE INSTALLATION 9 3.1. Resolutions and Color Depth Table (In Windows® XP 34 - 3 - Taskbar Icon ...18 3.1.6. How to reflash the BIOS 33 5.2. HARDWARE INSTALLATION 5 2.1. BIOS FLASH UTILITY...
... FEATURES 4 2. Win® XP driver and utilities installation 9 3.1.1. Driver Installation ...12 3.1.4. BOARD LAYOUT 6 2.3. Operating system requirement 9 3.1.2. Troubleshooting Tips 32 5. HARDWARE INSTALLATION 7 3. Display Properties pages 22 3.2. SOFTWARE INSTALLATION 9 3.1. Resolutions and Color Depth Table (In Windows® XP 34 - 3 - Taskbar Icon ...18 3.1.6. How to reflash the BIOS 33 5.2. HARDWARE INSTALLATION 5 2.1. BIOS FLASH UTILITY...
Manual
Page 11
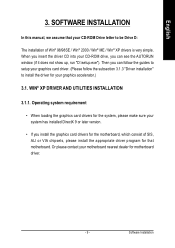
... make sure your CD-ROM Drive letter to install the driver for your CD-ROM drive, you insert the driver CD into your graphics accelerator.) 3.1. Software Installation Then you can see the AUTORUN window (if it does not show up, run "D:\setup.exe"). English...
... make sure your CD-ROM Drive letter to install the driver for your CD-ROM drive, you insert the driver CD into your graphics accelerator.) 3.1. Software Installation Then you can see the AUTORUN window (if it does not show up, run "D:\setup.exe"). English...
Manual
Page 12
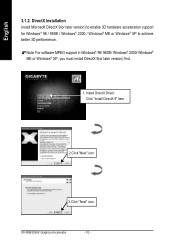
Install DirectX Driver: Click "Install DirectX 9" Item. 2.Click "Next" icon. 3.Click "Next" icon. GV-R96X256V Graphics Accelerator - 10 - Note: For software MPEG support in Windows® 98/ 98SE/ Windows® 2000/ Windows® ME or Windows® XP, you must install DirectX 9(or later version) first. 1. English 3.1.2. DirectX Installation Install Microsoft DirectX 9(or later version) to enable 3D hardware acceleration support for Windows® 98 / 98SE / Windows® 2000 / Windows® ME or Windows® XP to achieve better 3D performence.
Install DirectX Driver: Click "Install DirectX 9" Item. 2.Click "Next" icon. 3.Click "Next" icon. GV-R96X256V Graphics Accelerator - 10 - Note: For software MPEG support in Windows® 98/ 98SE/ Windows® 2000/ Windows® ME or Windows® XP, you must install DirectX 9(or later version) first. 1. English 3.1.2. DirectX Installation Install Microsoft DirectX 9(or later version) to enable 3D hardware acceleration support for Windows® 98 / 98SE / Windows® 2000 / Windows® ME or Windows® XP to achieve better 3D performence.

Manual
Page 13
Software Installation English 4.Click "Finish" item. Then the DirectX 9 installation is completed. - 11 -
Software Installation English 4.Click "Finish" item. Then the DirectX 9 installation is completed. - 11 -
Manual
Page 15
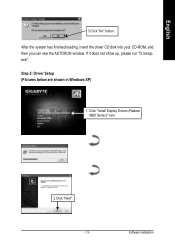
Step 5: Driver Setup (Pictures below are shown in Windows XP) 1. Software Installation If it does not show up, please run "D:\setup. Click "Install Display Drivers (Radeon 9600 Series)" item. 2.Click "Next". - 13 - exe". English 3.Click "No" button. After the system has finished loading, insert the driver CD disk into your CD-ROM, and then you can see the AUTORUN window.
Step 5: Driver Setup (Pictures below are shown in Windows XP) 1. Software Installation If it does not show up, please run "D:\setup. Click "Install Display Drivers (Radeon 9600 Series)" item. 2.Click "Next". - 13 - exe". English 3.Click "No" button. After the system has finished loading, insert the driver CD disk into your CD-ROM, and then you can see the AUTORUN window.
Manual
Page 17
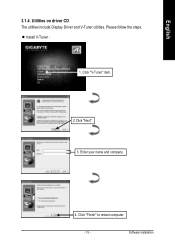
Click "V-Tuner" item. 2.Click "Next". 3. Software Installation Please follow the steps. English 3.1.4. Utilities on driver CD The utilities include Display Driver and V-Tuner utilities. Enter your name and company. 4. Click "Finish" to restart computer. - 15 - z Install V-Tuner : 1.
Click "V-Tuner" item. 2.Click "Next". 3. Software Installation Please follow the steps. English 3.1.4. Utilities on driver CD The utilities include Display Driver and V-Tuner utilities. Enter your name and company. 4. Click "Finish" to restart computer. - 15 - z Install V-Tuner : 1.
Manual
Page 21
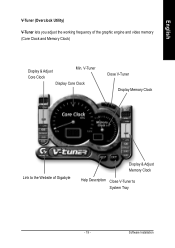
V-Tuner Core Clock Display Core Clock Close V-Tuner Display Memory Clock Link to the Website of the graphic engine and video memory (Core Clock and Memory Clock) Display & Adjust Min. English V-Tuner (Overclock Utility) V-Tuner lets you adjust the working frequency of Gigabyte Display & Adjust Memory Clock Help Description Close V-Tuner to System Tray - 19 - Software Installation
V-Tuner Core Clock Display Core Clock Close V-Tuner Display Memory Clock Link to the Website of the graphic engine and video memory (Core Clock and Memory Clock) Display & Adjust Min. English V-Tuner (Overclock Utility) V-Tuner lets you adjust the working frequency of Gigabyte Display & Adjust Memory Clock Help Description Close V-Tuner to System Tray - 19 - Software Installation
Manual
Page 23
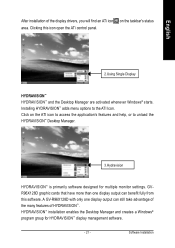
... menu options to unload the HYDRAVISION™ Desktop Manager. 3.Hydravision HYDRAVISION™ is primarily software designed for HYDRAVISION™ display management software. - 21 - A GV-R96X128D with only one display output can still take advantage of the many features of the display... panel. 2.Using Single Display HYDRAVISION™ HYDRAVISION™ and the Desktop Manager are activated whenever Windows® starts. Software Installation Click on the taskbar's status area. HYDRAVISION™ installation enables the Desktop Manager and creates a Windows® ...
... menu options to unload the HYDRAVISION™ Desktop Manager. 3.Hydravision HYDRAVISION™ is primarily software designed for HYDRAVISION™ display management software. - 21 - A GV-R96X128D with only one display output can still take advantage of the many features of the display... panel. 2.Using Single Display HYDRAVISION™ HYDRAVISION™ and the Desktop Manager are activated whenever Windows® starts. Software Installation Click on the taskbar's status area. HYDRAVISION™ installation enables the Desktop Manager and creates a Windows® ...
Manual
Page 25
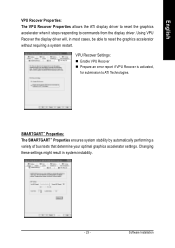
Using VPU Recover the display driver will, in system instability. - 23 - Software Installation SMARTGART™ Properties: The SMARTGART™ Properties ensures system stability by automatically performing a variety of bus tests that determine your optimal graphics accelerator settings. ...
Using VPU Recover the display driver will, in system instability. - 23 - Software Installation SMARTGART™ Properties: The SMARTGART™ Properties ensures system stability by automatically performing a variety of bus tests that determine your optimal graphics accelerator settings. ...
Manual
Page 27
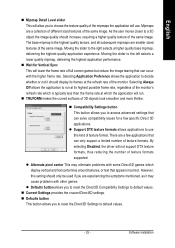
... base mipmap is typically less than the frame rate at the refresh rate of the monitor. There are smaller sized textures of the same image. Software Installation However, this kind of texture format. English „ Mipmap Detail Level slider This will allow you to the left selects a lower quality mipmap, delivering...
... base mipmap is typically less than the frame rate at the refresh rate of the monitor. There are smaller sized textures of the same image. Software Installation However, this kind of texture format. English „ Mipmap Detail Level slider This will allow you to the left selects a lower quality mipmap, delivering...

Manual
Page 29
... solve compatibility issues for Vertical Sync This will run at its frames at which the application will lower the frame rate of the same image. Software Installation Moving the slider to the left selects a lower quality mipmap, delivering the highest application performance. „ Wait for a few specific OpenGL applications. The base...
... solve compatibility issues for Vertical Sync This will run at its frames at which the application will lower the frame rate of the same image. Software Installation Moving the slider to the left selects a lower quality mipmap, delivering the highest application performance. „ Wait for a few specific OpenGL applications. The base...
Manual
Page 31
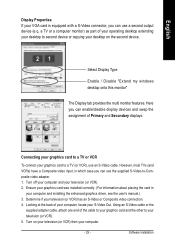
... features. Looking at the back of your computer, locate your television (or VCR) has an S-Video or Composite video connection. 4. Turn on the second device. Software Installation a TV or a computer monitor) as part of your operating desktop extending your desktop to your television (or VCR). 5. Using an S-Video cable or the...
... features. Looking at the back of your computer, locate your television (or VCR) has an S-Video or Composite video connection. 4. Turn on the second device. Software Installation a TV or a computer monitor) as part of your operating desktop extending your desktop to your television (or VCR). 5. Using an S-Video cable or the...
Manual
Page 33
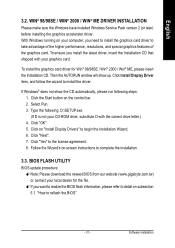
... is not your CD-ROM drive, substitute D with your graphics card. Click "OK". 5. Click on -screen instructions to begin the Installation Wizard. 6. Software Installation WIN® 98/98SE / WIN® 2000 / WIN® ME DRIVER INSTALLATION Please make sure the Windows have installed Windows Service Pack version 2...; ME, please insert the Installation CD. BIOS FLASH UTILITY BIOS update procedure: 0Note: Please download the newest BIOS from our website (www.gigabyte.com.tw) or contact your computer, you want to realize the BIOS flash information, please refer to reflash the BIOS". - 31 - ...
... is not your CD-ROM drive, substitute D with your graphics card. Click "OK". 5. Click on -screen instructions to begin the Installation Wizard. 6. Software Installation WIN® 98/98SE / WIN® 2000 / WIN® ME DRIVER INSTALLATION Please make sure the Windows have installed Windows Service Pack version 2...; ME, please insert the Installation CD. BIOS FLASH UTILITY BIOS update procedure: 0Note: Please download the newest BIOS from our website (www.gigabyte.com.tw) or contact your computer, you want to realize the BIOS flash information, please refer to reflash the BIOS". - 31 - ...