Manual
Page 5
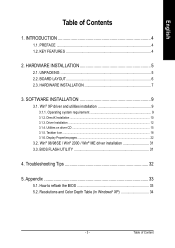
...® ME driver installation 31 3.3. Table of Contents 1. UNPACKING 5 2.2. Win® XP driver and utilities installation 9 3.1.1. PREFACE 4 1.2. HARDWARE INSTALLATION 7 3. Resolutions and Color Depth Table (In Windows® XP 34 - 3 - Troubleshooting Tips 32 5. KEY FEATURES 4 2. English Table of Content INTRODUCTION 4 1.1. BOARD LAYOUT 6 2.3. Operating system requirement 9 3.1.2. DirectX Installation ...10 3.1.3. Taskbar Icon ...18 3.1.6. Appendix...
...® ME driver installation 31 3.3. Table of Contents 1. UNPACKING 5 2.2. Win® XP driver and utilities installation 9 3.1.1. PREFACE 4 1.2. HARDWARE INSTALLATION 7 3. Resolutions and Color Depth Table (In Windows® XP 34 - 3 - Troubleshooting Tips 32 5. KEY FEATURES 4 2. English Table of Content INTRODUCTION 4 1.1. BOARD LAYOUT 6 2.3. Operating system requirement 9 3.1.2. DirectX Installation ...10 3.1.3. Taskbar Icon ...18 3.1.6. Appendix...

Manual
Page 11
... Drive D: The installation of SIS, ALI or VIA chipsets, please install the appropriate driver program for your CD-ROM drive, you can see the AUTORUN window (if it does not show up, run "D:\setup.exe"). Software Installation WIN® XP DRIVER AND UTILITIES INSTALLATION 3.1.1. When you install the graphics card drivers...
... Drive D: The installation of SIS, ALI or VIA chipsets, please install the appropriate driver program for your CD-ROM drive, you can see the AUTORUN window (if it does not show up, run "D:\setup.exe"). Software Installation WIN® XP DRIVER AND UTILITIES INSTALLATION 3.1.1. When you install the graphics card drivers...

Manual
Page 12
GV-R96X128D Graphics Accelerator - 10 - DirectX Installation Install Microsoft DirectX 9(or later version) to enable 3D hardware acceleration support for Windows® 98 / 98SE / Windows® 2000 / Windows® ME or Windows® XP to achieve better 3D performence. Note: For software MPEG support in Windows® 98/ 98SE/ Windows® 2000/ Windows® ME or Windows® XP, you must install DirectX 9(or later version) first. 1. Install DirectX Driver: Click "Install DirectX 9" Item. 2.Click "Next" icon. 3.Click "Next" icon. English 3.1.2.
GV-R96X128D Graphics Accelerator - 10 - DirectX Installation Install Microsoft DirectX 9(or later version) to enable 3D hardware acceleration support for Windows® 98 / 98SE / Windows® 2000 / Windows® ME or Windows® XP to achieve better 3D performence. Note: For software MPEG support in Windows® 98/ 98SE/ Windows® 2000/ Windows® ME or Windows® XP, you must install DirectX 9(or later version) first. 1. Install DirectX Driver: Click "Install DirectX 9" Item. 2.Click "Next" icon. 3.Click "Next" icon. English 3.1.2.

Manual
Page 14
GV-R96X128D Graphics Accelerator - 12 - Don't click "Cancel", because the system will ask for your computer at the first time, the windows will automatically detect a new hardware in order to complete the VGA driver installation. English 3.1.3. Step 2: Update Device Driver Wizard: ...Standard PCI Graphics Adapter(VGA) 1.Click "Next" button. Driver Installation The following is inserted into your Windows CD in the system and pop out a "New Hardware Found" message. Step 3: Update Device Driver Wizard: Finish At this time, system will...
GV-R96X128D Graphics Accelerator - 12 - Don't click "Cancel", because the system will ask for your computer at the first time, the windows will automatically detect a new hardware in order to complete the VGA driver installation. English 3.1.3. Step 2: Update Device Driver Wizard: ...Standard PCI Graphics Adapter(VGA) 1.Click "Next" button. Driver Installation The following is inserted into your Windows CD in the system and pop out a "New Hardware Found" message. Step 3: Update Device Driver Wizard: Finish At this time, system will...
Manual
Page 15
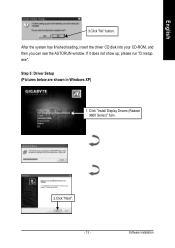
exe". Software Installation After the system has finished loading, insert the driver CD disk into your CD-ROM, and then you can see the AUTORUN window. English 3.Click "No" button. Step 5: Driver Setup (Pictures below are shown in Windows XP) 1. Click "Install Display Drivers (Radeon 9600 Series)" item. 2.Click "Next". - 13 - If it does not show up, please run "D:\setup.
exe". Software Installation After the system has finished loading, insert the driver CD disk into your CD-ROM, and then you can see the AUTORUN window. English 3.Click "No" button. Step 5: Driver Setup (Pictures below are shown in Windows XP) 1. Click "Install Display Drivers (Radeon 9600 Series)" item. 2.Click "Next". - 13 - If it does not show up, please run "D:\setup.

Manual
Page 23
... installation of HYDRAVISION™. Click on the taskbar's status area. HYDRAVISION™ installation enables the Desktop Manager and creates a Windows® program group for multiple monitor settings. Software Installation Clicking this software. A GV-R96X128D with only one display output can still take advantage of the many features of the display drivers, you will... can benefit fully from this icon open the ATi control panel. 2.Using Single Display HYDRAVISION™ HYDRAVISION™ and the Desktop Manager are activated whenever Windows® starts.
... installation of HYDRAVISION™. Click on the taskbar's status area. HYDRAVISION™ installation enables the Desktop Manager and creates a Windows® program group for multiple monitor settings. Software Installation Clicking this software. A GV-R96X128D with only one display output can still take advantage of the many features of the display drivers, you will... can benefit fully from this icon open the ATi control panel. 2.Using Single Display HYDRAVISION™ HYDRAVISION™ and the Desktop Manager are activated whenever Windows® starts.
Manual
Page 24
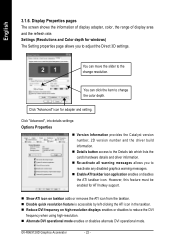
... frequency on high-resolution displays enables or disables to change resolution. However, this feature must be enabled for adapter and setting. GV-R96X128D Graphics Accelerator - 22 - Settings (Resolutions and Color depth for windows) The Setting properties page allows you to adjust the Direct 3D settings. English 3.1.6. Display Properties pages The screen shows the...
... frequency on high-resolution displays enables or disables to change resolution. However, this feature must be enabled for adapter and setting. GV-R96X128D Graphics Accelerator - 22 - Settings (Resolutions and Color depth for windows) The Setting properties page allows you to adjust the Direct 3D settings. English 3.1.6. Display Properties pages The screen shows the...

Manual
Page 30
... the higher the brightness and contrast of Direct 3D and OpenGL games played in fullscreen mode. (NOTE: Game Gamma is used to in Windows NT4.0) „ Default resets the desktop brightness and color settings to the default values. English Color Properties: The Color Properties is NOT ...gamma/brightness/contrast of your display. „ All Colors checkbox adjust the RGB individually or adjust all display devices mapped to the view. GV-R96X128D Graphics Accelerator - 28 - The color settings affect all three colors at the same time. „ Gamma/Brightness/Contrast adjust the color by...
... the higher the brightness and contrast of Direct 3D and OpenGL games played in fullscreen mode. (NOTE: Game Gamma is used to in Windows NT4.0) „ Default resets the desktop brightness and color settings to the default values. English Color Properties: The Color Properties is NOT ...gamma/brightness/contrast of your display. „ All Colors checkbox adjust the RGB individually or adjust all display devices mapped to the view. GV-R96X128D Graphics Accelerator - 28 - The color settings affect all three colors at the same time. „ Gamma/Brightness/Contrast adjust the color by...

Manual
Page 31
.... Turn off your computer and your television (or VCR) has an S-Video or Composite video connection. 4. Software Installation Select Display Type Enable / Disable "Extend my windows desktop onto this monitor" The Display tab provides the multi monitor features. Looking at the back of Primary and Secondary displays. Turn on the second...
.... Turn off your computer and your television (or VCR) has an S-Video or Composite video connection. 4. Software Installation Select Display Type Enable / Disable "Extend my windows desktop onto this monitor" The Display tab provides the multi monitor features. Looking at the back of Primary and Secondary displays. Turn on the second...

Manual
Page 33
...take advantage of the higher performance, resolutions, and special graphics features of the graphics card. Click on the control bar. 2. Software Installation With Windows running on your local dealer for Win® 98/98SE / Win® 2000 / Win® ME, please insert the Installation CD. ...the wizard to the license agreement. 8. BIOS FLASH UTILITY BIOS update procedure: 0Note: Please download the newest BIOS from our website (www.gigabyte.com.tw) or contact your computer, you want to realize the BIOS flash information, please refer to detail on -screen instructions to reflash...
...take advantage of the higher performance, resolutions, and special graphics features of the graphics card. Click on the control bar. 2. Software Installation With Windows running on your local dealer for Win® 98/98SE / Win® 2000 / Win® ME, please insert the Installation CD. ...the wizard to the license agreement. 8. BIOS FLASH UTILITY BIOS update procedure: 0Note: Please download the newest BIOS from our website (www.gigabyte.com.tw) or contact your computer, you want to realize the BIOS flash information, please refer to detail on -screen instructions to reflash...

Manual
Page 34
... Safe Mode, and press Enter. (You can also use the Troubleshooting Guide located in Safe Mode. In Windows® 98 SE and Windows® Me, press and hold the CTRL key until the Microsoft® Windows® Startup Menu appears on your monitor's setting by monitor's adjust panel to make the screen looks... information, consult your computer's manual or manufacturer. (NOTE: Some manufacturers do not allow the built-in graphics to be disabled or to the monitor's manual.) GV-R96X128D Graphics Accelerator - 32 -
... Safe Mode, and press Enter. (You can also use the Troubleshooting Guide located in Safe Mode. In Windows® 98 SE and Windows® Me, press and hold the CTRL key until the Microsoft® Windows® Startup Menu appears on your monitor's setting by monitor's adjust panel to make the screen looks... information, consult your computer's manual or manufacturer. (NOTE: Some manufacturers do not allow the built-in graphics to be disabled or to the monitor's manual.) GV-R96X128D Graphics Accelerator - 32 -

Manual
Page 35
Extract the Zip file to the file location C:\> or A:\> 4. How to MS-DOS mode) 3. please use GV-AR64SH VGA card and Atiflash BIOS flash utility as below : C:\> atiflash -p 0 5. Reboot your graphics card? 1. Restart your PC in MS-DOS mode (This function only for your PC when it's done. - 33 - Reflash BIOS command as example. APPENDIX 5.1. Change the command path to the drive C: or A: 2. Appendix How to reflash the BIOS We use the bootable disk to reflash the BIOS for Windows 98/98SE, If your OS is Windows 2000 / Windows Me / Windows XP. English 5.
Extract the Zip file to the file location C:\> or A:\> 4. How to MS-DOS mode) 3. please use GV-AR64SH VGA card and Atiflash BIOS flash utility as below : C:\> atiflash -p 0 5. Reboot your graphics card? 1. Restart your PC in MS-DOS mode (This function only for your PC when it's done. - 33 - Reflash BIOS command as example. APPENDIX 5.1. Change the command path to the drive C: or A: 2. Appendix How to reflash the BIOS We use the bootable disk to reflash the BIOS for Windows 98/98SE, If your OS is Windows 2000 / Windows Me / Windows XP. English 5.

Manual
Page 36
Resolutions and Color Depth Table (In Windows® XP) Display Screen Resolution 640 x 480 800 x 600 1024 x 768 GV-R96X128D 2D Single Display Modes Refresh Rate (Hz) 60 72 75 85 90 100 120 160 ...3 3 3 3 3 3 3 3 (interlaced) 3 3 3 3 3 3 3 3 3 3 3 3 (interlaced) 3 3 3 3 3 3 3 3 3 3 3 16bpp(65K color) High mode 3 3 3 3 3 3 3 3 3 3 (interlaced) 3 3 3 3 3 3 3 3 3 3 3 3 (interlaced) 3 3 3 3 3 3 3 3 3 3 3 32bpp(16.7M) True mode 3 3 3 3 3 3 3 3 3 3 (interlaced) 3 3 3 3 3 3 3 3 3 3 3 3 (interlaced) 3 3 3 3 3 3 3 3 3 3 3 To be continued... GV-R96X128D Graphics Accelerator - 34 - English 5.2.
Resolutions and Color Depth Table (In Windows® XP) Display Screen Resolution 640 x 480 800 x 600 1024 x 768 GV-R96X128D 2D Single Display Modes Refresh Rate (Hz) 60 72 75 85 90 100 120 160 ...3 3 3 3 3 3 3 3 (interlaced) 3 3 3 3 3 3 3 3 3 3 3 3 (interlaced) 3 3 3 3 3 3 3 3 3 3 3 16bpp(65K color) High mode 3 3 3 3 3 3 3 3 3 3 (interlaced) 3 3 3 3 3 3 3 3 3 3 3 3 (interlaced) 3 3 3 3 3 3 3 3 3 3 3 32bpp(16.7M) True mode 3 3 3 3 3 3 3 3 3 3 (interlaced) 3 3 3 3 3 3 3 3 3 3 3 3 (interlaced) 3 3 3 3 3 3 3 3 3 3 3 To be continued... GV-R96X128D Graphics Accelerator - 34 - English 5.2.
