
Manual
Page 4
... Installation 8 3.1.1. Display Properties pages 17 3.2. Appendix 31 5.1. Introduction 3 1.1. Board Layout 4 2.2. Driver Installation ...10 3.1.4. Windows® 2000 Driver Installation 29 4. Troubleshooting Tips 30 5. Features ...3 1.2. Hardware Installation 6 3. Resolutions and Color Depth Table (In Windows® XP 32 GV-R96P256D/GV-R96P128DE Graphics Accelerator - 2 - Operating System Requirement 8 3.1.2. Reflash BIOS in Windows mode 31 5.2. How to Reflash the BIOS 31 5.1.1. Software Installation...
... Installation 8 3.1.1. Display Properties pages 17 3.2. Appendix 31 5.1. Introduction 3 1.1. Board Layout 4 2.2. Driver Installation ...10 3.1.4. Windows® 2000 Driver Installation 29 4. Troubleshooting Tips 30 5. Features ...3 1.2. Hardware Installation 6 3. Resolutions and Color Depth Table (In Windows® XP 32 GV-R96P256D/GV-R96P128DE Graphics Accelerator - 2 - Operating System Requirement 8 3.1.2. Reflash BIOS in Windows mode 31 5.2. How to Reflash the BIOS 31 5.1.1. Software Installation...
Manual
Page 10
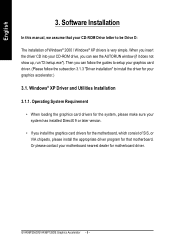
... version. • If you can see the AUTORUN window (if it does not show up, run "D:\setup.exe"). Then you install the graphics card drivers for motherboard driver. Or please contact your graphics accelerator.) 3.1. Operating System...driver program for that your CD-ROM Drive letter to install the driver for your motherboard nearest dealer for the motherboard, which consist of Windows® 2000 / Windows® XP drivers is very simple. Software Installation In this manual, we assume that motherboard. GV-R96P256D/GV-R96P128DE Graphics Accelerator - 8 - Windows® XP Driver...
... version. • If you can see the AUTORUN window (if it does not show up, run "D:\setup.exe"). Then you install the graphics card drivers for motherboard driver. Or please contact your graphics accelerator.) 3.1. Operating System...driver program for that your CD-ROM Drive letter to install the driver for your motherboard nearest dealer for the motherboard, which consist of Windows® 2000 / Windows® XP drivers is very simple. Software Installation In this manual, we assume that motherboard. GV-R96P256D/GV-R96P128DE Graphics Accelerator - 8 - Windows® XP Driver...
Manual
Page 12
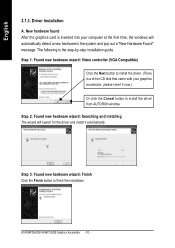
... install it now.) Or click the Cancel button to install the driver from AUTORUN window. Step 1: Found new hardware wizard: Video controller (VGA Compatible) Click the Next button to finish the installation. Driver Installation A. English 3.1.3. New hardware found After the graphics card is the step-by-step installation guide. GV-R96P256D/GV-R96P128DE Graphics Accelerator - 10 -
... install it now.) Or click the Cancel button to install the driver from AUTORUN window. Step 1: Found new hardware wizard: Video controller (VGA Compatible) Click the Next button to finish the installation. Driver Installation A. English 3.1.3. New hardware found After the graphics card is the step-by-step installation guide. GV-R96P256D/GV-R96P128DE Graphics Accelerator - 10 -
Manual
Page 13
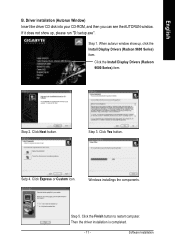
.... - 11 - Click Next button. Click the Install Display Drivers (Radeon 9600 Series) item. Windows installings the components. Driver installation (Autorun Window) Insert the driver CD disk into your CD-ROM, and then you can see the AUTORUN window. Click Yes button. When autorun window show up , click the Install Display Drivers (Radeon 9600 Series) item. English B. Step 3. Click...
.... - 11 - Click Next button. Click the Install Display Drivers (Radeon 9600 Series) item. Windows installings the components. Driver installation (Autorun Window) Insert the driver CD disk into your CD-ROM, and then you can see the AUTORUN window. Click Yes button. When autorun window show up , click the Install Display Drivers (Radeon 9600 Series) item. English B. Step 3. Click...
Manual
Page 14
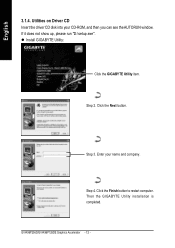
Utilities on Driver CD Insert the driver CD disk into your name and company. Step 2. Step 3. Enter your CD-ROM, and then you can see the AUTORUN window. If it does not show up, please run "D:\setup.exe". Click the Next button. Then the GIGABYTE Utility installation is completed. GV-R96P256D/GV-R96P128DE Graphics Accelerator - 12 - z Install GIGABYTE Utility: Click the GIGABYTE Utility item. Step 4. Click the Finish button to restart computer. English 3.1.4.
Utilities on Driver CD Insert the driver CD disk into your name and company. Step 2. Step 3. Enter your CD-ROM, and then you can see the AUTORUN window. If it does not show up, please run "D:\setup.exe". Click the Next button. Then the GIGABYTE Utility installation is completed. GV-R96P256D/GV-R96P128DE Graphics Accelerator - 12 - z Install GIGABYTE Utility: Click the GIGABYTE Utility item. Step 4. Click the Finish button to restart computer. English 3.1.4.

Manual
Page 18
.... It allows you to quickly and easily tailor your computer desktop to the way you need to manage increased amounts of the display drivers, you can right-click on the desktop to select Properties>Settings>Advanced>ATI CATALYST Control Center tab and press ATI CATALYST(tm) Control...virtual desktops. • add special effects to Fig. 1). English ATI CATALYSTTM Control Center: After installation of information across your graphics card settings. Fig. 3 GV-R96P256D/GV-R96P128DE Graphics Accelerator - 16 - Right-click the icon to enter the ATI CATALYSTTM Control Center (refer to...
.... It allows you to quickly and easily tailor your computer desktop to the way you need to manage increased amounts of the display drivers, you can right-click on the desktop to select Properties>Settings>Advanced>ATI CATALYST Control Center tab and press ATI CATALYST(tm) Control...virtual desktops. • add special effects to Fig. 1). English ATI CATALYSTTM Control Center: After installation of information across your graphics card settings. Fig. 3 GV-R96P256D/GV-R96P128DE Graphics Accelerator - 16 - Right-click the icon to enter the ATI CATALYSTTM Control Center (refer to...
Manual
Page 22
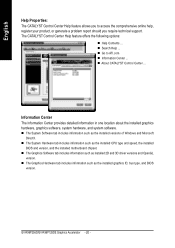
...graphics software, system hardware, and system software. „ The System Software tab includes information such as the installed versions of Windows and Microsoft DirectX. „ The System Hardware tab includes information such as the installed CPU type and speed, the installed BIOS...Graphics Software tab includes information such as installed 2D and 3D driver versions and OpenGL version. „ The Graphics Hardware tab includes information such as the installed graphics ID, bus type, and BIOS version. GV-R96P256D/GV-R96P128DE Graphics Accelerator - 20 - English Help Properties: The ...
...graphics software, system hardware, and system software. „ The System Software tab includes information such as the installed versions of Windows and Microsoft DirectX. „ The System Hardware tab includes information such as the installed CPU type and speed, the installed BIOS...Graphics Software tab includes information such as installed 2D and 3D driver versions and OpenGL version. „ The Graphics Hardware tab includes information such as the installed graphics ID, bus type, and BIOS version. GV-R96P256D/GV-R96P128DE Graphics Accelerator - 20 - English Help Properties: The ...
Manual
Page 31
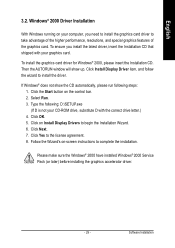
..., and follow the wizard to the license agreement. 8. Select Run. 3. Windows® 2000 Driver Installation With Windows running on Install Display Drivers to complete the installation. Please make sure the Windows® 2000 have installed Windows® 2000 Service Pack (or later) before installing the graphics accelerator driver. - 29 - Click on your graphics card. Follow the Wizard...
..., and follow the wizard to the license agreement. 8. Select Run. 3. Windows® 2000 Driver Installation With Windows running on Install Display Drivers to complete the installation. Please make sure the Windows® 2000 have installed Windows® 2000 Service Pack (or later) before installing the graphics accelerator driver. - 29 - Click on your graphics card. Follow the Wizard...
Manual
Page 32
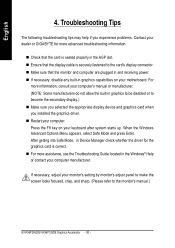
...and press Enter. For more assistance, use the Troubleshooting Guide located in the Windows® Help or contact your computer manufacturer. After getting into Safe Mode, in Device Manager check whether the driver for more advanced troubleshooting information. „ Check that the card is seated ... or GIGABYTE for the graphics card is securely fastened to the card's display connector. „ Make sure that the monitor and computer are plugged in and receiving power. „ If necessary, disable any built-in graphics to be disabled or to the monitor's manual.) GV-R96P256D/GV-R96P128DE ...
...and press Enter. For more assistance, use the Troubleshooting Guide located in the Windows® Help or contact your computer manufacturer. After getting into Safe Mode, in Device Manager check whether the driver for more advanced troubleshooting information. „ Check that the card is seated ... or GIGABYTE for the graphics card is securely fastened to the card's display connector. „ Make sure that the monitor and computer are plugged in and receiving power. „ If necessary, disable any built-in graphics to be disabled or to the monitor's manual.) GV-R96P256D/GV-R96P128DE ...
Manual
Page 33
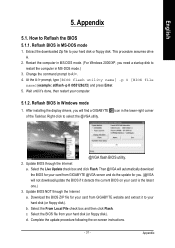
...(@VGA will not download/update the BIOS if it to your computer. 5.1.2. Select the BIOS file from GIGABYTE website and extract it detects the current BIOS on -screen instructions. - 31 - d. Update BIOS through...A. 2. Restart the computer in MS-DOS mode. (For Windows 2000/XP, you will automatically download the BIOS for your card from GIGABYTE @VGA server and do the update for your card from...5.1.1. Select the Live Update check box and click Flash. Then @VGA will find a GIGABYTE of the Taskbar. Appendix Change the command prompt to restart the computer in MS-DOS ...
...(@VGA will not download/update the BIOS if it to your computer. 5.1.2. Select the BIOS file from GIGABYTE website and extract it detects the current BIOS on -screen instructions. - 31 - d. Update BIOS through...A. 2. Restart the computer in MS-DOS mode. (For Windows 2000/XP, you will automatically download the BIOS for your card from GIGABYTE @VGA server and do the update for your card from...5.1.1. Select the Live Update check box and click Flash. Then @VGA will find a GIGABYTE of the Taskbar. Appendix Change the command prompt to restart the computer in MS-DOS ...

