
Manual
Page 4
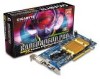
... 8 3.1. Driver Installation ...10 3.1.4. Appendix 31 5.1. Minimum System Requirement 3 2. Windows® XP Driver and Utilities Installation 8 3.1.1. Utilities on Driver CD ...12 3.1.5. Windows® 2000 Driver Installation 29 4. Hardware Installation 4 2.1. Display Properties pages 17 ... Icon ...14 3.1.6. Introduction 3 1.1. Troubleshooting Tips 30 5. Resolutions and Color Depth Table (In Windows® XP 32 GV-R96P256D/GV-R96P128DE Graphics Accelerator - 2 - DirectX Installation ...9 3.1.3. Reflash BIOS in Windows mode 31 5.2. English Table of Contents 1.
... 8 3.1. Driver Installation ...10 3.1.4. Appendix 31 5.1. Minimum System Requirement 3 2. Windows® XP Driver and Utilities Installation 8 3.1.1. Utilities on Driver CD ...12 3.1.5. Windows® 2000 Driver Installation 29 4. Hardware Installation 4 2.1. Display Properties pages 17 ... Icon ...14 3.1.6. Introduction 3 1.1. Troubleshooting Tips 30 5. Resolutions and Color Depth Table (In Windows® XP 32 GV-R96P256D/GV-R96P128DE Graphics Accelerator - 2 - DirectX Installation ...9 3.1.3. Reflash BIOS in Windows mode 31 5.2. English Table of Contents 1.
Manual
Page 5
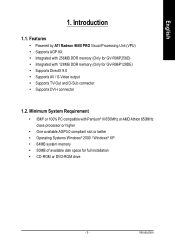
... AMD Athlon 650MHz class processor or higher • One available AGP3.0 compliant slot or better • Operating Systems Windows® 2000 / Windows® XP • 64MB system memory • 50MB of available disk space for GV-R96P128DE) • Supports DirectX 9.0 • Supports AV / S-Video output • Supports TV-Out and D-Sub connector • Supports...
... AMD Athlon 650MHz class processor or higher • One available AGP3.0 compliant slot or better • Operating Systems Windows® 2000 / Windows® XP • 64MB system memory • 50MB of available disk space for GV-R96P128DE) • Supports DirectX 9.0 • Supports AV / S-Video output • Supports TV-Out and D-Sub connector • Supports...
Manual
Page 10
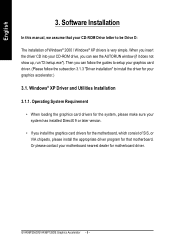
... of SIS, or VIA chipsets, please install the appropriate driver program for that motherboard. GV-R96P256D/GV-R96P128DE Graphics Accelerator - 8 - Operating System Requirement • When loading the graphics card drivers for the motherboard, which consist of Windows® 2000 / Windows® XP drivers is very simple. Then you install the graphics card drivers for the...
... of SIS, or VIA chipsets, please install the appropriate driver program for that motherboard. GV-R96P256D/GV-R96P128DE Graphics Accelerator - 8 - Operating System Requirement • When loading the graphics card drivers for the motherboard, which consist of Windows® 2000 / Windows® XP drivers is very simple. Then you install the graphics card drivers for the...

Manual
Page 11
...; XP, you must install DirectX first. DirectX Installation Install Microsoft DirectX to enable 3D hardware acceleration support for Windows® 2000 or Windows® XP to restart computer. Step 1. Step 2. When autorun window show up, click the Install DirectX 9 item. Click the Next button. Choose I accept the agreement and click the Next button...
...; XP, you must install DirectX first. DirectX Installation Install Microsoft DirectX to enable 3D hardware acceleration support for Windows® 2000 or Windows® XP to restart computer. Step 1. Step 2. When autorun window show up, click the Install DirectX 9 item. Click the Next button. Choose I accept the agreement and click the Next button...
Manual
Page 12
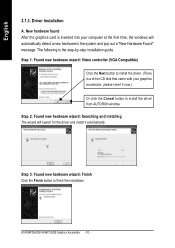
... search for the driver and install it now.) Or click the Cancel button to install the driver from AUTORUN window. GV-R96P256D/GV-R96P128DE Graphics Accelerator - 10 - Driver Installation A. Step 3: Found new hardware wizard: Finish Click the Finish button to install the driver. (There is the step-by-step ...
... search for the driver and install it now.) Or click the Cancel button to install the driver from AUTORUN window. GV-R96P256D/GV-R96P128DE Graphics Accelerator - 10 - Driver Installation A. Step 3: Found new hardware wizard: Finish Click the Finish button to install the driver. (There is the step-by-step ...
Manual
Page 13
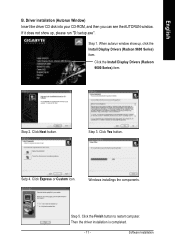
.... - 11 - When autorun window show up , click the Install Display Drivers (Radeon 9600 Series) item. Step 3. Setp 4. Click the Finish button to restart computer. Click Yes button. Software Installation Click Express or Custom icon. Driver installation (Autorun Window) Insert the driver CD disk ...into your CD-ROM, and then you can see the AUTORUN window. Click the Install Display Drivers (Radeon 9600 Series) item. Click Next button. Windows installings the components. If it does not show...
.... - 11 - When autorun window show up , click the Install Display Drivers (Radeon 9600 Series) item. Step 3. Setp 4. Click the Finish button to restart computer. Click Yes button. Software Installation Click Express or Custom icon. Driver installation (Autorun Window) Insert the driver CD disk ...into your CD-ROM, and then you can see the AUTORUN window. Click the Install Display Drivers (Radeon 9600 Series) item. Click Next button. Windows installings the components. If it does not show...
Manual
Page 14
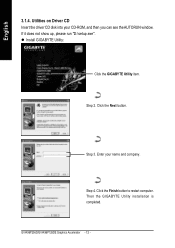
If it does not show up, please run "D:\setup.exe". Click the Finish button to restart computer. Then the GIGABYTE Utility installation is completed. GV-R96P256D/GV-R96P128DE Graphics Accelerator - 12 - Step 3. Enter your CD-ROM, and then you can see the AUTORUN window. z Install GIGABYTE Utility: Click the GIGABYTE Utility item. Utilities on Driver CD Insert the driver CD disk into your name and company. Step 2. Click the Next button. Step 4. English 3.1.4.
If it does not show up, please run "D:\setup.exe". Click the Finish button to restart computer. Then the GIGABYTE Utility installation is completed. GV-R96P256D/GV-R96P128DE Graphics Accelerator - 12 - Step 3. Enter your CD-ROM, and then you can see the AUTORUN window. z Install GIGABYTE Utility: Click the GIGABYTE Utility item. Utilities on Driver CD Insert the driver CD disk into your name and company. Step 2. Click the Next button. Step 4. English 3.1.4.

Manual
Page 15
Click the Yes button. Step 5. Step 2. Click the Next button. Click the Finish button to restart computer. Windows installings the components. Then the Hydravision installation is completed. - 13 - Software Installation Click the Next button. English z Install Hydravision : Click the Hydravision Install item. Step 4. Click the Next button. Step 3. Step 6.
Click the Yes button. Step 5. Step 2. Click the Next button. Click the Finish button to restart computer. Windows installings the components. Then the Hydravision installation is completed. - 13 - Software Installation Click the Next button. English z Install Hydravision : Click the Hydravision Install item. Step 4. Click the Next button. Step 3. Step 6.

Manual
Page 18
... right-click on the desktop to select Properties>Settings>Advanced>ATI CATALYST Control Center tab and press ATI CATALYST(tm) Control Center button (refer to windows and menus. The ATI CATALYSTTM Control Center is used to Fig. 3). Fig. 1 Fig. 2 HYDRAVISIONTM : HYDRAVISION has everything you need to manage increased amounts of the... the icon to enter the ATI CATALYSTTM Control Center (refer to the way you to quickly and easily tailor your computer desktop to Fig. 1). Fig. 3 GV-R96P256D/GV-R96P128DE Graphics Accelerator - 16 - It allows you work.
... right-click on the desktop to select Properties>Settings>Advanced>ATI CATALYST Control Center tab and press ATI CATALYST(tm) Control Center button (refer to windows and menus. The ATI CATALYSTTM Control Center is used to Fig. 3). Fig. 1 Fig. 2 HYDRAVISIONTM : HYDRAVISION has everything you need to manage increased amounts of the... the icon to enter the ATI CATALYSTTM Control Center (refer to the way you to quickly and easily tailor your computer desktop to Fig. 1). Fig. 3 GV-R96P256D/GV-R96P128DE Graphics Accelerator - 16 - It allows you work.

Manual
Page 19
Display Matrix Model CRT+TV CRT+DVI DVI+TV DVI+TV+CRT GV-R96P256D Yes Yes Yes Yes GV-R96P128DE Yes Yes Yes Yes - 17 - You can click the item to change the color quality. You can move the slider to change the resolution. The ... display adapter, color, the range of display area, and the refresh rate. Software Installation Display Properties pages To access Display Properties pages, right-click the GIGABYTE icon on the taskbar and select Display Properties or right-click on Desktop and then select Properties. Settings (Resolutions and Color depth for adapter and...
Display Matrix Model CRT+TV CRT+DVI DVI+TV DVI+TV+CRT GV-R96P256D Yes Yes Yes Yes GV-R96P128DE Yes Yes Yes Yes - 17 - You can click the item to change the color quality. You can move the slider to change the resolution. The ... display adapter, color, the range of display area, and the refresh rate. Software Installation Display Properties pages To access Display Properties pages, right-click the GIGABYTE icon on the taskbar and select Display Properties or right-click on Desktop and then select Properties. Settings (Resolutions and Color depth for adapter and...
Manual
Page 22
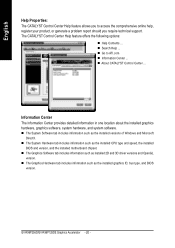
... ... „ Go to access the comprehensive online help, register your product, or generate a problem report should you require technical support. GV-R96P256D/GV-R96P128DE Graphics Accelerator - 20 - English Help Properties: The CATALYST Control Center Help feature allows you to ATI.com „ Information Center ... ... software, system hardware, and system software. „ The System Software tab includes information such as the installed versions of Windows and Microsoft DirectX. „ The System Hardware tab includes information such as the installed CPU type and speed, the installed...
... ... „ Go to access the comprehensive online help, register your product, or generate a problem report should you require technical support. GV-R96P256D/GV-R96P128DE Graphics Accelerator - 20 - English Help Properties: The CATALYST Control Center Help feature allows you to ATI.com „ Information Center ... ... software, system hardware, and system software. „ The System Software tab includes information such as the installed versions of Windows and Microsoft DirectX. „ The System Hardware tab includes information such as the installed CPU type and speed, the installed...
Manual
Page 28
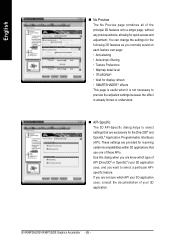
... select settings that use one of the principal 3D features onto a single page, without any preview window, allowing for resolving certain incompatibilities within 3D applications that are know which API your 3D application uses, consult the documentation of API (Direct3D® or OpenGL®) your 3D application. GV-R96P256D/GV-R96P128DE Graphics Accelerator - 26 -
... select settings that use one of the principal 3D features onto a single page, without any preview window, allowing for resolving certain incompatibilities within 3D applications that are know which API your 3D application uses, consult the documentation of API (Direct3D® or OpenGL®) your 3D application. GV-R96P256D/GV-R96P128DE Graphics Accelerator - 26 -
Manual
Page 31
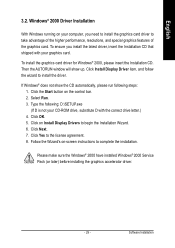
...the graphics card driver to take advantage of the higher performance, resolutions, and special graphics features of the graphics card. Then the AUTORUN window will show the CD automatically, please run following : D:\SETUP.exe (If D is not your CD-ROM drive, substitute D with ... CD that shipped with the correct drive letter.) 4. Select Run. 3. Type the following steps: 1. To install the graphics card driver for Windows® 2000, please insert the Installation CD. Click OK. 5. Click the Start button on -screen instructions to begin the Installation Wizard. 6....
...the graphics card driver to take advantage of the higher performance, resolutions, and special graphics features of the graphics card. Then the AUTORUN window will show the CD automatically, please run following : D:\SETUP.exe (If D is not your CD-ROM drive, substitute D with ... CD that shipped with the correct drive letter.) 4. Select Run. 3. Type the following steps: 1. To install the graphics card driver for Windows® 2000, please insert the Installation CD. Click OK. 5. Click the Start button on -screen instructions to begin the Installation Wizard. 6....
Manual
Page 32
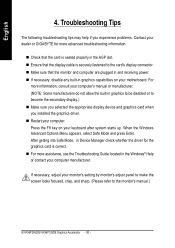
...the appropriate display device and graphics card when you experience problems. Contact your dealer or GIGABYTE for the graphics card is securely fastened to the monitor's manual.) GV-R96P256D/GV-R96P128DE Graphics Accelerator - 30 - Troubleshooting Tips The following troubleshooting tips may help if you ... „ Ensure that the display cable is correct. „ For more assistance, use the Troubleshooting Guide located in the Windows® Help or contact your computer manufacturer. After getting into Safe Mode, in graphics capabilities on your motherboard. English 4. ...
...the appropriate display device and graphics card when you experience problems. Contact your dealer or GIGABYTE for the graphics card is securely fastened to the monitor's manual.) GV-R96P256D/GV-R96P128DE Graphics Accelerator - 30 - Troubleshooting Tips The following troubleshooting tips may help if you ... „ Ensure that the display cable is correct. „ For more assistance, use the Troubleshooting Guide located in the Windows® Help or contact your computer manufacturer. After getting into Safe Mode, in graphics capabilities on your motherboard. English 4. ...
Manual
Page 33
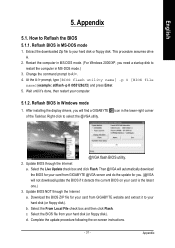
... A. 2. Change the command prompt to restart the computer in Windows mode 1. icon in MS-DOS mode 1. b. Extract the downloaded Zip file to Reflash the BIOS 5.1.1. Select the From Local File check box and then click Flash. Select the BIOS file from GIGABYTE website and extract it detects the current BIOS on -screen...
... A. 2. Change the command prompt to restart the computer in Windows mode 1. icon in MS-DOS mode 1. b. Extract the downloaded Zip file to Reflash the BIOS 5.1.1. Select the From Local File check box and then click Flash. Select the BIOS file from GIGABYTE website and extract it detects the current BIOS on -screen...
Manual
Page 34
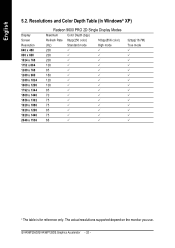
GV-R96P256D/GV-R96P128DE Graphics Accelerator - 32 - Resolutions and Color Depth Table (In Windows® XP) Display Screen Resolution 640 x 480 800 x 600 1024 x 768 1152 x 864 1280 x 768 1280 x 960 1280 x 1024 1600 x 1200 1792 x 1344 1800 x 1440 ...
GV-R96P256D/GV-R96P128DE Graphics Accelerator - 32 - Resolutions and Color Depth Table (In Windows® XP) Display Screen Resolution 640 x 480 800 x 600 1024 x 768 1152 x 864 1280 x 768 1280 x 960 1280 x 1024 1600 x 1200 1792 x 1344 1800 x 1440 ...
