
Manual
Page 3
... 5 2.2. APPENDIX 32 - 3 - DRIVER INSTALLATION 12 3.1.4. PREFACE 4 1.2. HARDWARE INSTALLATION 5 2.1. SOFTWARE INSTALLATION 9 3.1. DIRECTX INSTALLATION 10 3.1.3. TROUBLESHOOTING TIPS 31 5. Table of Content English TABLE OF CONTENTS 1.INTRODUCTION 4 1.1. BOARD LAYOUT 6 2.3. WINDOWS 2000 DRIVER INSTALLATION 30 3.3. OPERATING SYSTEM REQUIREMENT 9 3.1.2. DISPLAY PROPERTIES PAGES 22 3.2. KEY FEATURES 4 2. UTILITIES ON DRIVER CD 15 3.1.5. WINDOWS® 98 /98SE / WINDOWS® ME / WINDOWS® XP DRIVER AND UTILITIES...
... 5 2.2. APPENDIX 32 - 3 - DRIVER INSTALLATION 12 3.1.4. PREFACE 4 1.2. HARDWARE INSTALLATION 5 2.1. SOFTWARE INSTALLATION 9 3.1. DIRECTX INSTALLATION 10 3.1.3. TROUBLESHOOTING TIPS 31 5. Table of Content English TABLE OF CONTENTS 1.INTRODUCTION 4 1.1. BOARD LAYOUT 6 2.3. WINDOWS 2000 DRIVER INSTALLATION 30 3.3. OPERATING SYSTEM REQUIREMENT 9 3.1.2. DISPLAY PROPERTIES PAGES 22 3.2. KEY FEATURES 4 2. UTILITIES ON DRIVER CD 15 3.1.5. WINDOWS® 98 /98SE / WINDOWS® ME / WINDOWS® XP DRIVER AND UTILITIES...

Manual
Page 9
...-ROM drive, you install the GV-R92128TE drivers for the motherboard, which consist of Win® 98/98SE / WINDOWS® 2000 / Win® ME / Win® XP drivers is Microsoft Windows, when loading the GV-R92128TE drivers for the system, please make sure your motherboard nearest dealer for your GV-R92128TE driver (Please follow guides to setup your GV-R92128TE graphics accelerator. 3.1.1. Operating system...
...-ROM drive, you install the GV-R92128TE drivers for the motherboard, which consist of Win® 98/98SE / WINDOWS® 2000 / Win® ME / Win® XP drivers is Microsoft Windows, when loading the GV-R92128TE drivers for the system, please make sure your motherboard nearest dealer for your GV-R92128TE driver (Please follow guides to setup your GV-R92128TE graphics accelerator. 3.1.1. Operating system...
Manual
Page 10
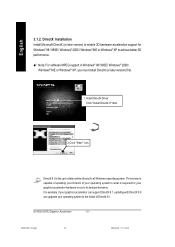
... the fullset of your DirectX of DirectX 8.1. DirectX 9.0 is required for all Windows operating system. GV-R92128TE Graphics Accelerator - 10 - M Note: For software MPEG support in Windows® 98/ 98SE/ Windows® 2000 / Windows® ME or Windows® XP, you must install DirectX (or later version) first. 1. Install DirectX Driver: Click "Install DirectX 9" Item. 2.Click "Next" icon.
... the fullset of your DirectX of DirectX 8.1. DirectX 9.0 is required for all Windows operating system. GV-R92128TE Graphics Accelerator - 10 - M Note: For software MPEG support in Windows® 98/ 98SE/ Windows® 2000 / Windows® ME or Windows® XP, you must install DirectX (or later version) first. 1. Install DirectX Driver: Click "Install DirectX 9" Item. 2.Click "Next" icon.
Manual
Page 12
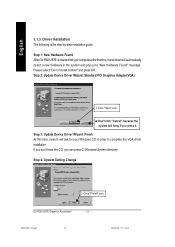
...Click "Finish" icon. GV-R92128TE Graphics Accelerator - 12 - English 3.1.3. Step 2: Update Device Driver Wizard: Standard PCI Graphics Adapter(VGA) 1.Click "Next" icon. Driver Installation The following is the step-by-step installation guide. Step 1: New Hardware Found AfterGV-R92128TE isinsertedintoyourcomputerat thefirst time, thewindowswill...in order to complete the VGA driver installation. MDon't click "Cancel", because the system will ask for your Windows CD in the system and pop out a "New Hardware Found" message. Step 3: Update Device Driver Wizard: Finish At this time, ...
...Click "Finish" icon. GV-R92128TE Graphics Accelerator - 12 - English 3.1.3. Step 2: Update Device Driver Wizard: Standard PCI Graphics Adapter(VGA) 1.Click "Next" icon. Driver Installation The following is the step-by-step installation guide. Step 1: New Hardware Found AfterGV-R92128TE isinsertedintoyourcomputerat thefirst time, thewindowswill...in order to complete the VGA driver installation. MDon't click "Cancel", because the system will ask for your Windows CD in the system and pop out a "New Hardware Found" message. Step 3: Update Device Driver Wizard: Finish At this time, ...
Manual
Page 13
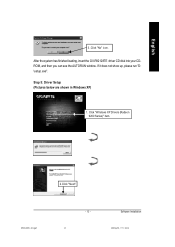
Click "Windows XP Drivers (Radeon 9200 Series)" item. 2.Click "Next". - 13 - If it does not show up, please run "D: \setup.exe". Software Installation Step 5: Driver Setup (Pictures below are shown in Windows XP) 1. English 3..Click "No" icon. After the system has finished loading, insert the GV-R92128TE driver CD disk into your CDROM, and then you can see the AUTORUN window.
Click "Windows XP Drivers (Radeon 9200 Series)" item. 2.Click "Next". - 13 - If it does not show up, please run "D: \setup.exe". Software Installation Step 5: Driver Setup (Pictures below are shown in Windows XP) 1. English 3..Click "No" icon. After the system has finished loading, insert the GV-R92128TE driver CD disk into your CDROM, and then you can see the AUTORUN window.

Manual
Page 21
.... 1.Using Single Display HYDRAVISION™ HYDRAVISION™ and the Desktop Manager are activated whenever Windows® starts. HYDRAVISION™ installation enables the Desktop Manager and creates a Windows® program group for multiple monitor settings. Clicking this software. Click on the taskbar's status... area. A RADEON 9200 with only one display output can still take advantage of the many features of the display drivers, you will find...
.... 1.Using Single Display HYDRAVISION™ HYDRAVISION™ and the Desktop Manager are activated whenever Windows® starts. HYDRAVISION™ installation enables the Desktop Manager and creates a Windows® program group for multiple monitor settings. Clicking this software. Click on the taskbar's status... area. A RADEON 9200 with only one display output can still take advantage of the many features of the display drivers, you will find...
Manual
Page 22
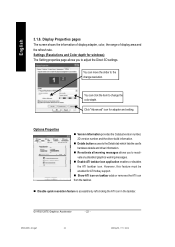
..., this feature must be enabled for windows) The Setting properties page allows you to reactivate any disabled graphics warning messages. Options Properties n Version Information provides the Catalyst version number, 2D version number and the driver build information. You can click the item...the slider to change resolution. GV-R92128TE Graphics Accelerator - 22 - Settings (Resolutions and Color depth for ATI hotkey support. n Re-activate all warning messages allows you to the Details tab which lists the card's hardware details and driver information. n Disable quick resolution...
..., this feature must be enabled for windows) The Setting properties page allows you to reactivate any disabled graphics warning messages. Options Properties n Version Information provides the Catalyst version number, 2D version number and the driver build information. You can click the item...the slider to change resolution. GV-R92128TE Graphics Accelerator - 22 - Settings (Resolutions and Color depth for ATI hotkey support. n Re-activate all warning messages allows you to the Details tab which lists the card's hardware details and driver information. n Disable quick resolution...
Manual
Page 30
...: MNote: Please download the newest BIOS from our website (www.gigabyte.com.tw) or contact your local dealer for Windows® 2000: 1. Click "OK". 6. MIf you need to install the GV-R92128TE driver to the license agreement. 9. WINDOWS 2000 DRIVER INSTALLATION Please make sure the Windows 2000 have installed Windows ® 2000 Service Pack version 2 (or later) before installing...
...: MNote: Please download the newest BIOS from our website (www.gigabyte.com.tw) or contact your local dealer for Windows® 2000: 1. Click "OK". 6. MIf you need to install the GV-R92128TE driver to the license agreement. 9. WINDOWS 2000 DRIVER INSTALLATION Please make sure the Windows 2000 have installed Windows ® 2000 Service Pack version 2 (or later) before installing...
Manual
Page 31
...until the Microsoft® Windows® Startup Menu appears on your computer's manual or manufacturer. (NOTE: Some manufacturers do not allow the built-in and receiving power. Then select the number for duplicate display adapter and monitor entries if you installed the graphics driver. n Check that the... card is securely fastened to bring up the Microsoft Windows® Startup Menu.) In Safe Mode, bring up the Device Manager and check for Safe Mode,...
...until the Microsoft® Windows® Startup Menu appears on your computer's manual or manufacturer. (NOTE: Some manufacturers do not allow the built-in and receiving power. Then select the number for duplicate display adapter and monitor entries if you installed the graphics driver. n Check that the... card is securely fastened to bring up the Microsoft Windows® Startup Menu.) In Safe Mode, bring up the Device Manager and check for Safe Mode,...

