
Manual
Page 1
... author assumes no responsibility for home and other intellectual property rights. Use of this manual. AMD Graphics Accelerator User's Manual Rev. 101 Copyright © 2012 GIGABYTE TECHNOLOGY CO., LTD Copyright by Rovi Corporation. No part of this document nor does the author make a commitment to rapid change in technology, some of...
... author assumes no responsibility for home and other intellectual property rights. Use of this manual. AMD Graphics Accelerator User's Manual Rev. 101 Copyright © 2012 GIGABYTE TECHNOLOGY CO., LTD Copyright by Rovi Corporation. No part of this document nor does the author make a commitment to rapid change in technology, some of...
Manual
Page 2
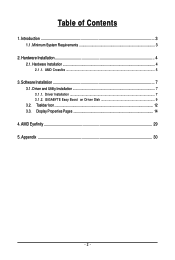
Minimum System Requirements 3 2. Hardware Installation ...4 2.1.1. Driver and Utility Installation 7 3.1.1. GIGABYTE Easy Boost on Driver Disk 9 3.2. Taskbar Icon ...12 3.3. Hardware Installation 4 2.1. Table of Contents 1. Appendix ...30 - 2 - Driver Installation ...7 3.1.2. Software Installation ...7 3.1. Display Properties Pages 14 4. Introduction ...3 1.1. AMD Eyefinity ...29 5. AMD Crossfire ...5 3.
Minimum System Requirements 3 2. Hardware Installation ...4 2.1.1. Driver and Utility Installation 7 3.1.1. GIGABYTE Easy Boost on Driver Disk 9 3.2. Taskbar Icon ...12 3.3. Hardware Installation 4 2.1. Table of Contents 1. Appendix ...30 - 2 - Driver Installation ...7 3.1.2. Software Installation ...7 3.1. Display Properties Pages 14 4. Introduction ...3 1.1. AMD Eyefinity ...29 5. AMD Crossfire ...5 3.

Manual
Page 3
Introduction 1.1. Minimum System Requirements • Hardware - Intel® Pentium® 4 / CoreTM 2 or AMD AthlonTM / PhenomTM - 1 GB or more of system memory for software installation (CD-ROM or DVD-ROM drive) • Operating System - Windows® XP with Service Pack 2 (SP2) - Windows® 7 - Optical drive for best performance - Introduction Windows® Vista - Windows® XP Professional x64 Edition - 3 - 1.
Introduction 1.1. Minimum System Requirements • Hardware - Intel® Pentium® 4 / CoreTM 2 or AMD AthlonTM / PhenomTM - 1 GB or more of system memory for software installation (CD-ROM or DVD-ROM drive) • Operating System - Windows® XP with Service Pack 2 (SP2) - Windows® 7 - Optical drive for best performance - Introduction Windows® Vista - Windows® XP Professional x64 Edition - 3 - 1.
Manual
Page 4
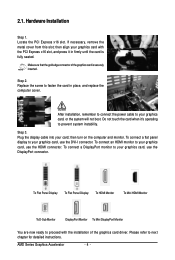
Locate the PCI Express x16 slot. If necessary, remove the metal cover from this slot; Step 2. To connect a DisplayPort monitor to your card; Hardware Installation Step 1. then align your graphics card, use the HDMI connector. Replace the screw to prevent system instability. After installation, remember to connect the power cable to your graphics card with the installation of the graphics card is fully seated. Step 3. then turn on the computer and monitor. Make sure that the gold edge connector of the graphics card driver. To connect an HDMI monitor to proceed with...
Locate the PCI Express x16 slot. If necessary, remove the metal cover from this slot; Step 2. To connect a DisplayPort monitor to your card; Hardware Installation Step 1. then align your graphics card, use the HDMI connector. Replace the screw to prevent system instability. After installation, remember to connect the power cable to your graphics card with the installation of the graphics card is fully seated. Step 3. then turn on the computer and monitor. Make sure that the gold edge connector of the graphics card driver. To connect an HDMI monitor to proceed with...
Manual
Page 5
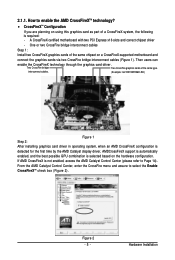
... card driver. From the AMD Catalyst Control Center, enter the CrossFire menu and assure to select the Enable CrossFireXTM check box (Figure 2). interconnect cables. (Example: GV-RX195P256D-RH) Figure 1 Step 2: After installing graphics card driver in operating system, when an AMD CrossFireX configuration is detected for the first time by the...
... card driver. From the AMD Catalyst Control Center, enter the CrossFire menu and assure to select the Enable CrossFireXTM check box (Figure 2). interconnect cables. (Example: GV-RX195P256D-RH) Figure 1 Step 2: After installing graphics card driver in operating system, when an AMD CrossFireX configuration is detected for the first time by the...

Manual
Page 6
...or the external sound card to be the default Sound Playback device to a metal object, such as the anti-static mat. Using non-official GIGABYTE BIOS might cause problem(s) on the bag that your hands to a safely grounded object or to obtain audio output from static electricity, you ...can work on your computer and unplug power supply. 2. To protect them against damage from your card. If you work correctly, please use official GIGABYTE BIOS only. Place components on a grounded antistatic pad or on the graphics card. In order to ensure that came with the components whenever the...
...or the external sound card to be the default Sound Playback device to a metal object, such as the anti-static mat. Using non-official GIGABYTE BIOS might cause problem(s) on the bag that your hands to a safely grounded object or to obtain audio output from static electricity, you ...can work on your computer and unplug power supply. 2. To protect them against damage from your card. If you work correctly, please use official GIGABYTE BIOS only. Place components on a grounded antistatic pad or on the graphics card. In order to ensure that came with the components whenever the...
Manual
Page 7
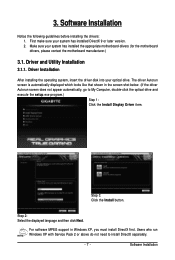
Software Installation Notice the following guidelines before installing the drivers: 1. Users who run Windows XP with Service Pack 2 or above do not need to My Computer, double-click the optical drive and execute the setup.exe program.) Step 1: Click the Install Display Driver item. 3. Software Installation For software MPEG support in the screen shot below. (If the driver Autorun screen does not appear automatically, go to install DirectX separately. - 7 - Make sure your optical drive. The driver Autorun screen is automatically displayed which looks like that shown in ...
Software Installation Notice the following guidelines before installing the drivers: 1. Users who run Windows XP with Service Pack 2 or above do not need to My Computer, double-click the optical drive and execute the setup.exe program.) Step 1: Click the Install Display Driver item. 3. Software Installation For software MPEG support in the screen shot below. (If the driver Autorun screen does not appear automatically, go to install DirectX separately. - 7 - Make sure your optical drive. The driver Autorun screen is automatically displayed which looks like that shown in ...
Manual
Page 8
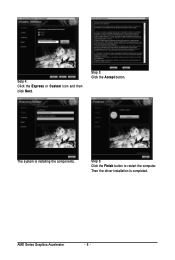
Then the driver installation is installing the components. The system is completed. AMD Series Graphics Accelerator - 8 - Step 6: Click the Finish button to restart the computer. Setp 4: Click the Express or Custom icon and then click Next. Step 5: Click the Accept button.
Then the driver installation is installing the components. The system is completed. AMD Series Graphics Accelerator - 8 - Step 6: Click the Finish button to restart the computer. Setp 4: Click the Express or Custom icon and then click Next. Step 5: Click the Accept button.
Manual
Page 9
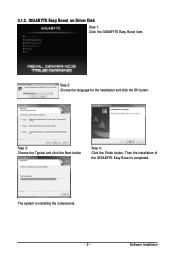
GIGABYTE Easy Boost on Driver Disk Step 1: Click the GIGABYTE Easy Boost item. Then the installation of the GIGABYTE Easy Boost is installing the components. - 9 - The system is completed. Step 2: Choose the language for the installation and click the OK button. 3.1.2. Step 3: Choose the Typical and click the Next button Step 4: Click the Finish button. Software Installation
GIGABYTE Easy Boost on Driver Disk Step 1: Click the GIGABYTE Easy Boost item. Then the installation of the GIGABYTE Easy Boost is installing the components. - 9 - The system is completed. Step 2: Choose the language for the installation and click the OK button. 3.1.2. Step 3: Choose the Typical and click the Next button Step 4: Click the Finish button. Software Installation
Manual
Page 10
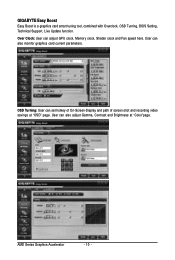
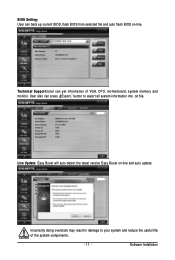
AMD Series Graphics Accelerator - 10 - GIGABYTE Easy Boost Easy Boost is a graphics card smart tuning tool, combined with Overclock, OSD Turning, BIOS Setting, Technical Support, Live Update function. Over Clock: User can also monitor graphics card current parameters. OSD Turning: User can also adjust Gamma, Contrast and Brightness at "OSD" page. User can adjust GPU clock, Memory clock, Shader clock and Fan speed here. User can set hotkey of On-Screen-Display and path of screen shot and recording video savings at "Color"page.
AMD Series Graphics Accelerator - 10 - GIGABYTE Easy Boost Easy Boost is a graphics card smart tuning tool, combined with Overclock, OSD Turning, BIOS Setting, Technical Support, Live Update function. Over Clock: User can also monitor graphics card current parameters. OSD Turning: User can also adjust Gamma, Contrast and Brightness at "OSD" page. User can adjust GPU clock, Memory clock, Shader clock and Fan speed here. User can set hotkey of On-Screen-Display and path of screen shot and recording video savings at "Color"page.
Manual
Page 11
User also can get information of the system components. - 11 - Incorrectly doing overclock may result in damage to export all system information into .txt file. Live Update: Easy Boost will auto detect the latest version Easy Boost on -line. Technical Support:User can press ¡§Export¡¨ button to your system and reduce the useful life of VGA, CPU, motherboard, system memory and monitor. Software Installation BIOS Setting: User can back up current BIOS, flash BIOS from selected file and auto flash BIOS on -line and auto update.
User also can get information of the system components. - 11 - Incorrectly doing overclock may result in damage to export all system information into .txt file. Live Update: Easy Boost will auto detect the latest version Easy Boost on -line. Technical Support:User can press ¡§Export¡¨ button to your system and reduce the useful life of VGA, CPU, motherboard, system memory and monitor. Software Installation BIOS Setting: User can back up current BIOS, flash BIOS from selected file and auto flash BIOS on -line and auto update.
Manual
Page 12
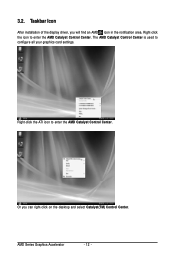
Taskbar Icon After installation of the display driver, you can right-click on the desktop and select Catalyst(TM) Control Center. AMD Series Graphics Accelerator - 12 - Right-click the ATI icon to enter the AMD Catalyst Control Center. Right-click the icon to enter the AMD Catalyst Control Center. The AMD Catalyst Control Center is used to configure all your graphics card settings. Or you will find an AMD icon in the notification area. 3.2.
Taskbar Icon After installation of the display driver, you can right-click on the desktop and select Catalyst(TM) Control Center. AMD Series Graphics Accelerator - 12 - Right-click the ATI icon to enter the AMD Catalyst Control Center. Right-click the icon to enter the AMD Catalyst Control Center. The AMD Catalyst Control Center is used to configure all your graphics card settings. Or you will find an AMD icon in the notification area. 3.2.
Manual
Page 13
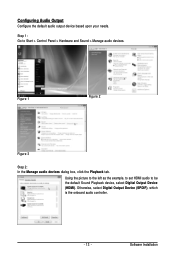
Using the picture to the left as the example, to set HDMI audio to Start > Control Panel > Hardware and Sound > Manage audio devices. Otherwise, select Digital Output Device (SPDIF), which is the onboard audio controller. - 13 - Configuring Audio Output Configure the default audio output device based upon your needs. Step 1: Go to be the default Sound Playback device, select Digital Output Device (HDMI). Figure 1 Figure 2 Figure 3 Step 2: In the Manage audio devices dialog box, click the Playback tab. Software Installation
Using the picture to the left as the example, to set HDMI audio to Start > Control Panel > Hardware and Sound > Manage audio devices. Otherwise, select Digital Output Device (SPDIF), which is the onboard audio controller. - 13 - Configuring Audio Output Configure the default audio output device based upon your needs. Step 1: Go to be the default Sound Playback device, select Digital Output Device (HDMI). Figure 1 Figure 2 Figure 3 Step 2: In the Manage audio devices dialog box, click the Playback tab. Software Installation

Manual
Page 14
Click the Advanced button for Windows) To access Display Settings page, right-click on desktop and select Personalize, then the Personalization windows will show up. You can click the item to change the resolution. 3.3. Select Display Settings to change the color quality. AMD Series Graphics Accelerator - 14 - You can move the slider to adjust the screen resolution and color quality settings. Display Properties Pages Display Settings (Resolutions and Color Quality for advanced settings.
Click the Advanced button for Windows) To access Display Settings page, right-click on desktop and select Personalize, then the Personalization windows will show up. You can click the item to change the resolution. 3.3. Select Display Settings to change the color quality. AMD Series Graphics Accelerator - 14 - You can move the slider to adjust the screen resolution and color quality settings. Display Properties Pages Display Settings (Resolutions and Color Quality for advanced settings.
Manual
Page 15
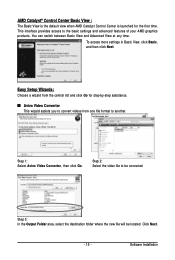
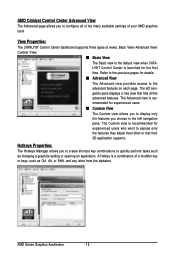
Step 2: Select the video file to be located. You can switch between Basic View and Advanced View at any time. AMD Catalyst® Control Center Basic View : The Basic View is the default view when AMD Catalyst Control Center is launched for step-by-step assistance. „ Avivo Video Converter This wizard assists you to convert videos from the central list and click Go for the first time. Click Next. - 15 - This interface provides access to the basic settings and advanced features of your AMD graphics products. Step 1: Select Avivo Video Converter, then click Go. Easy ...
Step 2: Select the video file to be located. You can switch between Basic View and Advanced View at any time. AMD Catalyst® Control Center Basic View : The Basic View is the default view when AMD Catalyst Control Center is launched for step-by-step assistance. „ Avivo Video Converter This wizard assists you to convert videos from the central list and click Go for the first time. Click Next. - 15 - This interface provides access to the basic settings and advanced features of your AMD graphics products. Step 1: Select Avivo Video Converter, then click Go. Easy ...
Manual
Page 16
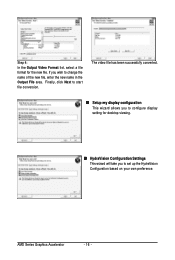
The video file has been successfully converted. „ Setup my display configuration This wizard allows you to configure display setting for the new file. Finally, click Next to change the name of the new file, enter the new name in the Output File area. AMD Series Graphics Accelerator - 16 - If you wish to start file conversion. Step 4: In the Output Video Format list, select a file format for desktop viewing. „ HydraVision Configuration Settings This wizard will take you to set up the HydraVision Configuration based on your own preference.
The video file has been successfully converted. „ Setup my display configuration This wizard allows you to configure display setting for the new file. Finally, click Next to change the name of the new file, enter the new name in the Output File area. AMD Series Graphics Accelerator - 16 - If you wish to start file conversion. Step 4: In the Output Video Format list, select a file format for desktop viewing. „ HydraVision Configuration Settings This wizard will take you to set up the HydraVision Configuration based on your own preference.
Manual
Page 17
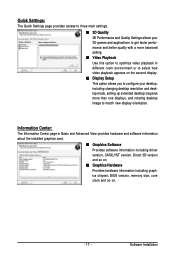
Information Center: The Information Center page in Basic and Advanced View provides hardware and software information about the installed graphics card. „ Graphics Software Provides software information including driver version, CATALYST version, Direct 3D version and so on. „ Graphics Hardware Provides hardware information including graphics chipset, BIOS version, memory size, core clock and so on the second display. „ Display Setup This option allows you to configure your 3D games and applications to get faster performance and better quality with a more balanced setting...
Information Center: The Information Center page in Basic and Advanced View provides hardware and software information about the installed graphics card. „ Graphics Software Provides software information including driver version, CATALYST version, Direct 3D version and so on. „ Graphics Hardware Provides hardware information including graphics chipset, BIOS version, memory size, core clock and so on the second display. „ Display Setup This option allows you to configure your 3D games and applications to get faster performance and better quality with a more balanced setting...
Manual
Page 18
LYST Control Center is recommended for experienced users. „ Custom View The Custom view allows you to display only the features you choose in the left navi- The left navigation pane. The Custom view is launched for details. „ Advanced View The Advanced view provides access to the advanced features on each page. gation pane displays a tree view that their 3D application supports. The Advanced view is the default view when CATA- ommended for experienced users who want to expose only the features they adjust most often or that lists all of the many ...
LYST Control Center is recommended for experienced users. „ Custom View The Custom view allows you to display only the features you choose in the left navi- The left navigation pane. The Custom view is launched for details. „ Advanced View The Advanced view provides access to the advanced features on each page. gation pane displays a tree view that their 3D application supports. The Advanced view is the default view when CATA- ommended for experienced users who want to expose only the features they adjust most often or that lists all of the many ...
Manual
Page 19
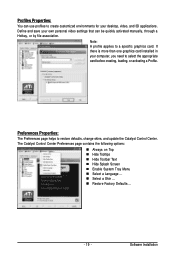
Preferences Properties: The Preferences page helps to a specific graphics card. If there is more than one graphics card installed in your desktop, video, and 3D applications. Define and save your own personal video settings that can use profiles to create customized environments for your computer, you need to select the appropriate card before creating, loading, or activating a Profile. Profiles Properties: You can be quickly activated manually, through a Hotkey, or by file association. The Catalyst Control Center Preferences page contains the following options: „ Always on ...
Preferences Properties: The Preferences page helps to a specific graphics card. If there is more than one graphics card installed in your desktop, video, and 3D applications. Define and save your own personal video settings that can use profiles to create customized environments for your computer, you need to select the appropriate card before creating, loading, or activating a Profile. Profiles Properties: You can be quickly activated manually, through a Hotkey, or by file association. The Catalyst Control Center Preferences page contains the following options: „ Always on ...
Manual
Page 20
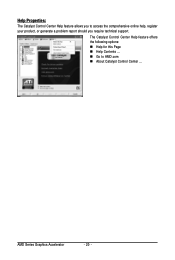
The Catalyst Control Center Help feature offers the following options: „ Help for this Page „ Help Contents ... „ Go to access the comprehensive online help, register your product, or generate a problem report should you require technical support. AMD Series Graphics Accelerator - 20 - Help Properties: The Catalyst Control Center Help feature allows you to AMD.com „ About Catalyst Control Center ...
The Catalyst Control Center Help feature offers the following options: „ Help for this Page „ Help Contents ... „ Go to access the comprehensive online help, register your product, or generate a problem report should you require technical support. AMD Series Graphics Accelerator - 20 - Help Properties: The Catalyst Control Center Help feature allows you to AMD.com „ About Catalyst Control Center ...