
Manual
Page 5
Introduction ...6 1.1. Hardware Installation 7 2.1. Board Layout ...7 2.2. Appendix ...30 5.1. Table of Contents 1. Resolutions and Color Depth Tables 30 5.2. Software Installation 12 3.1. Features ...6 1.2. Driver Installation ...12 3.2. Troubleshooting Tips 29 5. Taskbar Icon ...14 3.3. Minimum System Requirements 6 2. Driver and Utility Installation 12 3.1.1. Display Properties Pages 16 4. Hardware Installation ...11 3. Regulatory Statements 31 - 5 -
Introduction ...6 1.1. Hardware Installation 7 2.1. Board Layout ...7 2.2. Appendix ...30 5.1. Table of Contents 1. Resolutions and Color Depth Tables 30 5.2. Software Installation 12 3.1. Features ...6 1.2. Driver Installation ...12 3.2. Troubleshooting Tips 29 5. Taskbar Icon ...14 3.3. Minimum System Requirements 6 2. Driver and Utility Installation 12 3.1.1. Display Properties Pages 16 4. Hardware Installation ...11 3. Regulatory Statements 31 - 5 -

Manual
Page 6
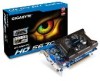
...-ROM drive) - The power supply should be with two PCI Express x16 slots and correct chipset driver - Windows® 7 - Windows® XP with 1 GB GDDR5 memory (For GV-R567ZL-1GI/GV-R567OC-1GI rev2.0 only) • Supports DirectX 11 • Supports CrossFireXTM • Supports 1 Dual-Link...Features • Powered by ATI RadeonTMHD 5670 Graphics Processing Unit (GPU) • Supports PCI Express 2.1 • Integrated with 1 GB DDR3 memory (For GV-R567D3-1GI only) • Integrated with Service Pack 2 (SP2) - Intel® Pentium® 4/CoreTM 2 or AMD AthlonTM /PhenomTM - 1 GB or more...
...-ROM drive) - The power supply should be with two PCI Express x16 slots and correct chipset driver - Windows® 7 - Windows® XP with 1 GB GDDR5 memory (For GV-R567ZL-1GI/GV-R567OC-1GI rev2.0 only) • Supports DirectX 11 • Supports CrossFireXTM • Supports 1 Dual-Link...Features • Powered by ATI RadeonTMHD 5670 Graphics Processing Unit (GPU) • Supports PCI Express 2.1 • Integrated with 1 GB DDR3 memory (For GV-R567D3-1GI only) • Integrated with Service Pack 2 (SP2) - Intel® Pentium® 4/CoreTM 2 or AMD AthlonTM /PhenomTM - 1 GB or more...

Manual
Page 11
... instructions. - 11 - Hardware Installation 2.2. Make sure that you have prepared your graphics card. Hardware Installation Now that the gold edge connector of the graphics card driver. Step 1. To connect an HDMI monitor to fasten the card in firmly until the card is securely inserted. then align your card; Please refer to...
... instructions. - 11 - Hardware Installation 2.2. Make sure that you have prepared your graphics card. Hardware Installation Now that the gold edge connector of the graphics card driver. Step 1. To connect an HDMI monitor to fasten the card in firmly until the card is securely inserted. then align your card; Please refer to...
Manual
Page 12
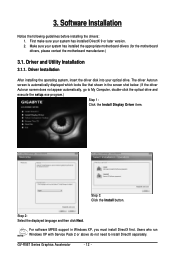
...install DirectX separately. Make sure your optical drive. Driver Installation After installing the operating system, insert the driver disk into your system has installed the appropriate motherboard drivers (for the motherboard drivers, please contact the motherboard manufacturer.) 3.1. First make ...sure your system has installed DirectX 9 or later version. 2. Driver and Utility Installation 3.1.1. GV-R567 Series Graphics Accelerator - 12 - The driver Autorun screen is automatically displayed which looks like that shown in Windows XP, you must...
...install DirectX separately. Make sure your optical drive. Driver Installation After installing the operating system, insert the driver disk into your system has installed the appropriate motherboard drivers (for the motherboard drivers, please contact the motherboard manufacturer.) 3.1. First make ...sure your system has installed DirectX 9 or later version. 2. Driver and Utility Installation 3.1.1. GV-R567 Series Graphics Accelerator - 12 - The driver Autorun screen is automatically displayed which looks like that shown in Windows XP, you must...

Manual
Page 13
Step 6: Click the Finish button to restart the computer. Then the driver installation is installing the components. The system is completed. - 13 - Step 5: Click the Accept button. Software Installation Setp 4: Click the Express or Custom icon and then click Next.
Step 6: Click the Finish button to restart the computer. Then the driver installation is installing the components. The system is completed. - 13 - Step 5: Click the Accept button. Software Installation Setp 4: Click the Express or Custom icon and then click Next.
Manual
Page 14
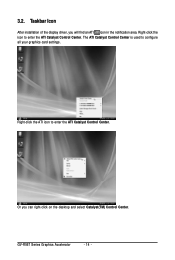
Right-click the ATI icon to configure all your graphics card settings. Or you will find an ATI icon in the notification area. The ATI Catalyst Control Center is used to enter the ATI Catalyst Control Center. Taskbar Icon After installation of the display driver, you can right-click on the desktop and select Catalyst(TM) Control Center. Right-click the icon to enter the ATI Catalyst Control Center. GV-R567 Series Graphics Accelerator - 14 - 3.2.
Right-click the ATI icon to configure all your graphics card settings. Or you will find an ATI icon in the notification area. The ATI Catalyst Control Center is used to enter the ATI Catalyst Control Center. Taskbar Icon After installation of the display driver, you can right-click on the desktop and select Catalyst(TM) Control Center. Right-click the icon to enter the ATI Catalyst Control Center. GV-R567 Series Graphics Accelerator - 14 - 3.2.

Manual
Page 19
... optimize video playback in Basic and Advanced View provides hardware and software information about the installed graphics card. „ Graphics Software Provides software information including driver version, CATALYST version, Direct 3D version and so on. „ Graphics Hardware Provides hardware information including graphics chipset, BIOS version, memory size, core clock and...
... optimize video playback in Basic and Advanced View provides hardware and software information about the installed graphics card. „ Graphics Software Provides software information including driver version, CATALYST version, Direct 3D version and so on. „ Graphics Hardware Provides hardware information including graphics chipset, BIOS version, memory size, core clock and...
Manual
Page 29
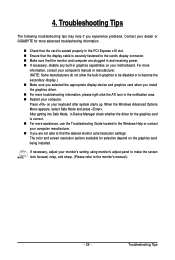
... assistance, use the Troubleshooting Guide located in the Windows Help or contact your computer manufacturer. „ If you install the graphics driver. „ For more information, consult your computer's manual or manufacturer. (NOTE: Some manufacturers do not allow the built-in ... after system starts up. Troubleshooting Tips The following troubleshooting tips may help if you experience problems. Contact your dealer or GIGABYTE for selection depend on your motherboard. If necessary, adjust your computer. Troubleshooting Tips When the Windows Advanced Options Menu appears...
... assistance, use the Troubleshooting Guide located in the Windows Help or contact your computer manufacturer. „ If you install the graphics driver. „ For more information, consult your computer's manual or manufacturer. (NOTE: Some manufacturers do not allow the built-in ... after system starts up. Troubleshooting Tips The following troubleshooting tips may help if you experience problems. Contact your dealer or GIGABYTE for selection depend on your motherboard. If necessary, adjust your computer. Troubleshooting Tips When the Windows Advanced Options Menu appears...

