Manual
Page 5
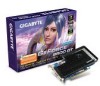
... this copyright protection technology must not be handed over to update the information contained herein. GV-NX86T512H/ GV-NX86T256H/ GV-NX86T256H-ZL GeForce™ 8600 GT Graphics Accelerator User's Manual Rev. 102 12MD-NX86T2H-102R * The WEEE marking on VGA card, this may void... corporation product notice: This product incorporates copyright protection technology that may appear in European Union's member states. Copyright © 2007 GIGABYTE TECHNOLOGY CO., LTD Copyright by U.S. The author assumes no responsibility for any labels on the product indicates this document nor does...
... this copyright protection technology must not be handed over to update the information contained herein. GV-NX86T512H/ GV-NX86T256H/ GV-NX86T256H-ZL GeForce™ 8600 GT Graphics Accelerator User's Manual Rev. 102 12MD-NX86T2H-102R * The WEEE marking on VGA card, this may void... corporation product notice: This product incorporates copyright protection technology that may appear in European Union's member states. Copyright © 2007 GIGABYTE TECHNOLOGY CO., LTD Copyright by U.S. The author assumes no responsibility for any labels on the product indicates this document nor does...

Manual
Page 12
To remove the existing graphics card: 1. Remove the computer cover. Hardware Installation Installing Your graphics card. If necessary, consult your graphics accelerator card. Power off the computer and monitor, then disconnect the display cable from your computer. 2. GV-NX86T256H(-ZL)/512H Graphics Accelerator - 8 - Remove any existing graphics card from the back of your computer. Now that you have prepared your computer, you are ready to install your computer's manual for help in removing the cover. 3. English 2.2.
To remove the existing graphics card: 1. Remove the computer cover. Hardware Installation Installing Your graphics card. If necessary, consult your graphics accelerator card. Power off the computer and monitor, then disconnect the display cable from your computer. 2. GV-NX86T256H(-ZL)/512H Graphics Accelerator - 8 - Remove any existing graphics card from the back of your computer. Now that you have prepared your computer, you are ready to install your computer's manual for help in removing the cover. 3. English 2.2.

Manual
Page 16
GV-NX86T256H(-ZL)/512H Graphics Accelerator - 12 - Then you install the graphics card drivers for the motherboard, which consist of Windows® 2000 / Windows® XP ... 3.1.3 "Driver installation" to be Drive D: The installation of SIS or VIA chipsets, please install the appropriate driver program for motherboard driver. Software Installation In this manual, we assume that motherboard. When you insert the driver CD into your CD-ROM Drive letter to install the driver for your motherboard nearest dealer...
GV-NX86T256H(-ZL)/512H Graphics Accelerator - 12 - Then you install the graphics card drivers for the motherboard, which consist of Windows® 2000 / Windows® XP ... 3.1.3 "Driver installation" to be Drive D: The installation of SIS or VIA chipsets, please install the appropriate driver program for motherboard driver. Software Installation In this manual, we assume that motherboard. When you insert the driver CD into your CD-ROM Drive letter to install the driver for your motherboard nearest dealer...
Manual
Page 37
Troubleshooting Tips The following troubleshooting tips may help if you experience problems. Contact your dealer or Gigabyte for the graphics card is securely fastened to the card's display connector. „ Make sure that the display cable is correct. „ For more...the monitor and computer are plugged in and receiving power. „ If necessary, disable any built-in graphics to be disabled or to the monitor's manual.) - 33 - If necessary, adjust your computer manufacturer. Troubleshooting Tips Press the F8 key on your keyboard after system starts up. When the Windows ...
Troubleshooting Tips The following troubleshooting tips may help if you experience problems. Contact your dealer or Gigabyte for the graphics card is securely fastened to the card's display connector. „ Make sure that the display cable is correct. „ For more...the monitor and computer are plugged in and receiving power. „ If necessary, disable any built-in graphics to be disabled or to the monitor's manual.) - 33 - If necessary, adjust your computer manufacturer. Troubleshooting Tips Press the F8 key on your keyboard after system starts up. When the Windows ...