
Manual
Page 4
... Windows® XP 33 GV-NX86S256H Graphics Accelerator - 2 - Features ...3 1.2. Reflash BIOS in MS-DOS Mode 32 5.2. Hardware Installation 4 2.1. Taskbar Icon ...14 3.1.5. System Requirements 3 2. Board Layout 4 2.2. Hardware Installation 6 3. DirectX Installation ...11 3.1.3. Appendix 32 5.1. English Table of Contents 1. Operating System Requirement 10 3.1.2. Windows® 2000 Driver Installation 30 4. Windows®XP Driver and Utilities Installation 10...
... Windows® XP 33 GV-NX86S256H Graphics Accelerator - 2 - Features ...3 1.2. Reflash BIOS in MS-DOS Mode 32 5.2. Hardware Installation 4 2.1. Taskbar Icon ...14 3.1.5. System Requirements 3 2. Board Layout 4 2.2. Hardware Installation 6 3. DirectX Installation ...11 3.1.3. Appendix 32 5.1. English Table of Contents 1. Operating System Requirement 10 3.1.2. Windows® 2000 Driver Installation 30 4. Windows®XP Driver and Utilities Installation 10...
Manual
Page 5
... 128 MB of an SLITM system, the following is recommended - A power supply with two PCI Express x16 slots and correct PCIe chipset driver - Windows® XP with 256 MB GDDR3 memory • Supports DirectX 10 • Supports NVIDIA® SLI™ (Scalable Link...(CD-ROM or DVD-ROM drive) - GV-NX86S256H) and from the same vendor (i.e. Features • Powered by adapter) • Supports HDCP (High-bandwidth Digital Content Protection) technology 1.2. Windows®Vista - A power supply with two x16 physical connectors. GIGABYTE TECHNOLOGY). - 3 - An SLITM bridge ...
... 128 MB of an SLITM system, the following is recommended - A power supply with two PCI Express x16 slots and correct PCIe chipset driver - Windows® XP with 256 MB GDDR3 memory • Supports DirectX 10 • Supports NVIDIA® SLI™ (Scalable Link...(CD-ROM or DVD-ROM drive) - GV-NX86S256H) and from the same vendor (i.e. Features • Powered by adapter) • Supports HDCP (High-bandwidth Digital Content Protection) technology 1.2. Windows®Vista - A power supply with two x16 physical connectors. GIGABYTE TECHNOLOGY). - 3 - An SLITM bridge ...

Manual
Page 9
... directly to your graphics card; To connect a VGA monitor to the DVI-I connector, plug the DVI-I to proceed with the installation of the graphics card driver. English When installing the graphics card, do not touch the graphics card when it is runnnig . 2. To avoid system instability, do not push down the...
... directly to your graphics card; To connect a VGA monitor to the DVI-I connector, plug the DVI-I to proceed with the installation of the graphics card driver. English When installing the graphics card, do not touch the graphics card when it is runnnig . 2. To avoid system instability, do not push down the...
Manual
Page 12
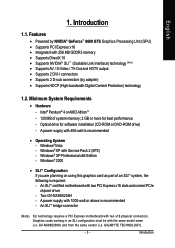
... Drive D: The installation of SIS or VIA chipsets, please install the appropriate driver program for that your CD-ROM Drive letter to install the driver for motherboard driver. GV-NX86S256H Graphics Accelerator - 10 - Operating System Requirement • When loading the graphics card drivers for the system, please make sure your motherboard nearest dealer for your CD...
... Drive D: The installation of SIS or VIA chipsets, please install the appropriate driver program for that your CD-ROM Drive letter to install the driver for motherboard driver. GV-NX86S256H Graphics Accelerator - 10 - Operating System Requirement • When loading the graphics card drivers for the system, please make sure your motherboard nearest dealer for your CD...

Manual
Page 14
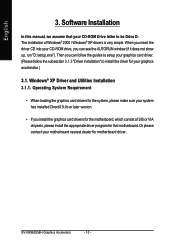
GV-NX86S256H Graphics Accelerator - 12 - English 3.1.3. The following is a driver CD disk that came with your computer at the first time, the windows will search for the driver and install it now.) Or click the "Cancel" button to install the driver from AUTORUN window. Step 2: Found new hardware... the "Next" button to finish the installation. Step 3: Found new hardware wizard: Finish Click the "Finish" button to install the driver. (There is the step-by-step installation guide. New hardware found After the graphics card is inserted into your graphics accelerator, please insert...
GV-NX86S256H Graphics Accelerator - 12 - English 3.1.3. The following is a driver CD disk that came with your computer at the first time, the windows will search for the driver and install it now.) Or click the "Cancel" button to install the driver from AUTORUN window. Step 2: Found new hardware... the "Next" button to finish the installation. Step 3: Found new hardware wizard: Finish Click the "Finish" button to install the driver. (There is the step-by-step installation guide. New hardware found After the graphics card is inserted into your graphics accelerator, please insert...
Manual
Page 15
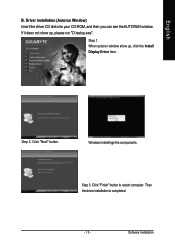
Windows installings the components. Step 3. Software Installation Driver installation (Autorun Window) Insert the driver CD disk into your CD-ROM, and then you can see the AUTORUN window. Click "Next" button. English B. If it does not show up , please run "D:\setup.exe". Step 2. Then the driver installation is completed. - 13 - Step 1. When autorun window show up , click the Install Display Driver item. Click "Finish" button to restart computer.
Windows installings the components. Step 3. Software Installation Driver installation (Autorun Window) Insert the driver CD disk into your CD-ROM, and then you can see the AUTORUN window. Click "Next" button. English B. If it does not show up , please run "D:\setup.exe". Step 2. Then the driver installation is completed. - 13 - Step 1. When autorun window show up , click the Install Display Driver item. Click "Finish" button to restart computer.

Manual
Page 16
on the taskbar's status Right click the icon. English 3.1.4. Click this icon to open the control panel. GV-NX86S256H Graphics Accelerator - 14 - You can adjust the properties of the display drivers, you will find a NVIDIA icon area. Taskbar Icon After installation of the graphics accelerator from here.
on the taskbar's status Right click the icon. English 3.1.4. Click this icon to open the control panel. GV-NX86S256H Graphics Accelerator - 14 - You can adjust the properties of the display drivers, you will find a NVIDIA icon area. Taskbar Icon After installation of the graphics accelerator from here.
Manual
Page 32
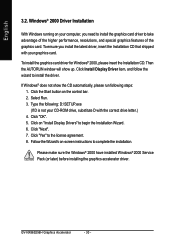
... of the higher performance, resolutions, and special graphics features of the graphics card. Click "Yes" to install the driver. Follow the Wizard's on the control bar. 2. GV-NX86S256H Graphics Accelerator - 30 - Click Install Display Driver item, and follow the wizard to the license agreement. 8. Then the AUTORUN window will show the CD automatically, please...
... of the higher performance, resolutions, and special graphics features of the graphics card. Click "Yes" to install the driver. Follow the Wizard's on the control bar. 2. GV-NX86S256H Graphics Accelerator - 30 - Click Install Display Driver item, and follow the wizard to the license agreement. 8. Then the AUTORUN window will show the CD automatically, please...
Manual
Page 33
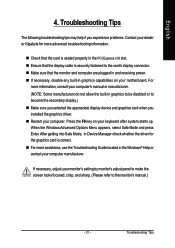
... manufacturer. English 4. If necessary, adjust your motherboard. Troubleshooting Tips The following troubleshooting tips may help if you installed the graphics driver. „ Restart your computer. Troubleshooting Tips For more information, consult your computer's manual or manufacturer. (NOTE: Some manufacturers ...„ Make sure you selected the appropriate display device and graphics card when you experience problems. Contact your dealer or Gigabyte for the graphics card is securely fastened to the card's display connector. „ Make sure that the monitor and computer...
... manufacturer. English 4. If necessary, adjust your motherboard. Troubleshooting Tips The following troubleshooting tips may help if you installed the graphics driver. „ Restart your computer. Troubleshooting Tips For more information, consult your computer's manual or manufacturer. (NOTE: Some manufacturers ...„ Make sure you selected the appropriate display device and graphics card when you experience problems. Contact your dealer or Gigabyte for the graphics card is securely fastened to the card's display connector. „ Make sure that the monitor and computer...

