Manual
Page 8
... 26 3.2. Troubleshooting Tips 32 5. Board Layout 4 2.2. Operating System Requirement 11 3.1.2. Taskbar Icon ...15 3.1.5. Display Properties Pages 15 3.1.6. Appendix 33 5.1. Resolutions and Color Depth Table (In Windows® XP 34 GV-NX85T Series Graphics Accelerator - 2 - Software Installation 11 3.1. Hardware Installation 4 2.1. Driver Installation ...13 3.1.4. English Table of Contents 1. Introduction 3 1.1. Features...
... 26 3.2. Troubleshooting Tips 32 5. Board Layout 4 2.2. Operating System Requirement 11 3.1.2. Taskbar Icon ...15 3.1.5. Display Properties Pages 15 3.1.6. Appendix 33 5.1. Resolutions and Color Depth Table (In Windows® XP 34 GV-NX85T Series Graphics Accelerator - 2 - Software Installation 11 3.1. Hardware Installation 4 2.1. Driver Installation ...13 3.1.4. English Table of Contents 1. Introduction 3 1.1. Features...
Manual
Page 9
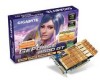
...; Supports D-sub connector (The GV-NX85T256HP require adapter to support this function) • Supports 1 DVI-I connector (For GV-NX85T256H/GV-NX85T512HP only) • Supports 2 DVI-I connectors (For GV-NX85T256HP only) • Supports HDCP (High-bandwidth Digital Content Protection) technology 1.2. GIGABYTE TECHNOLOGY). - 3 - Features ...256 MB GDDR2 memory (For GV-NX85T256H only) • Integrated with 512 MB GDDR2 memory (For GV-NX85T512HP only) • Integrated with 450-watt is recommended • Operating System - Optical drive for best performance - Windows® 2000 (Note) SLI ...
...; Supports D-sub connector (The GV-NX85T256HP require adapter to support this function) • Supports 1 DVI-I connector (For GV-NX85T256H/GV-NX85T512HP only) • Supports 2 DVI-I connectors (For GV-NX85T256HP only) • Supports HDCP (High-bandwidth Digital Content Protection) technology 1.2. GIGABYTE TECHNOLOGY). - 3 - Features ...256 MB GDDR2 memory (For GV-NX85T256H only) • Integrated with 512 MB GDDR2 memory (For GV-NX85T512HP only) • Integrated with 450-watt is recommended • Operating System - Optical drive for best performance - Windows® 2000 (Note) SLI ...
Manual
Page 17
... your motherboard nearest dealer for that your CD-ROM Drive letter to be Drive D: The installation of Windows® 2000 / Windows® XP drivers is very simple. Or please contact your graphics accelerator.) 3.1. Software Installation Windows® XP Driver and Utilities Installation 3.1.1. Operating System Requirement • When loading the graphics card drivers ... the appropriate driver program for motherboard driver. - 11 - When you insert the driver CD into your CD-ROM drive, you can see the AUTORUN window (if it does not show up, run "D:\setup.exe"). English 3.
... your motherboard nearest dealer for that your CD-ROM Drive letter to be Drive D: The installation of Windows® 2000 / Windows® XP drivers is very simple. Or please contact your graphics accelerator.) 3.1. Software Installation Windows® XP Driver and Utilities Installation 3.1.1. Operating System Requirement • When loading the graphics card drivers ... the appropriate driver program for motherboard driver. - 11 - When you insert the driver CD into your CD-ROM drive, you can see the AUTORUN window (if it does not show up, run "D:\setup.exe"). English 3.
Manual
Page 18
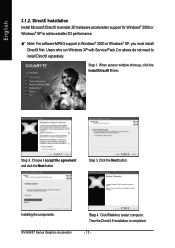
...Install Microsoft DirectX to enable 3D hardware acceleration support for Windows® 2000 or Windows® XP to restart computer. Click Finish to achieve better 3D performance. 0 Note: For software MPEG support in Windows® 2000 or Windows® XP, you must install DirectX first. Choose ...I accept the agreement and click the Next button. Users who run Windows XP with Service Pack 2 or above do not need to install DirectX separately. GV-NX85T Series Graphics Accelerator Step 4. When autorun window show up, click the Install DirectX 9 item. Step 1. English 3.1.2....
...Install Microsoft DirectX to enable 3D hardware acceleration support for Windows® 2000 or Windows® XP to restart computer. Click Finish to achieve better 3D performance. 0 Note: For software MPEG support in Windows® 2000 or Windows® XP, you must install DirectX first. Choose ...I accept the agreement and click the Next button. Users who run Windows XP with Service Pack 2 or above do not need to install DirectX separately. GV-NX85T Series Graphics Accelerator Step 4. When autorun window show up, click the Install DirectX 9 item. Step 1. English 3.1.2....
Manual
Page 19
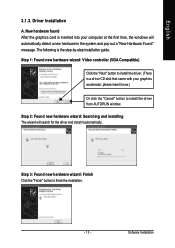
... driver. (There is the step-by-step installation guide. The following is a driver CD disk that came with your computer at the first time, the windows will search for the driver and install it now.) Or click the "Cancel" button to install the driver from AUTORUN...
... driver. (There is the step-by-step installation guide. The following is a driver CD disk that came with your computer at the first time, the windows will search for the driver and install it now.) Or click the "Cancel" button to install the driver from AUTORUN...

Manual
Page 20
Step 1. Then the driver installation is completed. When autorun window show up , click Install Display Driver item. If it does not show up , please run "D:\setup.exe". Step 3. GV-NX85T Series Graphics Accelerator - 14 - Driver installation (Autorun Window) Insert the driver CD disk into your CD-ROM, and then you can see the AUTORUN window. Step 2. Windows installings the components. Click "Next" button. Click "Finish" button to restart computer. English B.
Step 1. Then the driver installation is completed. When autorun window show up , click Install Display Driver item. If it does not show up , please run "D:\setup.exe". Step 3. GV-NX85T Series Graphics Accelerator - 14 - Driver installation (Autorun Window) Insert the driver CD disk into your CD-ROM, and then you can see the AUTORUN window. Step 2. Windows installings the components. Click "Next" button. Click "Finish" button to restart computer. English B.
Manual
Page 22
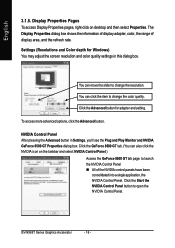
English 3.1.5. NVIDIA Control Panel After pressing the Advanced button in this dialog box. GV-NX85T Series Graphics Accelerator - 16 - You can move the slider to open the NVIDIA Control Panel. To access more advanced options, click the Advanced button. ... and Color depth for adapter and setting. You can also click the NVIDIA icon on desktop and then select Properties. Click the Advanced button for Windows) You may adjust the screen resolution and color quality settings in Settings, you'll see the Plug and Play Monitor and NVIDIA GeForce 8500 GT...
English 3.1.5. NVIDIA Control Panel After pressing the Advanced button in this dialog box. GV-NX85T Series Graphics Accelerator - 16 - You can move the slider to open the NVIDIA Control Panel. To access more advanced options, click the Advanced button. ... and Color depth for adapter and setting. You can also click the NVIDIA icon on desktop and then select Properties. Click the Advanced button for Windows) You may adjust the screen resolution and color quality settings in Settings, you'll see the Plug and Play Monitor and NVIDIA GeForce 8500 GT...

Manual
Page 32
With nView you can click the NVIDIA icon select nView Properties under nView Destop Manager. GV-NX85T Series Graphics Accelerator - 26 - Multiple desktops give you extra desktop areas on which to run your applications so you connect two monitors. Enable ...on the taskbar and Click the item to start configuringing nView features. (Note) This item will show up multiple desktops to crowd several open application windows on the taskbar and select nView Properties under nView Desktop Manager. Access nView properties page: To access the nView properties page, you be more productive...
With nView you can click the NVIDIA icon select nView Properties under nView Destop Manager. GV-NX85T Series Graphics Accelerator - 26 - Multiple desktops give you extra desktop areas on which to run your applications so you connect two monitors. Enable ...on the taskbar and Click the item to start configuringing nView features. (Note) This item will show up multiple desktops to crowd several open application windows on the taskbar and select nView Properties under nView Desktop Manager. Access nView properties page: To access the nView properties page, you be more productive...

Manual
Page 33
Software Installation nView Windows properties „ This tab allows you to control window and dialog box placement when using multiple monitors. - 27 - The setup wizard can also be accessed from this tab. nView Profiles properties „ This tab contains a record all nView display settings for easy software setup. English nView Desktop Management properties „ ThistabcontainsinformationaboutthenViewDesktopManager.
Software Installation nView Windows properties „ This tab allows you to control window and dialog box placement when using multiple monitors. - 27 - The setup wizard can also be accessed from this tab. nView Profiles properties „ This tab contains a record all nView display settings for easy software setup. English nView Desktop Management properties „ ThistabcontainsinformationaboutthenViewDesktopManager.

Manual
Page 35
Software Installation nView Hot Keys properties „ This tab lets you can apply to your applications. English nView Effects properties „ This tab provides special windows effects that you perform various actions with shortcut keys or key combinations. - 29 - Also enables full screen video playback via the video mirroring control button. nView Zoom properties „ This tab provides dynamic zoom functionality on the desktop.
Software Installation nView Hot Keys properties „ This tab lets you can apply to your applications. English nView Effects properties „ This tab provides special windows effects that you perform various actions with shortcut keys or key combinations. - 29 - Also enables full screen video playback via the video mirroring control button. nView Zoom properties „ This tab provides dynamic zoom functionality on the desktop.
Manual
Page 37
...the higher performance, resolutions, and special graphics features of the graphics card. Select Run. 3. English 3.2. Click "OK". 5. If Windows® does not show up. Click the Start button on -screen instructions to the license agreement. 8. To install the graphics card driver for... the Installation CD. Click Install Display Driver item, and follow the wizard to begin the Installation Wizard. 6. Click "Next". 7. Then the AUTORUN window will show the CD automatically, please run following : D:\SETUP.exe (If D is not your CD-ROM drive, substitute D with your computer, ...
...the higher performance, resolutions, and special graphics features of the graphics card. Select Run. 3. English 3.2. Click "OK". 5. If Windows® does not show up. Click the Start button on -screen instructions to the license agreement. 8. To install the graphics card driver for... the Installation CD. Click Install Display Driver item, and follow the wizard to begin the Installation Wizard. 6. Click "Next". 7. Then the AUTORUN window will show the CD automatically, please run following : D:\SETUP.exe (If D is not your CD-ROM drive, substitute D with your computer, ...
Manual
Page 38
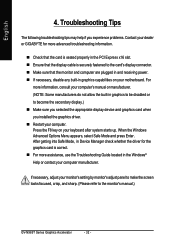
...following troubleshooting tips may help if you experience problems. Contact your dealer or GIGABYTE for the graphics card is securely fastened to the card's display connector....Some manufacturers do not allow the built-in graphics to be disabled or to the monitor's manual.) GV-NX85T Series Graphics Accelerator - 32 - Press the F8 key on your keyboard after system starts up....monitor and computer are plugged in and receiving power. „ If necessary, disable any built-in the Windows® Help or contact your monitor's setting by monitor's adjust panel to make the screen looks focused,...
...following troubleshooting tips may help if you experience problems. Contact your dealer or GIGABYTE for the graphics card is securely fastened to the card's display connector....Some manufacturers do not allow the built-in graphics to be disabled or to the monitor's manual.) GV-NX85T Series Graphics Accelerator - 32 - Press the F8 key on your keyboard after system starts up....monitor and computer are plugged in and receiving power. „ If necessary, disable any built-in the Windows® Help or contact your monitor's setting by monitor's adjust panel to make the screen looks focused,...

Manual
Page 39
... computer. - 33 - Appendix This procedure assumes drive A. 2. How to restart the computer in MS-DOS Mode 1. Appendix 5.1. Restart the computer in MS-DOS mode. (For Windows 2000/XP, you need a startup disk to Reflash the BIOS in MS-DOS mode.) 3.
... computer. - 33 - Appendix This procedure assumes drive A. 2. How to restart the computer in MS-DOS Mode 1. Appendix 5.1. Restart the computer in MS-DOS mode. (For Windows 2000/XP, you need a startup disk to Reflash the BIOS in MS-DOS mode.) 3.
Manual
Page 40
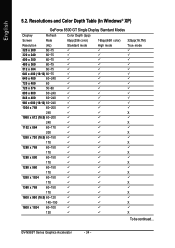
GV-NX85T Series Graphics Accelerator - 34 - Resolutions and Color Depth Table (In Windows® XP) GeForce 8500 GT Single Display Standard Modes Display Refresh Color Depth (bpp) Screen Rate 8bpp(256 color) 16bpp(65K color) 32bpp(16.7M) ...
GV-NX85T Series Graphics Accelerator - 34 - Resolutions and Color Depth Table (In Windows® XP) GeForce 8500 GT Single Display Standard Modes Display Refresh Color Depth (bpp) Screen Rate 8bpp(256 color) 16bpp(65K color) 32bpp(16.7M) ...
