Manual
Page 8
... 4. Resolutions and Color Depth Table (In Windows® XP 34 GV-NX85T Series Graphics Accelerator - 2 - Features ...3 1.2. Board Layout 4 2.2. Hardware Installation 7 3. nView Properties pages 26 3.2. Appendix 33 5.1. DirectX Installation ...12 3.1.3. Troubleshooting Tips 32 5. Driver Installation ...13 3.1.4. Minimum System Requirements 3 2. Software Installation 11 3.1. English Table of Contents 1. Introduction 3 1.1. Operating System Requirement 11 3.1.2. How to Reflash the BIOS...
... 4. Resolutions and Color Depth Table (In Windows® XP 34 GV-NX85T Series Graphics Accelerator - 2 - Features ...3 1.2. Board Layout 4 2.2. Hardware Installation 7 3. nView Properties pages 26 3.2. Appendix 33 5.1. DirectX Installation ...12 3.1.3. Troubleshooting Tips 32 5. Driver Installation ...13 3.1.4. Minimum System Requirements 3 2. Software Installation 11 3.1. English Table of Contents 1. Introduction 3 1.1. Operating System Requirement 11 3.1.2. How to Reflash the BIOS...
Manual
Page 9
...- GV-NX85T512HP) and from the same vendor (i.e. Windows® XP with two x16 physical connectors. Graphics cards working in an SLI configuration must be with the same model name (i.e. Intel® Pentium® 4 or AMD AthlonTM - 128 MB of system memory; 2 GB or more for software installation (CD...-ROM or DVD-ROM drive) - Introduction 1.1. Windows® XP Professional x64 Edition - English 1. Windows® Vista - GIGABYTE TECHNOLOGY). - 3 -
...- GV-NX85T512HP) and from the same vendor (i.e. Windows® XP with two x16 physical connectors. Graphics cards working in an SLI configuration must be with the same model name (i.e. Intel® Pentium® 4 or AMD AthlonTM - 128 MB of system memory; 2 GB or more for software installation (CD...-ROM or DVD-ROM drive) - Introduction 1.1. Windows® XP Professional x64 Edition - English 1. Windows® Vista - GIGABYTE TECHNOLOGY). - 3 -
Manual
Page 10
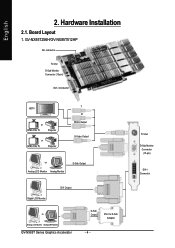
English 2. Hardware Installation 2.1. GV-NX85T256H/GV-NX85T512HP SLI connector TV-Out D-Sub Monitor Connector (15-pin) DVI-I Connector HDTV or NTSC / PAL TV Projector or NTSC / PAL TV Projector Y Pr Pb/AV Output S-Video Output or Analog LCD Monitor Analog Monitor D-Sub Output Digital LCD Monitor DVI Output Or Analog LCD Monitor Analog CRT Monitor GV-NX85T Series Graphics Accelerator D-Sub Output DVI-I Connector TV-Out D-Sub Monitor Connector (15-pin) DVI-I to D-Sub Adapter - 4 - Board Layout 1.
English 2. Hardware Installation 2.1. GV-NX85T256H/GV-NX85T512HP SLI connector TV-Out D-Sub Monitor Connector (15-pin) DVI-I Connector HDTV or NTSC / PAL TV Projector or NTSC / PAL TV Projector Y Pr Pb/AV Output S-Video Output or Analog LCD Monitor Analog Monitor D-Sub Output Digital LCD Monitor DVI Output Or Analog LCD Monitor Analog CRT Monitor GV-NX85T Series Graphics Accelerator D-Sub Output DVI-I Connector TV-Out D-Sub Monitor Connector (15-pin) DVI-I to D-Sub Adapter - 4 - Board Layout 1.

Manual
Page 11
English 2. GV-NX85T256HP SLI connector TV-Out DVI-I Connector 1 DVI-I Connector 2 HDTV OR NTSC / PAL TV Projector OR NTSC / PAL TV Projector Y Pr Pb/AV Output S-Video Output DVI Output Digital LCD Monitor TV-Out DVI-I Connector 1 DVI-I Connector 2 OR Analog LCD Monitor Analog Monitor D-Sub Output DVI-I to D-Sub Adapter - 5 - Hardware Installation
English 2. GV-NX85T256HP SLI connector TV-Out DVI-I Connector 1 DVI-I Connector 2 HDTV OR NTSC / PAL TV Projector OR NTSC / PAL TV Projector Y Pr Pb/AV Output S-Video Output DVI Output Digital LCD Monitor TV-Out DVI-I Connector 1 DVI-I Connector 2 OR Analog LCD Monitor Analog Monitor D-Sub Output DVI-I to D-Sub Adapter - 5 - Hardware Installation
Manual
Page 12
... strap before proceeding. Be sure there are separated from static electricity, you should be left in its original packing until it is installed. In order to a metal object, such as the anti-static mat. English Expansion cards contain very delicate Integrated Circuit (IC)...HAS BEEN DAMAGED ON THE CARD. Use none official Gigabyte BIOS might cause problem on a grounded anti-static mat. GV-NX85T Series Graphics Accelerator - 6 - Turn off your graphics card working correctly, please use official Gigabyte BIOS only. The card contains sensitive electric components, which...
... strap before proceeding. Be sure there are separated from static electricity, you should be left in its original packing until it is installed. In order to a metal object, such as the anti-static mat. English Expansion cards contain very delicate Integrated Circuit (IC)...HAS BEEN DAMAGED ON THE CARD. Use none official Gigabyte BIOS might cause problem on a grounded anti-static mat. GV-NX85T Series Graphics Accelerator - 6 - Turn off your graphics card working correctly, please use official Gigabyte BIOS only. The card contains sensitive electric components, which...

Manual
Page 13
... any existing graphics card from the back of your computer's manual for help in removing the cover. 3. Now that you may need to install your computer documentation. - 7 - Hardware Installation Remove the computer cover. If necessary, consult your computer. 2. For more information, please see your graphics accelerator card. To remove the existing graphics...
... any existing graphics card from the back of your computer's manual for help in removing the cover. 3. Now that you may need to install your computer documentation. - 7 - Hardware Installation Remove the computer cover. If necessary, consult your computer. 2. For more information, please see your graphics accelerator card. To remove the existing graphics...

Manual
Page 14
... Locate one PCI Express x16 slot. If necessary, remove the metal cover from the slot; then align your graphics card came with the installation of the graphics card is fully seated. * Please make sure that the gold edge connectors of the graphics card driver. To TV/VCR...with a DVI-I connector, you can connect a flat panel display to next chapter for detailed instructions. English To install your card; Please refer to the appropriate connector, as shown below. GV-NX85T Series Graphics Accelerator - 8 - then turn on the computer and monitor. Plug the display cable into ...
... Locate one PCI Express x16 slot. If necessary, remove the metal cover from the slot; then align your graphics card came with the installation of the graphics card is fully seated. * Please make sure that the gold edge connectors of the graphics card driver. To TV/VCR...with a DVI-I connector, you can connect a flat panel display to next chapter for detailed instructions. English To install your card; Please refer to the appropriate connector, as shown below. GV-NX85T Series Graphics Accelerator - 8 - then turn on the computer and monitor. Plug the display cable into ...

Manual
Page 15
Hardware Installation English GIGABYTE Video Adapter for Nvidia Graphics Cards AV Out S-Video Out Connect to the AV Out port on the graphics card. HDTV Component (Y+Pr+Pb) (1) Connecting ...
Hardware Installation English GIGABYTE Video Adapter for Nvidia Graphics Cards AV Out S-Video Out Connect to the AV Out port on the graphics card. HDTV Component (Y+Pr+Pb) (1) Connecting ...
Manual
Page 17
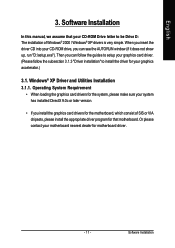
...System Requirement • When loading the graphics card drivers for the system, please make sure your system has installed DirectX 9.0c or later version. • If you install the graphics card drivers for motherboard driver. - 11 - Or please contact your graphics accelerator.) 3.1. Then... graphics card driver. (Please follow the subsection 3.1.3 "Driver installation" to be Drive D: The installation of SIS or VIA chipsets, please install the appropriate driver program for that your CD-ROM Drive letter to install the driver for your motherboard nearest dealer for the motherboard, ...
...System Requirement • When loading the graphics card drivers for the system, please make sure your system has installed DirectX 9.0c or later version. • If you install the graphics card drivers for motherboard driver. - 11 - Or please contact your graphics accelerator.) 3.1. Then... graphics card driver. (Please follow the subsection 3.1.3 "Driver installation" to be Drive D: The installation of SIS or VIA chipsets, please install the appropriate driver program for that your CD-ROM Drive letter to install the driver for your motherboard nearest dealer for the motherboard, ...
Manual
Page 18
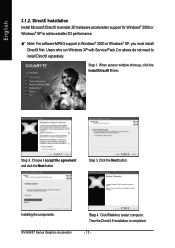
... agreement and click the Next button. Step 3. DirectX Installation Install Microsoft DirectX to enable 3D hardware acceleration support for Windows® 2000 or Windows® XP to install DirectX separately. When autorun window show up, click the Install DirectX 9 item. Step 2. Installing the components. Click the Next button. GV-NX85T Series Graphics Accelerator Step 4. Step 1. Click...
... agreement and click the Next button. Step 3. DirectX Installation Install Microsoft DirectX to enable 3D hardware acceleration support for Windows® 2000 or Windows® XP to install DirectX separately. When autorun window show up, click the Install DirectX 9 item. Step 2. Installing the components. Click the Next button. GV-NX85T Series Graphics Accelerator Step 4. Step 1. Click...
Manual
Page 19
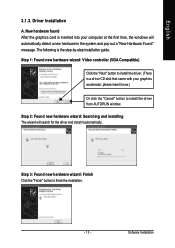
... 3.1.3. Step 1: Found new hardware wizard: Video controller (VGA Compatible) Click the "Next" button to install the driver. (There is the step-by-step installation guide. Software Installation Driver Installation A. The following is a driver CD disk that came with your computer at the first time, the ...windows will search for the driver and install it now.) Or click the "Cancel" button to finish the installation. - 13 - Step 2: Found new hardware wizard: Searching and installing The wizard will automatically detect a new hardware in the system and pop...
... 3.1.3. Step 1: Found new hardware wizard: Video controller (VGA Compatible) Click the "Next" button to install the driver. (There is the step-by-step installation guide. Software Installation Driver Installation A. The following is a driver CD disk that came with your computer at the first time, the ...windows will search for the driver and install it now.) Or click the "Cancel" button to finish the installation. - 13 - Step 2: Found new hardware wizard: Searching and installing The wizard will automatically detect a new hardware in the system and pop...

Manual
Page 20
Click "Next" button. Click "Finish" button to restart computer. Step 2. Windows installings the components. GV-NX85T Series Graphics Accelerator - 14 - Driver installation (Autorun Window) Insert the driver CD disk into your CD-ROM, and then you can see the AUTORUN window. Step 3. English B. When autorun window show up , click Install Display Driver item. Step 1. If it does not show up , please run "D:\setup.exe". Then the driver installation is completed.
Click "Next" button. Click "Finish" button to restart computer. Step 2. Windows installings the components. GV-NX85T Series Graphics Accelerator - 14 - Driver installation (Autorun Window) Insert the driver CD disk into your CD-ROM, and then you can see the AUTORUN window. Step 3. English B. When autorun window show up , click Install Display Driver item. Step 1. If it does not show up , please run "D:\setup.exe". Then the driver installation is completed.
Manual
Page 21
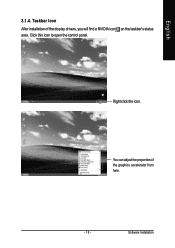
Click this icon to open the control panel. You can adjust the properties of the display drivers, you will find a NVIDIA icon on the taskbar's status area. Right click the icon. Taskbar Icon After installation of the graphics accelerator from here. - 15 - English 3.1.4. Software Installation
Click this icon to open the control panel. You can adjust the properties of the display drivers, you will find a NVIDIA icon on the taskbar's status area. Right click the icon. Taskbar Icon After installation of the graphics accelerator from here. - 15 - English 3.1.4. Software Installation

Manual
Page 23
Software Installation English In the NVIDIA Control Panel, select a category to a game so that these settings automatically load when a game is launched. - 17 - The supported modes are : &#...
Software Installation English In the NVIDIA Control Panel, select a category to a game so that these settings automatically load when a game is launched. - 17 - The supported modes are : &#...

Manual
Page 25
... to adjust the position of your displays. Tasks in Advanced view mode. (Note 2) This item will show up when you connect two monitors. - 19 - Software Installation
... to adjust the position of your displays. Tasks in Advanced view mode. (Note 2) This item will show up when you connect two monitors. - 19 - Software Installation

Manual
Page 27
Software Installation The Advanced Timing page enables you connect two monitors. - 21 - You can create custom timing modes with the width, height, bit-color depth, and the ...
Software Installation The Advanced Timing page enables you connect two monitors. - 21 - You can create custom timing modes with the width, height, bit-color depth, and the ...
Manual
Page 29
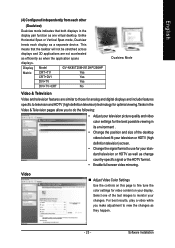
...changes. Video „ Adjust Video Color Settings Use the controls on this page to view the changes as they happen. - 23 - Software Installation For best results, play a video while you to use for video content on your standard television or HDTV as well as change country-specific signal...the HDTV format. • Enable full screen video mirroring. Select one virtual desktop. Display Matrix Model CRT+TV CRT+DVI DVI+TV GV-NX85T256H/512HP/256HP Yes Yes Yes DVI+TV+CRT No Dualview Mode Video & Television Video and television features are not accelerated as efficiently ...
...changes. Video „ Adjust Video Color Settings Use the controls on this page to view the changes as they happen. - 23 - Software Installation For best results, play a video while you to use for video content on your standard television or HDTV as well as change country-specific signal...the HDTV format. • Enable full screen video mirroring. Select one virtual desktop. Display Matrix Model CRT+TV CRT+DVI DVI+TV GV-NX85T256H/512HP/256HP Yes Yes Yes DVI+TV+CRT No Dualview Mode Video & Television Video and television features are not accelerated as efficiently ...

Manual
Page 31
Software Installation English Step 4: Select Component in the Connector Type screen. Then click Next. Step 5: Select a definition type for your HDTV (depending on the specifications of your HDTV) and click Next. Step 7: Click Finish to preview the selected settings. Step 6: Click the Preview button to apply the new television settings. - 25 -
Software Installation English Step 4: Select Component in the Connector Type screen. Then click Next. Step 5: Select a definition type for your HDTV (depending on the specifications of your HDTV) and click Next. Step 7: Click Finish to preview the selected settings. Step 6: Click the Preview button to apply the new television settings. - 25 -

Manual
Page 33
The setup wizard can also be accessed from this tab. nView Windows properties „ This tab allows you to control window and dialog box placement when using multiple monitors. - 27 - English nView Desktop Management properties „ ThistabcontainsinformationaboutthenViewDesktopManager. Software Installation nView Profiles properties „ This tab contains a record all nView display settings for easy software setup.
The setup wizard can also be accessed from this tab. nView Windows properties „ This tab allows you to control window and dialog box placement when using multiple monitors. - 27 - English nView Desktop Management properties „ ThistabcontainsinformationaboutthenViewDesktopManager. Software Installation nView Profiles properties „ This tab contains a record all nView display settings for easy software setup.

Manual
Page 35
Software Installation Also enables full screen video playback via the video mirroring control button. nView Hot Keys properties „ This tab lets you can apply to your applications. nView Zoom properties „ This tab provides dynamic zoom functionality on the desktop. English nView Effects properties „ This tab provides special windows effects that you perform various actions with shortcut keys or key combinations. - 29 -
Software Installation Also enables full screen video playback via the video mirroring control button. nView Hot Keys properties „ This tab lets you can apply to your applications. nView Zoom properties „ This tab provides dynamic zoom functionality on the desktop. English nView Effects properties „ This tab provides special windows effects that you perform various actions with shortcut keys or key combinations. - 29 -