Manual
Page 8
... 26 3.2. Windows® 2000 Driver Installation 31 4. Hardware Installation 7 3. Windows® XP Driver and Utilities Installation 11 3.1.1. Display Properties Pages 15 3.1.6. Introduction 3 1.1. Board Layout 4 2.2. Minimum System Requirements 3 2. DirectX Installation ...12 3.1.3. Appendix 33 5.1. Troubleshooting Tips 32 5. Resolutions and Color Depth Table (In Windows® XP 34 GV-NX85T Series Graphics Accelerator - 2 - Software Installation 11 3.1. Taskbar Icon ...15 3.1.5.
... 26 3.2. Windows® 2000 Driver Installation 31 4. Hardware Installation 7 3. Windows® XP Driver and Utilities Installation 11 3.1.1. Display Properties Pages 15 3.1.6. Introduction 3 1.1. Board Layout 4 2.2. Minimum System Requirements 3 2. DirectX Installation ...12 3.1.3. Appendix 33 5.1. Troubleshooting Tips 32 5. Resolutions and Color Depth Table (In Windows® XP 34 GV-NX85T Series Graphics Accelerator - 2 - Software Installation 11 3.1. Taskbar Icon ...15 3.1.5.
Manual
Page 9
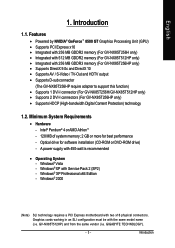
... HDTV output • Supports D-sub connector (The GV-NX85T256HP require adapter to support this function) • Supports 1 DVI-I connector (For GV-NX85T256H/GV-NX85T512HP only) • Supports 2 DVI-I connectors (For GV-NX85T256HP only) • Supports HDCP (High-bandwidth Digital Content Protection) technology 1.2. GIGABYTE TECHNOLOGY). - 3 - Optical drive for best performance...; Vista - Intel® Pentium® 4 or AMD AthlonTM - 128 MB of system memory; 2 GB or more for software installation (CD-ROM or DVD-ROM drive) - GV-NX85T512HP) and from the same vendor (i.e. English 1.
... HDTV output • Supports D-sub connector (The GV-NX85T256HP require adapter to support this function) • Supports 1 DVI-I connector (For GV-NX85T256H/GV-NX85T512HP only) • Supports 2 DVI-I connectors (For GV-NX85T256HP only) • Supports HDCP (High-bandwidth Digital Content Protection) technology 1.2. GIGABYTE TECHNOLOGY). - 3 - Optical drive for best performance...; Vista - Intel® Pentium® 4 or AMD AthlonTM - 128 MB of system memory; 2 GB or more for software installation (CD-ROM or DVD-ROM drive) - GV-NX85T512HP) and from the same vendor (i.e. English 1.
Manual
Page 10
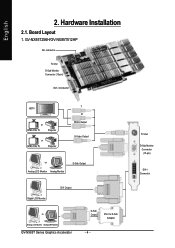
Hardware Installation 2.1. Board Layout 1. TV-Out D-Sub Monitor Connector (15-pin) DVI-I to D-Sub Adapter - 4 - English 2. GV-NX85T256H/GV-NX85T512HP SLI connector TV-Out D-Sub Monitor Connector (15-pin) DVI-I Connector HDTV or NTSC / PAL TV Projector or NTSC / PAL TV Projector Y Pr Pb/AV Output S-Video Output or Analog LCD Monitor Analog Monitor D-Sub Output Digital LCD Monitor DVI Output Or Analog LCD Monitor Analog CRT Monitor GV-NX85T Series Graphics Accelerator D-Sub Output DVI-I Connector
Hardware Installation 2.1. Board Layout 1. TV-Out D-Sub Monitor Connector (15-pin) DVI-I to D-Sub Adapter - 4 - English 2. GV-NX85T256H/GV-NX85T512HP SLI connector TV-Out D-Sub Monitor Connector (15-pin) DVI-I Connector HDTV or NTSC / PAL TV Projector or NTSC / PAL TV Projector Y Pr Pb/AV Output S-Video Output or Analog LCD Monitor Analog Monitor D-Sub Output Digital LCD Monitor DVI Output Or Analog LCD Monitor Analog CRT Monitor GV-NX85T Series Graphics Accelerator D-Sub Output DVI-I Connector

Manual
Page 11
Hardware Installation GV-NX85T256HP SLI connector TV-Out DVI-I Connector 1 DVI-I Connector 2 HDTV OR NTSC / PAL TV Projector OR NTSC / PAL TV Projector Y Pr Pb/AV Output S-Video Output DVI Output Digital LCD Monitor TV-Out DVI-I Connector 1 DVI-I Connector 2 OR Analog LCD Monitor Analog Monitor D-Sub Output DVI-I to D-Sub Adapter - 5 - English 2.
Hardware Installation GV-NX85T256HP SLI connector TV-Out DVI-I Connector 1 DVI-I Connector 2 HDTV OR NTSC / PAL TV Projector OR NTSC / PAL TV Projector Y Pr Pb/AV Output S-Video Output DVI Output Digital LCD Monitor TV-Out DVI-I Connector 1 DVI-I Connector 2 OR Analog LCD Monitor Analog Monitor D-Sub Output DVI-I to D-Sub Adapter - 5 - English 2.
Manual
Page 12
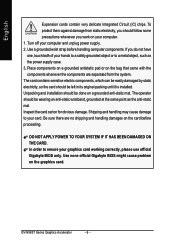
...IT HAS BEEN DAMAGED ON THE CARD. Inspect the card carton for obvious damage. Use none official Gigabyte BIOS might cause problem on a grounded anti-static mat. Unpacking and installation should follow some precautions whenever you do not have one, touch both of your hands to a safely... on the bag that came with the components whenever the components are no shipping and handling damages on the card before handling computer components. GV-NX85T Series Graphics Accelerator - 6 - To protect them against damage from static electricity, you should be done on the graphics card. Place...
...IT HAS BEEN DAMAGED ON THE CARD. Inspect the card carton for obvious damage. Use none official Gigabyte BIOS might cause problem on a grounded anti-static mat. Unpacking and installation should follow some precautions whenever you do not have one, touch both of your hands to a safely... on the bag that came with the components whenever the components are no shipping and handling damages on the card before handling computer components. GV-NX85T Series Graphics Accelerator - 6 - To protect them against damage from static electricity, you should be done on the graphics card. Place...

Manual
Page 13
Now that you have prepared your computer, you may need to install your computer documentation. - 7 - For more information, please see your graphics accelerator card. To remove the existing graphics card: 1. Power off the computer and monitor, then ... computer's manual for help in removing the cover. 3. If necessary, consult your computer has any existing graphics card from the back of your computer. Hardware Installation Remove any on-board graphics capability, you are ready to disable it on the motherboard. Hardware...
Now that you have prepared your computer, you may need to install your computer documentation. - 7 - For more information, please see your graphics accelerator card. To remove the existing graphics card: 1. Power off the computer and monitor, then ... computer's manual for help in removing the cover. 3. If necessary, consult your computer has any existing graphics card from the back of your computer. Hardware Installation Remove any on-board graphics capability, you are ready to disable it on the motherboard. Hardware...

Manual
Page 14
...graphics card with a DVI-I connector, you can connect a flat panel display to fasten the card in firmly until the card is securely inserted. 2. GV-NX85T Series Graphics Accelerator - 8 - Replace the screws to the appropriate connector, as shown below. To TV/VCR To D-Sub Monitor To Flat Panel ...Display You are now ready to next chapter for detailed instructions. English To install your card; Please refer to proceed with the installation of the graphics card is fully seated. * Please make sure that the gold edge connectors of the graphics card...
...graphics card with a DVI-I connector, you can connect a flat panel display to fasten the card in firmly until the card is securely inserted. 2. GV-NX85T Series Graphics Accelerator - 8 - Replace the screws to the appropriate connector, as shown below. To TV/VCR To D-Sub Monitor To Flat Panel ...Display You are now ready to next chapter for detailed instructions. English To install your card; Please refer to proceed with the installation of the graphics card is fully seated. * Please make sure that the gold edge connectors of the graphics card...

Manual
Page 15
Hardware Installation HDTV Component (Y+Pr+Pb) (1) Connecting HDTV Connect your HDTV cables to the video adapter according to the corresponding color. (Y= Green, Pr= Red, Pb= Blue) (2) Connecting S-... If your TV has a Composite video connection, you can connect the RCA cable from your TV to the TV-Out port on the adapter. - 9 - English GIGABYTE Video Adapter for Nvidia Graphics Cards AV Out S-Video Out Connect to the AV Out port on the graphics card.
Hardware Installation HDTV Component (Y+Pr+Pb) (1) Connecting HDTV Connect your HDTV cables to the video adapter according to the corresponding color. (Y= Green, Pr= Red, Pb= Blue) (2) Connecting S-... If your TV has a Composite video connection, you can connect the RCA cable from your TV to the TV-Out port on the adapter. - 9 - English GIGABYTE Video Adapter for Nvidia Graphics Cards AV Out S-Video Out Connect to the AV Out port on the graphics card.
Manual
Page 17
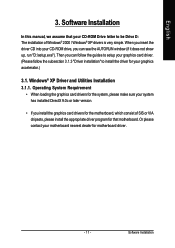
... (if it does not show up, run "D:\setup.exe"). Then you insert the driver CD into your graphics accelerator.) 3.1. Software Installation Software Installation In this manual, we assume that motherboard. Operating System Requirement • When loading the graphics card drivers for the system, please... make sure your CD-ROM Drive letter to install the driver for your CD-ROM drive, you install the graphics card drivers for motherboard driver. - 11 - English 3. Or please contact your motherboard nearest dealer ...
... (if it does not show up, run "D:\setup.exe"). Then you insert the driver CD into your graphics accelerator.) 3.1. Software Installation Software Installation In this manual, we assume that motherboard. Operating System Requirement • When loading the graphics card drivers for the system, please... make sure your CD-ROM Drive letter to install the driver for your CD-ROM drive, you install the graphics card drivers for motherboard driver. - 11 - English 3. Or please contact your motherboard nearest dealer ...
Manual
Page 18
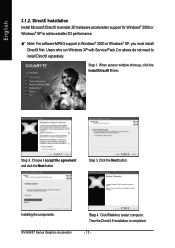
... button. GV-NX85T Series Graphics Accelerator Step 4. Step 3. Then the DirectX 9 installation is completed. - 12 - Users who run Windows XP with Service Pack 2 or above do not need to restart computer. Choose I accept the agreement and click the Next button. Installing the components. Click Finish to install DirectX separately. English 3.1.2. Step 1. DirectX Installation Install Microsoft DirectX...
... button. GV-NX85T Series Graphics Accelerator Step 4. Step 3. Then the DirectX 9 installation is completed. - 12 - Users who run Windows XP with Service Pack 2 or above do not need to restart computer. Choose I accept the agreement and click the Next button. Installing the components. Click Finish to install DirectX separately. English 3.1.2. Step 1. DirectX Installation Install Microsoft DirectX...
Manual
Page 19
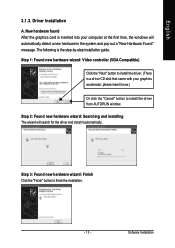
...with your computer at the first time, the windows will search for the driver and install it now.) Or click the "Cancel" button to install the driver from AUTORUN window. Software Installation Driver Installation A. The following is inserted into your graphics accelerator, please insert it automatically. Step ...2: Found new hardware wizard: Searching and installing The wizard will automatically detect a new hardware in the system and pop out a "New Hardware Found" message. Step 1: ...
...with your computer at the first time, the windows will search for the driver and install it now.) Or click the "Cancel" button to install the driver from AUTORUN window. Software Installation Driver Installation A. The following is inserted into your graphics accelerator, please insert it automatically. Step ...2: Found new hardware wizard: Searching and installing The wizard will automatically detect a new hardware in the system and pop out a "New Hardware Found" message. Step 1: ...

Manual
Page 20
If it does not show up , please run "D:\setup.exe". Step 3. GV-NX85T Series Graphics Accelerator - 14 - English B. Windows installings the components. Then the driver installation is completed. Driver installation (Autorun Window) Insert the driver CD disk into your CD-ROM, and then you can see the AUTORUN window. When autorun window show up , click Install Display Driver item. Step 1. Click "Next" button. Click "Finish" button to restart computer. Step 2.
If it does not show up , please run "D:\setup.exe". Step 3. GV-NX85T Series Graphics Accelerator - 14 - English B. Windows installings the components. Then the driver installation is completed. Driver installation (Autorun Window) Insert the driver CD disk into your CD-ROM, and then you can see the AUTORUN window. When autorun window show up , click Install Display Driver item. Step 1. Click "Next" button. Click "Finish" button to restart computer. Step 2.
Manual
Page 21
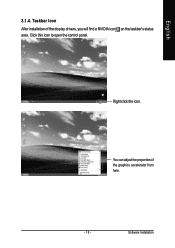
Click this icon to open the control panel. Taskbar Icon After installation of the graphics accelerator from here. - 15 - You can adjust the properties of the display drivers, you will find a NVIDIA icon on the taskbar's status area. Software Installation English 3.1.4. Right click the icon.
Click this icon to open the control panel. Taskbar Icon After installation of the graphics accelerator from here. - 15 - You can adjust the properties of the display drivers, you will find a NVIDIA icon on the taskbar's status area. Software Installation English 3.1.4. Right click the icon.

Manual
Page 23
Software Installation The supported modes are : „ 3D Settings „ Display „ Video & Television In the NVIDIA Control Panel, select a view mode. The categories are : „ Standard &#...
Software Installation The supported modes are : „ 3D Settings „ Display „ Video & Television In the NVIDIA Control Panel, select a view mode. The categories are : „ Standard &#...

Manual
Page 25
... on your actual physical display. (Note 1) This item is a useful alternative to using the controls (buttons) on your keyboard to better fit your displays. Software Installation This is present only in the Display pages allow you to do the following: Appearance • Run display optimization wizard • Move CRT screen position...
... on your actual physical display. (Note 1) This item is a useful alternative to using the controls (buttons) on your keyboard to better fit your displays. Software Installation This is present only in the Display pages allow you to do the following: Appearance • Run display optimization wizard • Move CRT screen position...

Manual
Page 27
... (monitors) that are an advanced user, you can create custom timing modes with the width, height, bit-color depth, and the refresh rate etc. Software Installation
... (monitors) that are an advanced user, you can create custom timing modes with the width, height, bit-color depth, and the refresh rate etc. Software Installation
Manual
Page 29
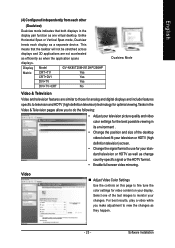
Display Matrix Model CRT+TV CRT+DVI DVI+TV GV-NX85T256H/512HP/256HP Yes Yes Yes DVI+TV+CRT No Dualview Mode Video & Television Video and television features are not accelerated as efficiently as when ... the position and size of the test images to monitor your display. Video „ Adjust Video Color Settings Use the controls on your changes. Software Installation For best results, play a video while you to do the following: • Adjust your television picture quality and video color settings for the best possible...
Display Matrix Model CRT+TV CRT+DVI DVI+TV GV-NX85T256H/512HP/256HP Yes Yes Yes DVI+TV+CRT No Dualview Mode Video & Television Video and television features are not accelerated as efficiently as when ... the position and size of the test images to monitor your display. Video „ Adjust Video Color Settings Use the controls on your changes. Software Installation For best results, play a video while you to do the following: • Adjust your television picture quality and video color settings for the best possible...

Manual
Page 31
Step 7: Click Finish to preview the selected settings. Step 6: Click the Preview button to apply the new television settings. - 25 - Step 5: Select a definition type for your HDTV (depending on the specifications of your HDTV) and click Next. Then click Next. English Step 4: Select Component in the Connector Type screen. Software Installation
Step 7: Click Finish to preview the selected settings. Step 6: Click the Preview button to apply the new television settings. - 25 - Step 5: Select a definition type for your HDTV (depending on the specifications of your HDTV) and click Next. Then click Next. English Step 4: Select Component in the Connector Type screen. Software Installation

Manual
Page 33
nView Windows properties „ This tab allows you to control window and dialog box placement when using multiple monitors. - 27 - The setup wizard can also be accessed from this tab. Software Installation English nView Desktop Management properties „ ThistabcontainsinformationaboutthenViewDesktopManager. nView Profiles properties „ This tab contains a record all nView display settings for easy software setup.
nView Windows properties „ This tab allows you to control window and dialog box placement when using multiple monitors. - 27 - The setup wizard can also be accessed from this tab. Software Installation English nView Desktop Management properties „ ThistabcontainsinformationaboutthenViewDesktopManager. nView Profiles properties „ This tab contains a record all nView display settings for easy software setup.

Manual
Page 35
Software Installation Also enables full screen video playback via the video mirroring control button. nView Zoom properties „ This tab provides dynamic zoom functionality on the desktop. English nView Effects properties „ This tab provides special windows effects that you perform various actions with shortcut keys or key combinations. - 29 - nView Hot Keys properties „ This tab lets you can apply to your applications.
Software Installation Also enables full screen video playback via the video mirroring control button. nView Zoom properties „ This tab provides dynamic zoom functionality on the desktop. English nView Effects properties „ This tab provides special windows effects that you perform various actions with shortcut keys or key combinations. - 29 - nView Hot Keys properties „ This tab lets you can apply to your applications.