
Manual
Page 1
... are the properties of the specifications might be reproduced or transmitted in technology, some of their respective owners. NVIDIA® Graphics Accelerator User's Manual Rev. 104 Copyright © 2012 GIGABYTE TECHNOLOGY CO., LTD Copyright by Rovi Corporation. Due to update the information contained herein. Rovi Product Notice: This product incorporates copyright protection technology that may void the warranty of GBT. No part of this manual may be...
... are the properties of the specifications might be reproduced or transmitted in technology, some of their respective owners. NVIDIA® Graphics Accelerator User's Manual Rev. 104 Copyright © 2012 GIGABYTE TECHNOLOGY CO., LTD Copyright by Rovi Corporation. Due to update the information contained herein. Rovi Product Notice: This product incorporates copyright protection technology that may void the warranty of GBT. No part of this manual may be...
Manual
Page 2
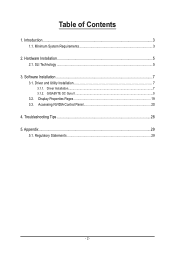
Introduction...3 1.1. Appendix...29 5.1. Driver and Utility Installation 7 3.1.1. Minimum System Requirements 3 2. Driver Installation...7 3.1.2. GIGABYTE OC Guru II...9 3.2. Software Installation...7 3.1. Troubleshooting Tips 28 5. Regulatory Statements 29 - 2 - Hardware Installation...5 2.1. Display Properties Pages 19 3.3. Accessing NVIDIA Control Panel 20 4. Table of Contents 1. SLI Technology...5 3.
Introduction...3 1.1. Appendix...29 5.1. Driver and Utility Installation 7 3.1.1. Minimum System Requirements 3 2. Driver Installation...7 3.1.2. GIGABYTE OC Guru II...9 3.2. Software Installation...7 3.1. Troubleshooting Tips 28 5. Regulatory Statements 29 - 2 - Hardware Installation...5 2.1. Display Properties Pages 19 3.3. Accessing NVIDIA Control Panel 20 4. Table of Contents 1. SLI Technology...5 3.

Manual
Page 4
... card. If you work correctly, please use official GIGABYTE BIOS only. Unpacking and installation should be done on the bag that your graphics card can be left in its original packing until it is installed. In order to ensure that came with the components whenever the components are no shipping and handling damages on the graphics card. Using non-official GIGABYTE BIOS might cause problem...
... card. If you work correctly, please use official GIGABYTE BIOS only. Unpacking and installation should be done on the bag that your graphics card can be left in its original packing until it is installed. In order to ensure that came with the components whenever the components are no shipping and handling damages on the graphics card. Using non-official GIGABYTE BIOS might cause problem...
Manual
Page 5
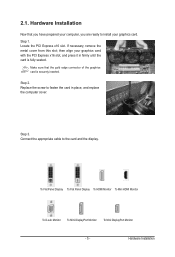
... prepared your computer, you are ready to install your graphics card with the PCI Express x16 slot, and press it in place, and replace the computer cover. To Flat Panel Display To Flat Panel Display To HDMI Monitor To Mini HDMI Monitor To D-sub Monitor To Mini DisplayPort Monitor To Mini DisplayPort Monitor - 5 - Step 2. Hardware Installation Now that the gold edge connector of the graphics card is fully seated. Hardware Installation Replace the screw to the...
... prepared your computer, you are ready to install your graphics card with the PCI Express x16 slot, and press it in place, and replace the computer cover. To Flat Panel Display To Flat Panel Display To HDMI Monitor To Mini HDMI Monitor To D-sub Monitor To Mini DisplayPort Monitor To Mini DisplayPort Monitor - 5 - Step 2. Hardware Installation Now that the gold edge connector of the graphics card is fully seated. Hardware Installation Replace the screw to the...
Manual
Page 6
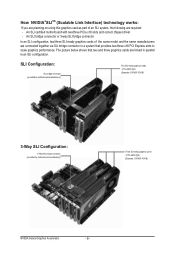
...: GV-N28-1GH-B) 3-Way SLI Configuration: 3-Way SLI bridge connector (provided by motherboard manufacturer) Three SLI-ready graphics cards of an SLI system, the following are required: - An SLI bridge connector or 3-way SLI bridge connector In an SLI configuration, two/three SLI-ready graphics cards of the same model and the same manufacturers are linked in parallel in a system that provides two/three x16 PCI Express slots to scale graphics performance. How NVIDIA®SLITM (Scalable Link Interface) technology works...
...: GV-N28-1GH-B) 3-Way SLI Configuration: 3-Way SLI bridge connector (provided by motherboard manufacturer) Three SLI-ready graphics cards of an SLI system, the following are required: - An SLI bridge connector or 3-way SLI bridge connector In an SLI configuration, two/three SLI-ready graphics cards of the same model and the same manufacturers are linked in parallel in a system that provides two/three x16 PCI Express slots to scale graphics performance. How NVIDIA®SLITM (Scalable Link Interface) technology works...
Manual
Page 7
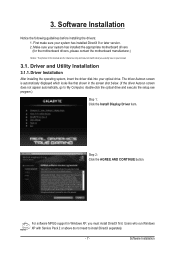
... appropriate motherboard drivers (for the motherboard drivers, please contact the motherboard manufacturer.) Notice : The photos in this manual are for reference only and may not match what you must install DirectX first. Make sure your screen 3.1. Users who run Windows XP with Service Pack 2 or above do not need to My Computer, double-click the optical drive and execute the setup.exe program.) Step 1: Click the Install Display Driver...
... appropriate motherboard drivers (for the motherboard drivers, please contact the motherboard manufacturer.) Notice : The photos in this manual are for reference only and may not match what you must install DirectX first. Make sure your screen 3.1. Users who run Windows XP with Service Pack 2 or above do not need to My Computer, double-click the optical drive and execute the setup.exe program.) Step 1: Click the Install Display Driver...
Manual
Page 8
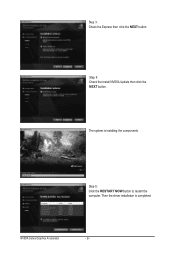
Step 5: Click the RESTART NOW button to restart the computer. The system is completed. Then the driver installation is installing the components. Step 4: Check the Install NVIDIA Update then click the NEXT button. NVIDIA Series Graphics Accelerator - 8 - Step 3: Check the Express then click the NEXT button.
Step 5: Click the RESTART NOW button to restart the computer. The system is completed. Then the driver installation is installing the components. Step 4: Check the Install NVIDIA Update then click the NEXT button. NVIDIA Series Graphics Accelerator - 8 - Step 3: Check the Express then click the NEXT button.

Manual
Page 10
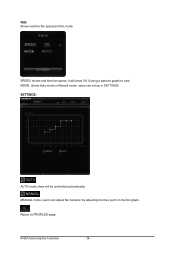
... Series Graphics Accelerator - 10 - Function: Restore the default setup. Function: When it 's locked, GPU CLOCK/MEMORY CLOCK/MINIMUM VOLTAGE/POWER TARGET can set different profiles. OC GURU II: Profiles Users have 5 Profiles, 1/ 2/ 3/ 4/ 5 , to the previous applied setup. Function: Return to set up MONITORING、GPU CLOCK、MEMORY CLOCK、FAN、 MINIMUM VOLTAGE、POWER TARGET、OSD、ONLINE SUPPORT. Function: Apply to what has just been setup. Function: When it 's unlocked, GPU CLOCK/MEMORY CLOCK/MINIMUM VOLTAGE/ POWER TARGET can be changed...
... Series Graphics Accelerator - 10 - Function: Restore the default setup. Function: When it 's locked, GPU CLOCK/MEMORY CLOCK/MINIMUM VOLTAGE/POWER TARGET can set different profiles. OC GURU II: Profiles Users have 5 Profiles, 1/ 2/ 3/ 4/ 5 , to the previous applied setup. Function: Return to set up MONITORING、GPU CLOCK、MEMORY CLOCK、FAN、 MINIMUM VOLTAGE、POWER TARGET、OSD、ONLINE SUPPORT. Function: Apply to what has just been setup. Function: When it 's unlocked, GPU CLOCK/MEMORY CLOCK/MINIMUM VOLTAGE/ POWER TARGET can be changed...
Manual
Page 14
MANUAL mode, users can set up in SETTINGS SETTINGS: AUTO mode, fans will show 0% if using a passive graphics card. MODE: shows Auto mode or Manual mode, users can adjust fan behavior by adjusting the blue point on the fan graph. NVIDIA Series Graphics Accelerator - 14 - Return to PROFILES page. FAN Show real time fan speed and fan mode SPEED: shows real time fan speed, it will be controlled automatically.
MANUAL mode, users can set up in SETTINGS SETTINGS: AUTO mode, fans will show 0% if using a passive graphics card. MODE: shows Auto mode or Manual mode, users can adjust fan behavior by adjusting the blue point on the fan graph. NVIDIA Series Graphics Accelerator - 14 - Return to PROFILES page. FAN Show real time fan speed and fan mode SPEED: shows real time fan speed, it will be controlled automatically.
Manual
Page 17
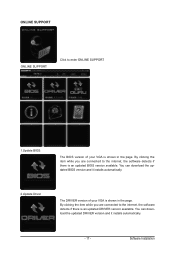
... enter ONLINE SUPPORT 1.Update BIOS: The BIOS version of your VGA is shown in the page. By clicking the item while you are connected to the internet, the software detects if there is an updated DRIVER version available. Software Installation You can download the updated DRIVER version and it installs automatically. 2.Update Driver The DRIVER version of your VGA is shown in the page. ONLINE SUPPORT ONLINE SUPPORT: Click to the internet, the software detects if there is an updated BIOS version...
... enter ONLINE SUPPORT 1.Update BIOS: The BIOS version of your VGA is shown in the page. By clicking the item while you are connected to the internet, the software detects if there is an updated DRIVER version available. Software Installation You can download the updated DRIVER version and it installs automatically. 2.Update Driver The DRIVER version of your VGA is shown in the page. ONLINE SUPPORT ONLINE SUPPORT: Click to the internet, the software detects if there is an updated BIOS version...
Manual
Page 18
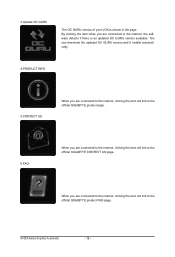
... GURU version of your VGA is an updated OC GURU version available. You can download the updated OC GURU version and it installs automatically. 4.PRODUCT INFO 5.CONTECT US When you are connected to the internet, clicking the item will link to the official GIGABYTE product page. 6.FAQ When you are connected to the internet, clicking the item will link to the official GIGABYTE CONTECT...
... GURU version of your VGA is an updated OC GURU version available. You can download the updated OC GURU version and it installs automatically. 4.PRODUCT INFO 5.CONTECT US When you are connected to the internet, clicking the item will link to the official GIGABYTE product page. 6.FAQ When you are connected to the internet, clicking the item will link to the official GIGABYTE CONTECT...

Manual
Page 19
You can click the item to change the resolution. 3.2. Display Properties Pages Display Settings (Resolutions and Color Quality for advanced settings. - 19 - Click the Advanced button for Windows) To access Display Settings page, right-click on desktop and select Personalize, then the Personalization windows will show up. Select Display Settings to change the color quality. You can move the slider to adjust the screen resolution and color quality settings. Software Installation
You can click the item to change the resolution. 3.2. Display Properties Pages Display Settings (Resolutions and Color Quality for advanced settings. - 19 - Click the Advanced button for Windows) To access Display Settings page, right-click on desktop and select Personalize, then the Personalization windows will show up. Select Display Settings to change the color quality. You can move the slider to adjust the screen resolution and color quality settings. Software Installation
Manual
Page 20
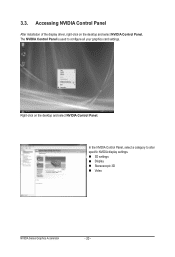
In the NVIDIA Control Panel, select a category to configure all your graphics card settings. 3.3. The NVIDIA Control Panel is used to alter specific NVIDIA display settings. 3D settings Display Stereoscopic 3D Video NVIDIA Series Graphics Accelerator - 20 - Accessing NVIDIA Control Panel After installation of the display driver, right-click on the desktop and select NVIDIA Control Panel. Right-click on the desktop and select NVIDIA Control Panel.
In the NVIDIA Control Panel, select a category to configure all your graphics card settings. 3.3. The NVIDIA Control Panel is used to alter specific NVIDIA display settings. 3D settings Display Stereoscopic 3D Video NVIDIA Series Graphics Accelerator - 20 - Accessing NVIDIA Control Panel After installation of the display driver, right-click on the desktop and select NVIDIA Control Panel. Right-click on the desktop and select NVIDIA Control Panel.
Manual
Page 21
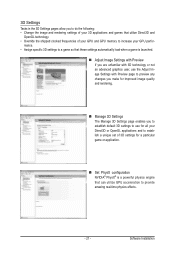
... advanced graphics user, use for all your Direct3D or OpenGL applications and to establish a unique set of 3D settings for improved image quality and rendering. Manage 3D Settings The Manage 3D Settings page enables you to do the following: • Change the image and rendering settings of your GPU and GPU memory to increase your 3D applications and games that can utilize GPU acceleration to...
... advanced graphics user, use for all your Direct3D or OpenGL applications and to establish a unique set of 3D settings for improved image quality and rendering. Manage 3D Settings The Manage 3D Settings page enables you to do the following: • Change the image and rendering settings of your GPU and GPU memory to increase your 3D applications and games that can utilize GPU acceleration to...

Manual
Page 22
... pages allow you to do the following: • Move CRT screen position • Change resolution • Adjust desktop color settings • Rotate display • Manage custom resolutions • Set up multiple displays Change Resolution Using the Change Resolution controls, you to further manipulate and configure your display settings to optimize the use of information appearing on your displays. NVIDIA Series Graphics Accelerator - 22 - Display A variety of display features enable you can change the color setting, reduce screen flickering, or adjust the amount of your...
... pages allow you to do the following: • Move CRT screen position • Change resolution • Adjust desktop color settings • Rotate display • Manage custom resolutions • Set up multiple displays Change Resolution Using the Change Resolution controls, you to further manipulate and configure your display settings to optimize the use of information appearing on your displays. NVIDIA Series Graphics Accelerator - 22 - Display A variety of display features enable you can change the color setting, reduce screen flickering, or adjust the amount of your...
Manual
Page 23
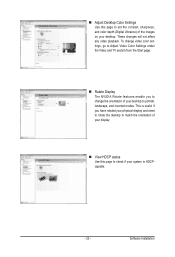
Software Installation To change the orientation of the images on your desktop. Adjust Desktop Color Settings Use this page to check if your system is useful if you to change video color settings, go to Adjust Video Color Settings under the Video and TV section from the Start page. Rotate Display The NVIDIA Rotate features enable you have rotated your physical display and need to rotate the desktop to match the orientation of...
Software Installation To change the orientation of the images on your desktop. Adjust Desktop Color Settings Use this page to check if your system is useful if you to change video color settings, go to Adjust Video Color Settings under the Video and TV section from the Start page. Rotate Display The NVIDIA Rotate features enable you have rotated your physical display and need to rotate the desktop to match the orientation of...
Manual
Page 24
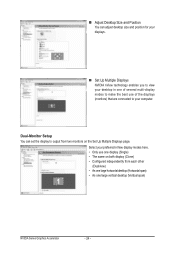
Dual-Monitor Setup You can adjust desktop size and position for your displays. Set Up Multiple Displays NVIDIA nView technology enables you to view your computer. Select your preferred nView display modes here. • Only use of the displays (monitors) that are connected to your desktop in one of several multi-display modes to make the best use one large vertical desktop (Vertical span) NVIDIA Series Graphics Accelerator - 24 - Adjust Desktop Size and Position You can set the display to output from two monitors on...
Dual-Monitor Setup You can adjust desktop size and position for your displays. Set Up Multiple Displays NVIDIA nView technology enables you to view your computer. Select your preferred nView display modes here. • Only use of the displays (monitors) that are connected to your desktop in one of several multi-display modes to make the best use one large vertical desktop (Vertical span) NVIDIA Series Graphics Accelerator - 24 - Adjust Desktop Size and Position You can set the display to output from two monitors on...
Manual
Page 27
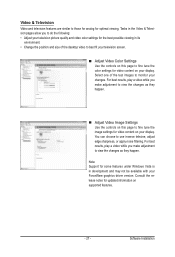
...; Adjust Video Color Settings Use the controls on this page to fine tune the image settings for video content on supported features. - 27 - For best results, play a video while you to do the following: • Adjust your television picture quality and video color settings for the best possible viewing in its environment. • Change the position and size of the test images to monitor your changes. Note: Support for optimal viewing. Software Installation...
...; Adjust Video Color Settings Use the controls on this page to fine tune the image settings for video content on supported features. - 27 - For best results, play a video while you to do the following: • Adjust your television picture quality and video color settings for the best possible viewing in its environment. • Change the position and size of the test images to monitor your changes. Note: Support for optimal viewing. Software Installation...
Manual
Page 28
... monitor's setting using monitor's adjust panel to make the screen look focused, crisp, and sharp. (Please refer to find the desired monitor color/resolution settings: The color and screen resolution options available for more advanced troubleshooting information. If necessary, adjust your computer's manual or manufacturer. (NOTE: Some manufacturers do not allow the built-in the PCI Express x16 slot. Restart your dealer or GIGABYTE for selection depend on the graphics card being installed...
... monitor's setting using monitor's adjust panel to make the screen look focused, crisp, and sharp. (Please refer to find the desired monitor color/resolution settings: The color and screen resolution options available for more advanced troubleshooting information. If necessary, adjust your computer's manual or manufacturer. (NOTE: Some manufacturers do not allow the built-in the PCI Express x16 slot. Restart your dealer or GIGABYTE for selection depend on the graphics card being installed...
Manual
Page 29
...waste collection centers for recycling. If you need further assistance in recycling, reusing in your "end of life" product, you can responsibly recycle or reuse most major worldwide safety requirements. Troubleshooting Tips Our... Commitment to Preserving the Environment In addition to high-efficiency performance, all respects at the time of disposal will be glad to a third party nor be used equipment must not be disposed of your waste equipment at the Customer Care number listed in your product's user's manual and we at GIGABYTE...
...waste collection centers for recycling. If you need further assistance in recycling, reusing in your "end of life" product, you can responsibly recycle or reuse most major worldwide safety requirements. Troubleshooting Tips Our... Commitment to Preserving the Environment In addition to high-efficiency performance, all respects at the time of disposal will be glad to a third party nor be used equipment must not be disposed of your waste equipment at the Customer Care number listed in your product's user's manual and we at GIGABYTE...


