Manual
Page 4
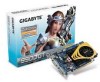
Hardware Installation 6 2.1. Windows® XP Driver and Utilities Installation 13 3.1.1. GIGABYTE Gamer HUD Lite on Driver CD 17 3.1.5. Appendix ...37 5.1. Resolutions and Color Depth Tables (In Windows XP 38 Regulatory Statements 40 (Note) This item will ... 13 3.1. Taskbar Icon ...19 3.1.6. Features ...5 1.2. Minimum System Requirements 5 2. Operating System Requirements 13 3.1.2. Hardware Installation ...8 3. Board Layout ...6 2.2. nView Properties Pages (Note 31 4. How to Reflash the BIOS in MS-DOS Mode 37 5.2.
Hardware Installation 6 2.1. Windows® XP Driver and Utilities Installation 13 3.1.1. GIGABYTE Gamer HUD Lite on Driver CD 17 3.1.5. Appendix ...37 5.1. Resolutions and Color Depth Tables (In Windows XP 38 Regulatory Statements 40 (Note) This item will ... 13 3.1. Taskbar Icon ...19 3.1.6. Features ...5 1.2. Minimum System Requirements 5 2. Operating System Requirements 13 3.1.2. Hardware Installation ...8 3. Board Layout ...6 2.2. nView Properties Pages (Note 31 4. How to Reflash the BIOS in MS-DOS Mode 37 5.2.

Manual
Page 7
DO NOT APPLY POWER TO YOUR SYSTEM IF THE GRAPHICS CARD IS DAMAGED. Using non-official GIGABYTE BIOS might cause problem(s) on your computer. 1. Expansion cards contain very delicate Integrated Circuit (IC) chips. The card contains sensitive electric components, ... grounded object or to a metal object, such as the anti-static mat. Turn off your card. If you work correctly, please use official GIGABYTE BIOS only. In order to your computer and unplug power supply. 2. Unpacking and installation should be done on the card before handling computer components. Be...
DO NOT APPLY POWER TO YOUR SYSTEM IF THE GRAPHICS CARD IS DAMAGED. Using non-official GIGABYTE BIOS might cause problem(s) on your computer. 1. Expansion cards contain very delicate Integrated Circuit (IC) chips. The card contains sensitive electric components, ... grounded object or to a metal object, such as the anti-static mat. Turn off your card. If you work correctly, please use official GIGABYTE BIOS only. In order to your computer and unplug power supply. 2. Unpacking and installation should be done on the card before handling computer components. Be...
Manual
Page 37
... the A:\> prompt, type[ B I O S f l a s h u t i l i t y n a m e ] - This procedure assumes drive A. 2. Wait until it's done, then restart your hard disk(s) or floppy disk. p [BIOS file name] (example: gvf19 -p 95td35h.f2) and press Enter. 6. Appendix To flash BIOS, at the A:\> prompt, type[BIOS flash utility name] -s [BIOS file name] (example: gvf19 -s 95td35h.f1) and press Enter. 5. 5. Appendix 5.1. How to A:\>. 4.
... the A:\> prompt, type[ B I O S f l a s h u t i l i t y n a m e ] - This procedure assumes drive A. 2. Wait until it's done, then restart your hard disk(s) or floppy disk. p [BIOS file name] (example: gvf19 -p 95td35h.f2) and press Enter. 6. Appendix To flash BIOS, at the A:\> prompt, type[BIOS flash utility name] -s [BIOS file name] (example: gvf19 -s 95td35h.f1) and press Enter. 5. 5. Appendix 5.1. How to A:\>. 4.

