Manual
Page 4
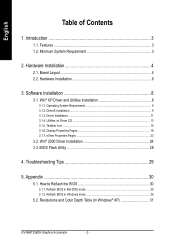
... Pages 23 3.2. Win® 2000 Driver Installation 28 3.3. Features ...3 1.2. Display Properties Pages 18 3.1.7. Reflash BIOS in Windows mode 30 5.2. Minimum System Requirement 3 2. Utilities on Driver CD ...13 3.1.5. Resolutions and Color Depth Table (In Windows® XP 31 GV-N68T256DH Graphics Accelerator - 2 - Hardware Installation 4 2.1. Operating System Requirement 8 3.1.2. Win® XP Driver and Utilities Installation...
... Pages 23 3.2. Win® 2000 Driver Installation 28 3.3. Features ...3 1.2. Display Properties Pages 18 3.1.7. Reflash BIOS in Windows mode 30 5.2. Minimum System Requirement 3 2. Utilities on Driver CD ...13 3.1.5. Resolutions and Color Depth Table (In Windows® XP 31 GV-N68T256DH Graphics Accelerator - 2 - Hardware Installation 4 2.1. Operating System Requirement 8 3.1.2. Win® XP Driver and Utilities Installation...
Manual
Page 7
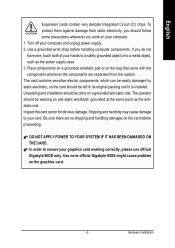
Turn off your graphics card working correctly, please use official Gigabyte BIOS only. Place components on a grounded antistatic pad or on your computer. 1. The operator should be wearing an anti-static wristband, grounded at the same point ... POWER TO YOUR SYSTEM IF IT HAS BEEN DAMAGED ON THE CARD. In order to a metal object, such as the antistatic mat. Use none official Gigabyte BIOS might cause problem on a grounded anti-static mat. Shipping and handling may cause damage to your hands to a safely grounded object or to ensure your...
Turn off your graphics card working correctly, please use official Gigabyte BIOS only. Place components on a grounded antistatic pad or on your computer. 1. The operator should be wearing an anti-static wristband, grounded at the same point ... POWER TO YOUR SYSTEM IF IT HAS BEEN DAMAGED ON THE CARD. In order to a metal object, such as the antistatic mat. Use none official Gigabyte BIOS might cause problem on a grounded anti-static mat. Shipping and handling may cause damage to your hands to a safely grounded object or to ensure your...
Manual
Page 30
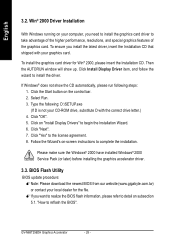
... 2000 Driver Installation With Windows running on subsection 5.1. Click Install Display Driver item, and follow the wizard to the license agreement. 8. GV-N68T256DH Graphics Accelerator - 28 - Please make sure the Windows® 2000 have installed Windows® 2000 Service Pack (or later) before ...your CD-ROM drive, substitute D with the correct drive letter.) 4. Select Run. 3. BIOS Flash Utility BIOS update procedure: 0Note: Please download the newest BIOS from our website (www.gigabyte.com.tw) or contact your local dealer for Win® 2000, please insert the Installation ...
... 2000 Driver Installation With Windows running on subsection 5.1. Click Install Display Driver item, and follow the wizard to the license agreement. 8. GV-N68T256DH Graphics Accelerator - 28 - Please make sure the Windows® 2000 have installed Windows® 2000 Service Pack (or later) before ...your CD-ROM drive, substitute D with the correct drive letter.) 4. Select Run. 3. BIOS Flash Utility BIOS update procedure: 0Note: Please download the newest BIOS from our website (www.gigabyte.com.tw) or contact your local dealer for Win® 2000, please insert the Installation ...
Manual
Page 32
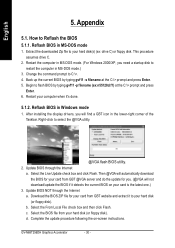
...and extract it to your computer when it detects the current BIOS on -screen instructions. Extract the downloaded Zip file to your hard disk (or floppy disk). GV-N68T256DH Graphics Accelerator - 30 - English 5. How to flash BIOS by typing gvf11 -s filename at the C:\> prompt and press ...Enter. 6. Back up the current BIOS by typing gvf11 -p filename (ex:n55128d.f1) at the C:\> prompt ...
...and extract it to your computer when it detects the current BIOS on -screen instructions. Extract the downloaded Zip file to your hard disk (or floppy disk). GV-N68T256DH Graphics Accelerator - 30 - English 5. How to flash BIOS by typing gvf11 -s filename at the C:\> prompt and press ...Enter. 6. Back up the current BIOS by typing gvf11 -p filename (ex:n55128d.f1) at the C:\> prompt ...

