
Manual
Page 2
... color depth table (In Windows® XP 34 GV-N57 Series Graphics Accelerator - 2 - Minimum system requirement 3 2. Hardware Installation 4 2.1. Unpacking 4 2.2. Win® 98/98SE / Win® 2000 / Win® ME driver installation 31 3.3. Features 3 1.2. Operating system requirement 9 3.1.2. nView properties pages 26 3.2. Software Installation 9 3.1. Utilities on driver CD 16 3.1.5. BIOS flash utility 31 4. Appendix 33...
... color depth table (In Windows® XP 34 GV-N57 Series Graphics Accelerator - 2 - Minimum system requirement 3 2. Hardware Installation 4 2.1. Unpacking 4 2.2. Win® 98/98SE / Win® 2000 / Win® ME driver installation 31 3.3. Features 3 1.2. Operating system requirement 9 3.1.2. nView properties pages 26 3.2. Software Installation 9 3.1. Utilities on driver CD 16 3.1.5. BIOS flash utility 31 4. Appendix 33...
Manual
Page 4
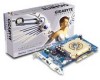
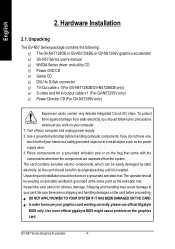
...Shipping and handling may cause damage to D-Sub connector TV-Out cable x 1(For GV-N57128DE/GV-N57256DE only) S-video and AV in stalled. Use none official gigabyte BIOS might cause problem on your card. GV-N57 Series Graphics Accelerator - 4 - English 2. The card contains sensitive electric ... YOUR SYSTEM IF IT HAS BEEN DAMAGED ON THE CARD. Unpacking The GV-N57 Series package contains the following: The GV-N57128DE or GV-N57256DE or GV-N57256V graphics accelerator GV-N57 Series user's manual NVIDIA Series driver and utility CD Power DVD CD Game CD DVI-I to your computer....
...Shipping and handling may cause damage to D-Sub connector TV-Out cable x 1(For GV-N57128DE/GV-N57256DE only) S-video and AV in stalled. Use none official gigabyte BIOS might cause problem on your card. GV-N57 Series Graphics Accelerator - 4 - English 2. The card contains sensitive electric ... YOUR SYSTEM IF IT HAS BEEN DAMAGED ON THE CARD. Unpacking The GV-N57 Series package contains the following: The GV-N57128DE or GV-N57256DE or GV-N57256V graphics accelerator GV-N57 Series user's manual NVIDIA Series driver and utility CD Power DVD CD Game CD DVI-I to your computer....

Manual
Page 8
then align your graphics card came with the installation of the graphics card driver. Plug the display cable into your operating system from this slot; For detailed instructions, select your card; English 4. If your graphics card with the AGP ... the computer and monitor. If necessary, remove the metal cover from the list below ... To VGA Monitor To TV or V CR (For GV-N57128DE/GV-N57256DE only) 9 Pin(VIVO ) (For GV-N57256V only) To Flat Panel Display You are now ready to proceed with a DVI connector, you can connect a flat panel display to fasten...
then align your graphics card came with the installation of the graphics card driver. Plug the display cable into your operating system from this slot; For detailed instructions, select your card; English 4. If your graphics card with the AGP ... the computer and monitor. If necessary, remove the metal cover from the list below ... To VGA Monitor To TV or V CR (For GV-N57128DE/GV-N57256DE only) 9 Pin(VIVO ) (For GV-N57256V only) To Flat Panel Display You are now ready to proceed with a DVI connector, you can connect a flat panel display to fasten...

Manual
Page 9
... show up, run "D:\setup.exe"). Or please contact your CD-ROM Drive letter to install the driver for your system has installed DirectX 8 or later version. • If you install the graphics card drivers for the motherboard, which consist of Win® 98/98SE / Win® 2000 / Win®...; ME / Win® XP drivers is very simple. Then you can follow the guides to setup your graphics card driver. (Please follow the subsection 3.1.3 "Driver installation" to be Drive D: The installation of SIS, ALI or VIA chipsets, please install the appropriate...
... show up, run "D:\setup.exe"). Or please contact your CD-ROM Drive letter to install the driver for your system has installed DirectX 8 or later version. • If you install the graphics card drivers for the motherboard, which consist of Win® 98/98SE / Win® 2000 / Win®...; ME / Win® XP drivers is very simple. Then you can follow the guides to setup your graphics card driver. (Please follow the subsection 3.1.3 "Driver installation" to be Drive D: The installation of SIS, ALI or VIA chipsets, please install the appropriate...

Manual
Page 12
.... Step 3: Found new hardware wizard: Finish Click the "Finish" button to install the driver from AUTORUN window. GV-N57 Series Graphics Accelerator - 12 - Step 1: Found new hardware wizard: Video controller (VGACompatible) Click "Next" button to install the driver. (There is a driver CD disk that came with your computer at the first time, the windows...
.... Step 3: Found new hardware wizard: Finish Click the "Finish" button to install the driver from AUTORUN window. GV-N57 Series Graphics Accelerator - 12 - Step 1: Found new hardware wizard: Video controller (VGACompatible) Click "Next" button to install the driver. (There is a driver CD disk that came with your computer at the first time, the windows...

Manual
Page 13
Click "Next" button. If it does not show up , please run "D:\setup.exe". Step 1. Windows installings the components. - 13 - Click "Install Display Driver" item. Driver installation (Autorun Window) Insert the driver CD disk into your CD-ROM, and then you can see theAUTORUN window. Click "Install Display Driver" item. When autorun window show up , click Install Disp lay Driver item. Step 2. Software Installation English B.
Click "Next" button. If it does not show up , please run "D:\setup.exe". Step 1. Windows installings the components. - 13 - Click "Install Display Driver" item. Driver installation (Autorun Window) Insert the driver CD disk into your CD-ROM, and then you can see theAUTORUN window. Click "Install Display Driver" item. When autorun window show up , click Install Disp lay Driver item. Step 2. Software Installation English B.

Manual
Page 14
If it does not show up , please run "D:\setup.exe". Step 1. Click "WDM Driver" item. Click "Finish" button to restart computer. Then the driver installation is completed. Click "Install Display Driver" item. Driver installation (WDM Driver)(For GV-N57256V only) Insert the driver CD disk into your CD-ROM, and then you can see theAUTORUN window. When autorun window show up , click Install Disp lay Driver item. C. GV-N57 Series Graphics Accelerator - 14 - English Step 3.
If it does not show up , please run "D:\setup.exe". Step 1. Click "WDM Driver" item. Click "Finish" button to restart computer. Then the driver installation is completed. Click "Install Display Driver" item. Driver installation (WDM Driver)(For GV-N57256V only) Insert the driver CD disk into your CD-ROM, and then you can see theAUTORUN window. When autorun window show up , click Install Disp lay Driver item. C. GV-N57 Series Graphics Accelerator - 14 - English Step 3.

Manual
Page 15
Windows installings the components. Click "Finish" button to restart computer. Then the driver installation is completed. * Please notice that the WDM driver is only for Windows XP. - 15 - Step 3. English Step 2. Software Installation Click "Next" button.
Windows installings the components. Click "Finish" button to restart computer. Then the driver installation is completed. * Please notice that the WDM driver is only for Windows XP. - 15 - Step 3. English Step 2. Software Installation Click "Next" button.

Manual
Page 16
When autorun window show up , click V-Tu ner item. Step 3 . Then the V-Tuner installation is completed. If it does not show up , please run "D:\setup.exe". • Install V-Tuner: Step 1. Step 4. Step 2. Click "V-Tuner" item. Enter your CD-ROM, and then you can see theAUTORUN window. GV-N57 Series Graphics Accelerator - 16 - English 3.1.4. Utilities on driver CD Insert the driver CD disk into your name and co mpany. Click "Finish" button to restart computer. Click "Next" button.
When autorun window show up , click V-Tu ner item. Step 3 . Then the V-Tuner installation is completed. If it does not show up , please run "D:\setup.exe". • Install V-Tuner: Step 1. Step 4. Step 2. Click "V-Tuner" item. Enter your CD-ROM, and then you can see theAUTORUN window. GV-N57 Series Graphics Accelerator - 16 - English 3.1.4. Utilities on driver CD Insert the driver CD disk into your name and co mpany. Click "Finish" button to restart computer. Click "Next" button.

Manual
Page 18
... icon opens the GBT control panel, showing a menu composed of shortcut of the display drivers, you will find a GBT icon on the taskbar's status area. Click "VGA Information" item into the "VGA Info" and "Color Adjust"ta bs. GV-N57 Series Graphics Accelerator - 18 - Click the appropriate tab to GBT website for...
... icon opens the GBT control panel, showing a menu composed of shortcut of the display drivers, you will find a GBT icon on the taskbar's status area. Click "VGA Information" item into the "VGA Info" and "Color Adjust"ta bs. GV-N57 Series Graphics Accelerator - 18 - Click the appropriate tab to GBT website for...

Manual
Page 20
You can adjust the properties of the display drivers, you will find a NVIDIA icon on the taskbar's status area. GV-N57 Series Graphics Accelerator - 20 - English After installation of the graphics accelertaor from here. Right click the icon. You can enable the nView function. Clicking this icon open the control panel.
You can adjust the properties of the display drivers, you will find a NVIDIA icon on the taskbar's status area. GV-N57 Series Graphics Accelerator - 20 - English After installation of the graphics accelertaor from here. Right click the icon. You can enable the nView function. Clicking this icon open the control panel.

Manual
Page 21
... color quality settings. Settings (Resolutions and Color depth for adapter and setting. English 3.1.6. Click "Advanced", into details settings: n This page shows the Adapter, System and Driver versions information. Software Installation
... color quality settings. Settings (Resolutions and Color depth for adapter and setting. English 3.1.6. Click "Advanced", into details settings: n This page shows the Adapter, System and Driver versions information. Software Installation

Manual
Page 31
... for Win® 98/98SE / Win® 2000 / Win® ME, please insert the Installation CD. To install the graphics card driver for the file. Click the Start button on subsection 5.1. BIOS flash utility BIOS update procedure: MNote: Please download the newest BIOS from our website... (www.gigabyte.com.tw) or contact your computer, you want to realize the BIOS flash information, please refer to complete the installation. 3.3. If Windows&#...
... for Win® 98/98SE / Win® 2000 / Win® ME, please insert the Installation CD. To install the graphics card driver for the file. Click the Start button on subsection 5.1. BIOS flash utility BIOS update procedure: MNote: Please download the newest BIOS from our website... (www.gigabyte.com.tw) or contact your computer, you want to realize the BIOS flash information, please refer to complete the installation. 3.3. If Windows&#...

Manual
Page 32
... problems. Contact your computer's manual or manufacturer. (NOTE: Some manufacturers do not allow the built-in graphics to be disabled or to the monitor's manual.) GV-N57 Series Graphics Accelerator - 32 - n For more information, consult your dealer or GBT for more advanced troubleshooting information. English 4. n Make sure that the monitor and... you are plugged in graphics capabilities on the screen. Then select the number for duplicate display adapter and monitor entries if you installed the graphics driver.
... problems. Contact your computer's manual or manufacturer. (NOTE: Some manufacturers do not allow the built-in graphics to be disabled or to the monitor's manual.) GV-N57 Series Graphics Accelerator - 32 - n For more information, consult your dealer or GBT for more advanced troubleshooting information. English 4. n Make sure that the monitor and... you are plugged in graphics capabilities on the screen. Then select the number for duplicate display adapter and monitor entries if you installed the graphics driver.

