Manual
Page 1
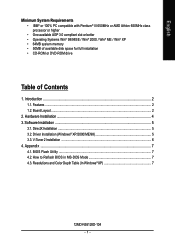
... ...7 4.1. Board Layout ...2 2. DirectX Installation ...5 3.2. BIOS Flash Utility ...7 4.2. How to Reflash BIOS in MS-DOS Mode 7 4.3. Hardware Installation 4 3. Driver Installation (Windows® XP/2000/ME/98 5 3.3. V-Tuner 2 Installation ...6 4. English Minimum System Requirements • IBM® or 100% PC compatible with Pentium® III 650MHz or AMD Athlon 650MHz class processor or higher • One available AGP 3.0 compliant slot or better • Operating Systems Win® 98/98SE / Win® 2000 / Win® ME / Win®...
... ...7 4.1. Board Layout ...2 2. DirectX Installation ...5 3.2. BIOS Flash Utility ...7 4.2. How to Reflash BIOS in MS-DOS Mode 7 4.3. Hardware Installation 4 3. Driver Installation (Windows® XP/2000/ME/98 5 3.3. V-Tuner 2 Installation ...6 4. English Minimum System Requirements • IBM® or 100% PC compatible with Pentium® III 650MHz or AMD Athlon 650MHz class processor or higher • One available AGP 3.0 compliant slot or better • Operating Systems Win® 98/98SE / Win® 2000 / Win® ME / Win®...
Manual
Page 2
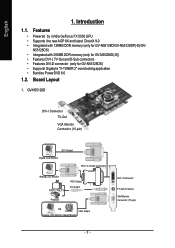
... 2" overclocking application • Bundles PowerDVD 6.0 1.2. Board Layout 1. English 1. GV-N55128D DVI-I Connector TV-Out VGA Monitor Connector (15-pin) DVI Output Digital LCD Monitor DVI-I to D-Sub Connector Analog LCD Monitor NTSC / PAL TV VGA Output AV Output Projector OR VGA Output Analog LCD Monitor Analog Monitor DVI-I , TV-Out and D-Sub connectors • Features DVI-D connector (only for GV-N55128D/GV-N55128DP(-E)/GV- Features • Powered by nVidia GeForce FX 5500 GPU • Supports the new AGP 8X and latest DirectX 9.0 • Integrated with 256MB DDR memory...
... 2" overclocking application • Bundles PowerDVD 6.0 1.2. Board Layout 1. English 1. GV-N55128D DVI-I Connector TV-Out VGA Monitor Connector (15-pin) DVI Output Digital LCD Monitor DVI-I to D-Sub Connector Analog LCD Monitor NTSC / PAL TV VGA Output AV Output Projector OR VGA Output Analog LCD Monitor Analog Monitor DVI-I , TV-Out and D-Sub connectors • Features DVI-D connector (only for GV-N55128D/GV-N55128DP(-E)/GV- Features • Powered by nVidia GeForce FX 5500 GPU • Supports the new AGP 8X and latest DirectX 9.0 • Integrated with 256MB DDR memory...
Manual
Page 4
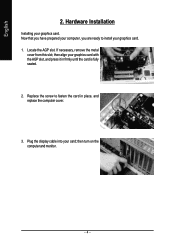
Replace the screw to install your graphics card. 1. Plug the display cable into your graphics card. If necessary, remove the metal cover from this slot; then turn on the computer and monitor. - 4 - Locate the AGP slot. then align your computer, you are ready to fasten the card in firmly until the card is fully seated. 2. Now that you have prepared your graphics card with the AGP slot, and press it in place, and replace the computer cover. 3. English 2. Hardware Installation Installing your card;
Replace the screw to install your graphics card. 1. Plug the display cable into your graphics card. If necessary, remove the metal cover from this slot; then turn on the computer and monitor. - 4 - Locate the AGP slot. then align your computer, you are ready to fasten the card in firmly until the card is fully seated. 2. Now that you have prepared your graphics card with the AGP slot, and press it in place, and replace the computer cover. 3. English 2. Hardware Installation Installing your card;
Manual
Page 5
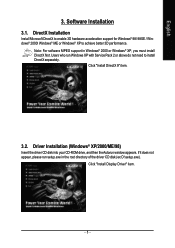
... "Install DirectX 9" item. 3.2. DirectX Installation Install Microsoft DirectX to enable 3D hardware acceleration support for Windows® 98/ 98SE / Windows® 2000/ Windows® ME or Windows® XP to install DirectX separately. Click "Install Display Driver" item. - 5 - Note: For software MPEG support in the root directory of the driver CD disk (ex:D:\setup.exe). Software Installation 3.1. Users who run setup.exe in Windows® 2000 or Windows® XP, you must install DirectX first. Driver Installation (Windows® XP/2000/ME/98) Insert the driver CD disk...
... "Install DirectX 9" item. 3.2. DirectX Installation Install Microsoft DirectX to enable 3D hardware acceleration support for Windows® 98/ 98SE / Windows® 2000/ Windows® ME or Windows® XP to install DirectX separately. Click "Install Display Driver" item. - 5 - Note: For software MPEG support in the root directory of the driver CD disk (ex:D:\setup.exe). Software Installation 3.1. Users who run setup.exe in Windows® 2000 or Windows® XP, you must install DirectX first. Driver Installation (Windows® XP/2000/ME/98) Insert the driver CD disk...
Manual
Page 6
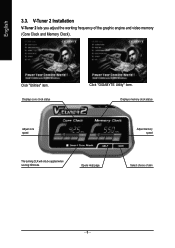
Click "Utilities" item. Displays memory clock status Adjust core speed The tunning CLK will only be applied when running 3D mode. Opens Help page Adjust memory speed Select choice of the graphic engine and video memory (Core Clock and Memory Clock). English 3.3. Displays core clock status Click "GIGABYTE Utility" item. V-Tuner 2 Installation V-Tuner 2 lets you adjust the working frequency of skin - 6 -
Click "Utilities" item. Displays memory clock status Adjust core speed The tunning CLK will only be applied when running 3D mode. Opens Help page Adjust memory speed Select choice of the graphic engine and video memory (Core Clock and Memory Clock). English 3.3. Displays core clock status Click "GIGABYTE Utility" item. V-Tuner 2 Installation V-Tuner 2 lets you adjust the working frequency of skin - 6 -
Manual
Page 7
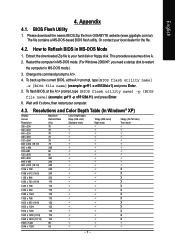
...-based BIOS flash utility. This procedure assumes drive A. 2. To flash BIOS, at the A:\> prompt, type[BIOS flash utility name] -s [BIOS file name] (example: gvf11 -s n55128d.e1) and press Enter. 5. Wait until it's done, then restart your hard disk or floppy disk. Restart the computer in MS-DOS mode. (For Windows 2000/XP, you need a startup disk to your computer. 4.3. Resolutions and Color Depth Table (In Windows® XP) Display Screen Resolution 320...
...-based BIOS flash utility. This procedure assumes drive A. 2. To flash BIOS, at the A:\> prompt, type[BIOS flash utility name] -s [BIOS file name] (example: gvf11 -s n55128d.e1) and press Enter. 5. Wait until it's done, then restart your hard disk or floppy disk. Restart the computer in MS-DOS mode. (For Windows 2000/XP, you need a startup disk to your computer. 4.3. Resolutions and Color Depth Table (In Windows® XP) Display Screen Resolution 320...


