
Manual
Page 4
Driver and Utility Installation 10 3.1.1. Driver Installation 10 3.2. Regulatory Statements 25 - 4 - Table of Contents 1. Features ...4 1.2. Board Layout ...5 2.2. Accessing NVIDIA Control Panel 13 4. Hardware Installation ...8 3. Display Properties Pages 12 3.3. Appendix ...22 5.1. Minimum System Requirements 4 2. Hardware Installation 5 2.1. Troubleshooting Tips 21 5. Introduction ...4 1.1. Software Installation 10 3.1. Resolutions and Color Depth Table (In Windows XP 23 5.3. How to Reflash the BIOS in MS-DOS Mode 22 5.2.
Driver and Utility Installation 10 3.1.1. Driver Installation 10 3.2. Regulatory Statements 25 - 4 - Table of Contents 1. Features ...4 1.2. Board Layout ...5 2.2. Accessing NVIDIA Control Panel 13 4. Hardware Installation ...8 3. Display Properties Pages 12 3.3. Appendix ...22 5.1. Minimum System Requirements 4 2. Hardware Installation 5 2.1. Troubleshooting Tips 21 5. Introduction ...4 1.1. Software Installation 10 3.1. Resolutions and Color Depth Table (In Windows XP 23 5.3. How to Reflash the BIOS in MS-DOS Mode 22 5.2.
Manual
Page 5
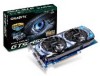
...driver - Minimum System Requirements • Hardware - 400-watt system power supply specification or above is recommended - GIGABYTE TECHNOLOGY). - 5 - Introduction 1.1. Windows® 7 - An SLI certified motherboard with two x16 physical connectors. Introduction Two GV-N450OC-1GI/GV-N450OC2-1GI...Link DVI-I connectors • Supports 1 mini HDMI connector • Supports HDCP (High-Bandwidth Digital Content Protection) technology 1.2. GV-N450OC2-1GI) and from the same vendor (e.g. Features • Powered by NVIDIA® GeForceTM GTS 450 Graphics Processing Unit (GPU) ...
...driver - Minimum System Requirements • Hardware - 400-watt system power supply specification or above is recommended - GIGABYTE TECHNOLOGY). - 5 - Introduction 1.1. Windows® 7 - An SLI certified motherboard with two x16 physical connectors. Introduction Two GV-N450OC-1GI/GV-N450OC2-1GI...Link DVI-I connectors • Supports 1 mini HDMI connector • Supports HDCP (High-Bandwidth Digital Content Protection) technology 1.2. GV-N450OC2-1GI) and from the same vendor (e.g. Features • Powered by NVIDIA® GeForceTM GTS 450 Graphics Processing Unit (GPU) ...
Manual
Page 10
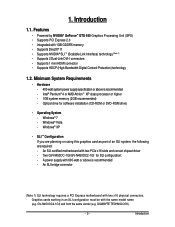
... sure your system has installed DirectX 9 or later version. 2. Step 2: Click the Next button. Driver and Utility Installation 3.1.1. For software MPEG support in the screen shot below. (If the driver Autorun screen does not appear automatically, go to install DirectX separately. Users who run Windows XP with Service... need to My Computer, double-click the optical drive and execute the setup.exe program.) Step 1: Click the Install Display Driver item. The driver Autorun screen is automatically displayed which looks like that shown in Windows XP, you must install DirectX first...
... sure your system has installed DirectX 9 or later version. 2. Step 2: Click the Next button. Driver and Utility Installation 3.1.1. For software MPEG support in the screen shot below. (If the driver Autorun screen does not appear automatically, go to install DirectX separately. Users who run Windows XP with Service... need to My Computer, double-click the optical drive and execute the setup.exe program.) Step 1: Click the Install Display Driver item. The driver Autorun screen is automatically displayed which looks like that shown in Windows XP, you must install DirectX first...
Manual
Page 11
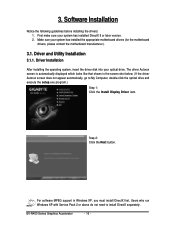
Step 3: Click the Yes button. Step 4: Click the Finish button to restart the computer. Then the driver installation is installing the components. The system is completed. - 11 - Software Installation
Step 3: Click the Yes button. Step 4: Click the Finish button to restart the computer. Then the driver installation is installing the components. The system is completed. - 11 - Software Installation
Manual
Page 13
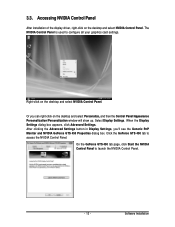
... Settings. Select Display Settings. Click the GeForce GTS 450 tab to access the NVIDIA Control Panel. Accessing NVIDIA Control Panel After installation of the display driver, right-click on the desktop and select NVIDIA Control Panel. 3.3.
... Settings. Select Display Settings. Click the GeForce GTS 450 tab to access the NVIDIA Control Panel. Accessing NVIDIA Control Panel After installation of the display driver, right-click on the desktop and select NVIDIA Control Panel. 3.3.
Manual
Page 20
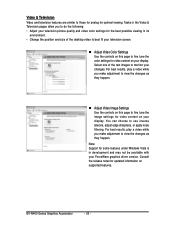
GV-N400 Series Graphics Accelerator - 20 - Consult the release notes for updated information on your display. For best results, play a video while you make adjustment to .... You can choose to those for analog for video content on supported features. For best results, play a video while you to monitor your ForceWare graphics driver version. Select one of the desktop video to best fit your television screen. „ Adjust Video Color Settings Use the controls on this page to...
GV-N400 Series Graphics Accelerator - 20 - Consult the release notes for updated information on your display. For best results, play a video while you make adjustment to .... You can choose to those for analog for video content on supported features. For best results, play a video while you to monitor your ForceWare graphics driver version. Select one of the desktop video to best fit your television screen. „ Adjust Video Color Settings Use the controls on this page to...
Manual
Page 21
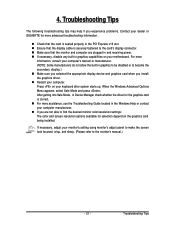
...your keyboard after system starts up. Troubleshooting Tips The following troubleshooting tips may help if you experience problems. Contact your dealer or GIGABYTE for more advanced troubleshooting information. „ Check that the card is seated properly in the Windows Help or contact your computer ...manufacturer. „ If you install the graphics driver. „ Restart your computer. Troubleshooting Tips 4. When the Windows Advanced Options Menu appears, select Safe Mode and press . For more...
...your keyboard after system starts up. Troubleshooting Tips The following troubleshooting tips may help if you experience problems. Contact your dealer or GIGABYTE for more advanced troubleshooting information. „ Check that the card is seated properly in the Windows Help or contact your computer ...manufacturer. „ If you install the graphics driver. „ Restart your computer. Troubleshooting Tips 4. When the Windows Advanced Options Menu appears, select Safe Mode and press . For more...

