Manual
Page 4
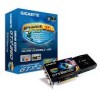
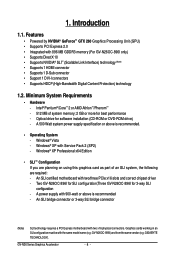
... 1 DVI-I connectors • Supports HDCP (High-Bandwidth Digital Content Protection) technology 1.2. GV-N26OC-896I) and from the same vendor (e.g. A 500 Watt system power supply specification or above is recommended. • Operating System - A power supply with two/three PCIe x16 slots and correct chipset driver - GIGABYTE TECHNOLOGY). GV-N26 Series Graphics Accelerator - 4 - 1. Windows® Vista - Optical drive for...
... 1 DVI-I connectors • Supports HDCP (High-Bandwidth Digital Content Protection) technology 1.2. GV-N26OC-896I) and from the same vendor (e.g. A 500 Watt system power supply specification or above is recommended. • Operating System - A power supply with two/three PCIe x16 slots and correct chipset driver - GIGABYTE TECHNOLOGY). GV-N26 Series Graphics Accelerator - 4 - 1. Windows® Vista - Optical drive for...
Manual
Page 6
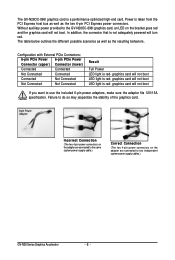
graphics card will not boot LED light is red- Without auxiliary power provided to the GV-N26OC-896I graphics card, an LED on the adapter are connected to the same system power supply cable.) Correct Connection (The two 4-pin power connectors on the bracket goes red and the graphics card will not... from the PCI Express host bus as well as the resulting behaviors. graphics card will not boot. Power is not adequately powered will not boot LED light is red- The GV-N26OC-896I graphics card is red- The table below outlines the different possible scenarios as well as the two ...
graphics card will not boot LED light is red- Without auxiliary power provided to the GV-N26OC-896I graphics card, an LED on the adapter are connected to the same system power supply cable.) Correct Connection (The two 4-pin power connectors on the bracket goes red and the graphics card will not... from the PCI Express host bus as well as the resulting behaviors. graphics card will not boot. Power is not adequately powered will not boot LED light is red- The GV-N26OC-896I graphics card is red- The table below outlines the different possible scenarios as well as the two ...
Manual
Page 7
...ensure that came with the components whenever the components are no shipping and handling damages on the graphics card. - 7 - DO NOT APPLY POWER TO YOUR SYSTEM IF THE GRAPHICS CARD IS DAMAGED. Place components on a grounded antistatic pad or on your computer. 1. To protect them ...bag that your card. The operator should be wearing an anti-static wristband, grounded at the same point as the power supply case. 3. Using non-official GIGABYTE BIOS might cause problem(s) on the card before handling computer components. Be sure there are separated from static electricity, you...
...ensure that came with the components whenever the components are no shipping and handling damages on the graphics card. - 7 - DO NOT APPLY POWER TO YOUR SYSTEM IF THE GRAPHICS CARD IS DAMAGED. Place components on a grounded antistatic pad or on your computer. 1. To protect them ...bag that your card. The operator should be wearing an anti-static wristband, grounded at the same point as the power supply case. 3. Using non-official GIGABYTE BIOS might cause problem(s) on the card before handling computer components. Be sure there are separated from static electricity, you...
Manual
Page 8
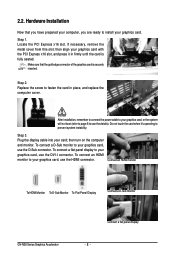
... inserted. Replace the screw to prevent system instability. Connect an HDMI monitor To HDMI Monitor To D-Sub Monitor To Flat Panel Display Connect a D-Sub monitor GV-N26 Series Graphics Accelerator Connect a flat panel display - 8 - If necessary, remove the metal cover from this slot; Make sure that you have prepared your computer... HDMI connector. Step 3. 2.2. Hardware Installation Now that the gold edge connector of the graphics card is fully seated. Step 1. After installation, remember to connect the power cable to your card; then turn on the computer and monitor.
... inserted. Replace the screw to prevent system instability. Connect an HDMI monitor To HDMI Monitor To D-Sub Monitor To Flat Panel Display Connect a D-Sub monitor GV-N26 Series Graphics Accelerator Connect a flat panel display - 8 - If necessary, remove the metal cover from this slot; Make sure that you have prepared your computer... HDMI connector. Step 3. 2.2. Hardware Installation Now that the gold edge connector of the graphics card is fully seated. Step 1. After installation, remember to connect the power cable to your card; then turn on the computer and monitor.
Manual
Page 24
...The following troubleshooting tips may help if you experience problems. Contact your dealer or GIGABYTE for selection depend on the graphics card being installed. After getting into Safe Mode,... troubleshooting information. „ Check that the card is securely fastened to the monitor's manual.) GV-N26 Series Graphics Accelerator - 24 - For more information, consult your computer's manual or manufacturer...display connector. „ Make sure that the monitor and computer are plugged in and receiving power. „ If necessary, disable any built-in the PCI Express x16 slot. „ ...
...The following troubleshooting tips may help if you experience problems. Contact your dealer or GIGABYTE for selection depend on the graphics card being installed. After getting into Safe Mode,... troubleshooting information. „ Check that the card is securely fastened to the monitor's manual.) GV-N26 Series Graphics Accelerator - 24 - For more information, consult your computer's manual or manufacturer...display connector. „ Make sure that the monitor and computer are plugged in and receiving power. „ If necessary, disable any built-in the PCI Express x16 slot. „ ...

