Manual
Page 3
... Installation Guide included with the product. For detailed product information, carefully read the User's Manual. Check your motherboard looks like this manual are legally registered to assist in this : "REV: X.X." The trademarks mentioned in the use of this product, GIGABYTE provides the following types of documentations: For quick set-up of this...
... Installation Guide included with the product. For detailed product information, carefully read the User's Manual. Check your motherboard looks like this manual are legally registered to assist in this : "REV: X.X." The trademarks mentioned in the use of this product, GIGABYTE provides the following types of documentations: For quick set-up of this...
Manual
Page 6
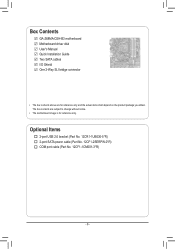
Optional Items 2-port USB 2.0 bracket (Part No. 12CR1-1UB030-5*R) 2-port SATA power cable (Part No. 12CF1-2SERPW-0*R) COM port cable (Part No. 12CF1-1CM001-3*R) - 6 - The box contents are for reference only. Box Contents GA-Z68MA-D2H-B3 motherboard Motherboard driver disk User's Manual Quick Installation Guide Two SATA cables I/O Shield One 2-Way SLI bridge connector • The box contents above are subject to change without notice. • The motherboard image is for reference only and the actual items shall depend on the product package you obtain.
Optional Items 2-port USB 2.0 bracket (Part No. 12CR1-1UB030-5*R) 2-port SATA power cable (Part No. 12CF1-2SERPW-0*R) COM port cable (Part No. 12CF1-1CM001-3*R) - 6 - The box contents are for reference only. Box Contents GA-Z68MA-D2H-B3 motherboard Motherboard driver disk User's Manual Quick Installation Guide Two SATA cables I/O Shield One 2-Way SLI bridge connector • The box contents above are subject to change without notice. • The motherboard image is for reference only and the actual items shall depend on the product package you obtain.
Manual
Page 9
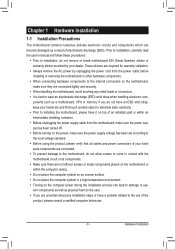
...eliminate static electricity. •• Prior to installing the motherboard, please have it on top of the product, please consult a certified computer technician. - 9 - Prior to installation, carefully read the user's manual and follow these procedures: •• Prior to installation..., do not remove or break motherboard S/N (Serial Number) sticker or warranty sticker provided by unplugging the power cord from the motherboard, make sure the power supply has been...
...eliminate static electricity. •• Prior to installing the motherboard, please have it on top of the product, please consult a certified computer technician. - 9 - Prior to installation, carefully read the user's manual and follow these procedures: •• Prior to installation..., do not remove or break motherboard S/N (Serial Number) sticker or warranty sticker provided by unplugging the power cord from the motherboard, make sure the power supply has been...

Manual
Page 15
Hardware Installation Check that the Male and Female push pins are joined closely. (Refer to your CPU cooler installation manual for instructions on installing the cooler.) Step 5: After the installation, check the back of arrow is to remove the cooler, on the contrary, is ...CPU cooler and CPU may damage the CPU. - 15 - 1-3-2 Installing the CPU Cooler Follow the steps below to correctly install the CPU cooler on the motherboard. (The following procedure uses Intel® boxed cooler as the picture above shows, the installation is to install.) Step 3: Place the cooler atop the ...
Hardware Installation Check that the Male and Female push pins are joined closely. (Refer to your CPU cooler installation manual for instructions on installing the cooler.) Step 5: After the installation, check the back of arrow is to remove the cooler, on the contrary, is ...CPU cooler and CPU may damage the CPU. - 15 - 1-3-2 Installing the CPU Cooler Follow the steps below to correctly install the CPU cooler on the motherboard. (The following procedure uses Intel® boxed cooler as the picture above shows, the installation is to install.) Step 3: Place the cooler atop the ...
Manual
Page 18
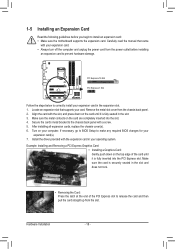
If necessary, go to BIOS Setup to install an expansion card: • Make sure the motherboard supports the expansion card. Hardware Installation - 18 - Example: Installing and Removing a PCI Express Graphics Card: • Installing a Graphics Card: Gently push down on the card ... expansion slot that came with your expansion card. • Always turn off the computer and unplug the power cord from the slot. Carefully read the manual that supports your card. PCI Express x16 Slot PCI Express x1 Slot Follow the steps below to prevent hardware damage. Make sure the card is...
If necessary, go to BIOS Setup to install an expansion card: • Make sure the motherboard supports the expansion card. Hardware Installation - 18 - Example: Installing and Removing a PCI Express Graphics Card: • Installing a Graphics Card: Gently push down on the card ... expansion slot that came with your expansion card. • Always turn off the computer and unplug the power cord from the slot. Carefully read the manual that supports your card. PCI Express x16 Slot PCI Express x1 Slot Follow the steps below to prevent hardware damage. Make sure the card is...

Manual
Page 19
... - One CrossFire (Note)/SLI bridge connector - Configuring the Graphics Card Driver C-1. Browse to the manual of identical brand and chip and correct driver - Refer to the manual that came with sufficient power is recommended (Refer to the Set SLI and Physx Configuration screen and ...graphics cards. Browse to the Catalyst Control Center. Hardware Installation A power supply with your graphics cards. C-2. A CrossFireX/SLI-supported motherboard with two PCI Express x16 slots and correct driver - 1-6 Setting up ATI CrossFireX™/NVIDIA SLI Configuration A.
... - One CrossFire (Note)/SLI bridge connector - Configuring the Graphics Card Driver C-1. Browse to the manual of identical brand and chip and correct driver - Refer to the manual that came with sufficient power is recommended (Refer to the Set SLI and Physx Configuration screen and ...graphics cards. Browse to the Catalyst Control Center. Hardware Installation A power supply with your graphics cards. C-2. A CrossFireX/SLI-supported motherboard with two PCI Express x16 slots and correct driver - 1-6 Setting up ATI CrossFireX™/NVIDIA SLI Configuration A.
Manual
Page 27
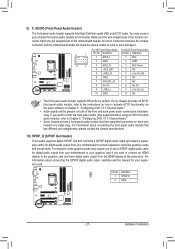
...1 23 1 •• The front panel audio header su1pports HD audio by expansion cards) for digital audio output from your motherboard to your graphics card if you wish to connect an HDMI display to this header. For information about connecting the S/PDIF digital ...audio cable, carefully read the manual for your motherboard to Chapter 5, "Configuring 2/4/5.1/7.1-Channel Audio." •• Some chassis provide a frontPWpaMnSewlitacuh d(Xio58mA-OoCd)ule that has different wire...
...1 23 1 •• The front panel audio header su1pports HD audio by expansion cards) for digital audio output from your motherboard to your graphics card if you wish to connect an HDMI display to this header. For information about connecting the S/PDIF digital ...audio cable, carefully read the manual for your motherboard to Chapter 5, "Configuring 2/4/5.1/7.1-Channel Audio." •• Some chassis provide a frontPWpaMnSewlitacuh d(Xio58mA-OoCd)ule that has different wire...
Manual
Page 29
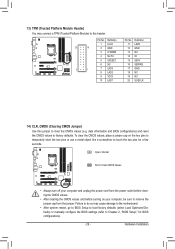
... (X58A-OC) DIP 1 23 13) TPM (Trusted Platform Module Header) You may cause damage to the motherboard. •• After system restart, go to BIOS Setup to load factory defaults (select Load Optimized Defaults) or manually configure the BIOS settings (refer to Chapter 2, "BIOS Setup," for a few seconds. Failure to do so...
... (X58A-OC) DIP 1 23 13) TPM (Trusted Platform Module Header) You may cause damage to the motherboard. •• After system restart, go to BIOS Setup to load factory defaults (select Load Optimized Defaults) or manually configure the BIOS settings (refer to Chapter 2, "BIOS Setup," for a few seconds. Failure to do so...
Manual
Page 57
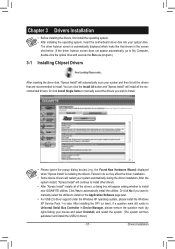
Or click Install Single Items to manually select the drivers you want to manually select the utilities to install new GIGABYTE utilities. Failure to do so may affect the driver installation. • Some device drivers will restart your system and then ...Drivers Installation Chapter 3 Drivers Installation • Before installing the drivers, first install the operating system. • After installing the operating system, insert the motherboard driver disk into your mouse and select Uninstall) and restart the system. (The system will then autodetect and install the USB 2.0 driver.) - 57 ...
Or click Install Single Items to manually select the drivers you want to manually select the utilities to install new GIGABYTE utilities. Failure to do so may affect the driver installation. • Some device drivers will restart your system and then ...Drivers Installation Chapter 3 Drivers Installation • Before installing the drivers, first install the operating system. • After installing the operating system, insert the motherboard driver disk into your mouse and select Uninstall) and restart the system. (The system will then autodetect and install the USB 2.0 driver.) - 57 ...

Manual
Page 58
3-2 Application Software This page displays all the utilities and applications that GIGABYTE develops and some free software. You can click the Install button on the right of an item to install it. 3-3 Technical Manuals This page provides GIGABYTE's application guides, content descriptions for this driver disk, and the motherboard manuals. Drivers Installation - 58 -
3-2 Application Software This page displays all the utilities and applications that GIGABYTE develops and some free software. You can click the Install button on the right of an item to install it. 3-3 Technical Manuals This page provides GIGABYTE's application guides, content descriptions for this driver disk, and the motherboard manuals. Drivers Installation - 58 -
Manual
Page 64
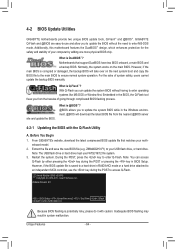
...motherboard features the DualBIOS™ design, which enhances protection for the safety and stability of your USB flash drive, or hard drive. What is Q-Flash™? Embedded in the BIOS, the Q-Flash tool frees you can access Q-Flash by adding one more physical BIOS chip. Restart the system. Z68MA-D2H-B3... main BIOS and a backup BIOS. Award Modular BIOS v6.00PG Copyright (C) 1984-2011, Award Software, Inc. 4-2 BIOS Update Utilities GIGABYTE motherboards provide two unique BIOS update tools, Q-Flash™ and @BIOS™. What is saved to a hard drive in system malfunction. Note...
...motherboard features the DualBIOS™ design, which enhances protection for the safety and stability of your USB flash drive, or hard drive. What is Q-Flash™? Embedded in the BIOS, the Q-Flash tool frees you can access Q-Flash by adding one more physical BIOS chip. Restart the system. Z68MA-D2H-B3... main BIOS and a backup BIOS. Award Modular BIOS v6.00PG Copyright (C) 1984-2011, Award Software, Inc. 4-2 BIOS Update Utilities GIGABYTE motherboards provide two unique BIOS update tools, Q-Flash™ and @BIOS™. What is saved to a hard drive in system malfunction. Note...

Manual
Page 67
... Click Save Current BIOS to File to save the BIOS update file obtained from GIGABYTE Server, select the @BIOS server site closest to your location and then download the BIOS file that matches your motherboard model. Make sure that is not present on -screen instructions to complete. Using...the Internet Update Function: Click Update BIOS from the Internet or through other source. Follow the on the @BIOS server site, please manually download the BIOS update file from an inadequate BIOS flashing. 4-2-2 Updating the BIOS with an incorrect BIOS file could cause your system...
... Click Save Current BIOS to File to save the BIOS update file obtained from GIGABYTE Server, select the @BIOS server site closest to your location and then download the BIOS file that matches your motherboard model. Make sure that is not present on -screen instructions to complete. Using...the Internet Update Function: Click Update BIOS from the Internet or through other source. Follow the on the @BIOS server site, please manually download the BIOS update file from an inadequate BIOS flashing. 4-2-2 Updating the BIOS with an incorrect BIOS file could cause your system...
Manual
Page 75
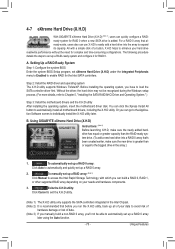
...a hard drive into a RAID 0 array that before you run the X.H.D utility, back up all motherboard drivers, including the X.H.D utility. Step 2: Install the RAID driver and operating system The X.H.D utility...- 75 - To manually set up a RAID array: (Note 3) Click Manual to access the Intel Rapid Storage Technology, with a simple click of data. (Note 3) If you manually build a non-RAID... Or you have to load the SATA controller driver first. A. 4-7 eXtreme Hard Drive (X.H.D) With GIGABYTE eXtreme Hard Drive (X.H.D) (Note 1), users can quickly configure a RAIDready system for RAID 0 when ...
...a hard drive into a RAID 0 array that before you run the X.H.D utility, back up all motherboard drivers, including the X.H.D utility. Step 2: Install the RAID driver and operating system The X.H.D utility...- 75 - To manually set up a RAID array: (Note 3) Click Manual to access the Intel Rapid Storage Technology, with a simple click of data. (Note 3) If you manually build a non-RAID... Or you have to load the SATA controller driver first. A. 4-7 eXtreme Hard Drive (X.H.D) With GIGABYTE eXtreme Hard Drive (X.H.D) (Note 1), users can quickly configure a RAIDready system for RAID 0 when ...
Manual
Page 90
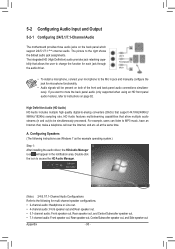
... allow multiple audio streams (in the notification area. Appendix - 90 - 5-2 Configuring Audio Input and Output 5-2-1 Configuring 2/4/5.1/7.1-Channel Audio The motherboard provides three audio jacks on page 92. HD Audio features multistreaming capabilities that support 44.1KHz/48KHz/ 96KHz/192KHz sampling rate. A. High.... Line In Front Speaker Out Mic In • To install a microphone, connect your microphone to the Mic in jack and manually configure the jack for multi-channel speaker configurations. • 2-channel audio: Headphone or Line out. • 4-channel audio: Front...
... allow multiple audio streams (in the notification area. Appendix - 90 - 5-2 Configuring Audio Input and Output 5-2-1 Configuring 2/4/5.1/7.1-Channel Audio The motherboard provides three audio jacks on page 92. HD Audio features multistreaming capabilities that support 44.1KHz/48KHz/ 96KHz/192KHz sampling rate. A. High.... Line In Front Speaker Out Mic In • To install a microphone, connect your microphone to the Mic in jack and manually configure the jack for multi-channel speaker configurations. • 2-channel audio: Headphone or Line out. • 4-channel audio: Front...


