
Manual
Page 69
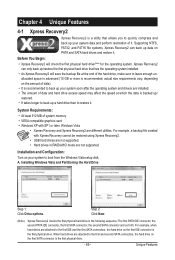
...at the end of data). • It is recommended to back up your system soon after the operating system and drivers are attached to boot from the Windows Vista setup disk. Unique Features Chapter 4 Unique Features 4-1 Xpress Recovery2 Xpress Recovery2 is a utility that has the operating ...depending on the first SATA connector is recommended; Step 2: Click New. (Note) Xpress Recovery2 checks the first physical hard drive in advanced (10 GB or more is the first physical drive. - 69 - Installation and Configuration: Turn on your system data and perform restoration of system...
...at the end of data). • It is recommended to back up your system soon after the operating system and drivers are attached to boot from the Windows Vista setup disk. Unique Features Chapter 4 Unique Features 4-1 Xpress Recovery2 Xpress Recovery2 is a utility that has the operating ...depending on the first SATA connector is recommended; Step 2: Click New. (Note) Xpress Recovery2 checks the first physical hard drive in advanced (10 GB or more is the first physical drive. - 69 - Installation and Configuration: Turn on your system data and perform restoration of system...
Manual
Page 98
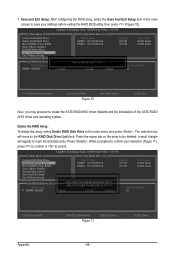
... Drive Delete RAID Disk Drive Revert HDD to Non-RAID Solve Mirror Conflict Rebuild Mirror Drive Save And Exit Setup Exit Without Saving Gigabyte Technology Corp. RAID Setup Utility v1.07.06 [ Hard Disk Drive List ] Model Name HDD0: ST3120026AS HDD1: ST3120026AS Capacity 120...Save to create the SATA RAID/AHCI driver diskette and the installation of the SATA RAID/ AHCI driver and operating system. Y Model Name RAID Level Capacity Status RDD0: GRAID 0-Stripe 240 GB Normal Members(HDDx) 01 [fgTAB]-Switch Window [hi]-Select ITEM Figure 10 [ENTER]-Action [ESC]-Exit Now,...
... Drive Delete RAID Disk Drive Revert HDD to Non-RAID Solve Mirror Conflict Rebuild Mirror Drive Save And Exit Setup Exit Without Saving Gigabyte Technology Corp. RAID Setup Utility v1.07.06 [ Hard Disk Drive List ] Model Name HDD0: ST3120026AS HDD1: ST3120026AS Capacity 120...Save to create the SATA RAID/AHCI driver diskette and the installation of the SATA RAID/ AHCI driver and operating system. Y Model Name RAID Level Capacity Status RDD0: GRAID 0-Stripe 240 GB Normal Members(HDDx) 01 [fgTAB]-Switch Window [hi]-Select ITEM Figure 10 [ENTER]-Action [ESC]-Exit Now,...
Manual
Page 110
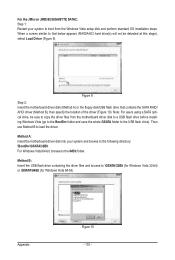
...that contains the SATA RAID/ AHCI driver (Method B), then specify the location of the driver (Figure 10). Note: For users using a SATA optical drive, be detected at this stage), select Load Driver (Figure 9). Appendix Figure 10 - 110 - Figure 9 Step 2: Insert the motherboard driver disk (Method A) or the ... installation steps. Method B: Insert the USB flash drive containing the driver files and browse to \GSATA\32Bit (for Windows Vista 32-bit) or \GSATA\64Bit (for Windows Vista 64-bit). For the JMicron JMB362/GIGABYTE SATA2: Step 1: Restart your system and browse to the following ...
...that contains the SATA RAID/ AHCI driver (Method B), then specify the location of the driver (Figure 10). Note: For users using a SATA optical drive, be detected at this stage), select Load Driver (Figure 9). Appendix Figure 10 - 110 - Figure 9 Step 2: Insert the motherboard driver disk (Method A) or the ... installation steps. Method B: Insert the USB flash drive containing the driver files and browse to \GSATA\32Bit (for Windows Vista 32-bit) or \GSATA\64Bit (for Windows Vista 64-bit). For the JMicron JMB362/GIGABYTE SATA2: Step 1: Restart your system and browse to the following ...


