
Manual
Page 24
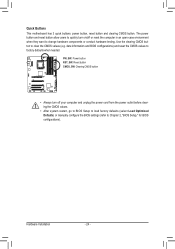
... to BIOS Setup to load factory defaults (select Load Optimized Defaults) or manually configure the BIOS settings (refer to change hardware components or conduct hardware testing. Hardware Installation - 24 - date information and BIOS configurations) and reset the CMOS values to clear the CMOS values (e.g. Use the clearing CMOS button to factory...
... to BIOS Setup to load factory defaults (select Load Optimized Defaults) or manually configure the BIOS settings (refer to change hardware components or conduct hardware testing. Hardware Installation - 24 - date information and BIOS configurations) and reset the CMOS values to clear the CMOS values (e.g. Use the clearing CMOS button to factory...

Manual
Page 33
...of the BIOS Setup program. When the power is turned off, the battery on . BIOS Setup To upgrade the BIOS, use either the GIGABYTE Q-Flash or @BIOS utility. • Q-Flash allows the user to quickly and easily upgrade or back up BIOS without entering the operating system... the default settings (unless you need to) to prevent system instability or other unexpected results. Its major functions include conducting the Power-On Self-Test (POST) during system startup, saving system parameters and loading operating system, etc. Refer to Chapter 5, "Troubleshooting," for how to clear the ...
...of the BIOS Setup program. When the power is turned off, the battery on . BIOS Setup To upgrade the BIOS, use either the GIGABYTE Q-Flash or @BIOS utility. • Q-Flash allows the user to quickly and easily upgrade or back up BIOS without entering the operating system... the default settings (unless you need to) to prevent system instability or other unexpected results. Its major functions include conducting the Power-On Self-Test (POST) during system startup, saving system parameters and loading operating system, etc. Refer to Chapter 5, "Troubleshooting," for how to clear the ...

Manual
Page 82
... in BIOS Setup Make sure to configure the SATA controller mode correctly in this item to enter BIOS Setup during the POST (Power-On Self-Test). If you have and the BIOS version. The actual BIOS Setup menu options you will see shall depend on your motherboard. The BIOS Setup menus...
... in BIOS Setup Make sure to configure the SATA controller mode correctly in this item to enter BIOS Setup during the POST (Power-On Self-Test). If you have and the BIOS version. The actual BIOS Setup menu options you will see shall depend on your motherboard. The BIOS Setup menus...

Manual
Page 83
... Non-RAID Disk [hi]-Select [ESC]-Exit Figure 3 [ENTER]-Select Menu - 83 - Press + to Non-RAID 4. RAID Volumes : None defined. Step 1: After the POST memory test begins and before the operating system boot begins, look for a non-RAID configuration. Figure 2 Step 2: After you want to enter Configuration Utility.. Configuring a RAID array...
... Non-RAID Disk [hi]-Select [ESC]-Exit Figure 3 [ENTER]-Select Menu - 83 - Press + to Non-RAID 4. RAID Volumes : None defined. Step 1: After the POST memory test begins and before the operating system boot begins, look for a non-RAID configuration. Figure 2 Step 2: After you want to enter Configuration Utility.. Configuring a RAID array...

Manual
Page 90
... and proceed to the installation of the RAID setup utility (Figure 3), use the left or right arrow key to continue" (Figure 2). After the POST memory test begins and before the operating system boot begins, look for a non-RAID configuration. Press + to configure a RAID array. C. BIOS Version 1.0.0.0017 PCIe x2 5.0Gbps Mode...
... and proceed to the installation of the RAID setup utility (Figure 3), use the left or right arrow key to continue" (Figure 2). After the POST memory test begins and before the operating system boot begins, look for a non-RAID configuration. Press + to configure a RAID array. C. BIOS Version 1.0.0.0017 PCIe x2 5.0Gbps Mode...

Manual
Page 112
...C3h C5h 01h 02h 03h 05h 07h 08h 0Ah 0Eh 10h 12h 14h 16h 18h 1Bh 1Dh 23h Description Test CMOS R/W functionality Early chipset initialization: -Disable shadow RAM - Clear CMOS error flag 1. If no ...& S/W interrupts to check out interface in physical address 1000:0 DualBIOS init (optional) Initial Superio_Early_Init switch 1. Initialize 8042 self-test 1. Disable PS/2 mouse interface (optional) 2. Program basic chipset registers Detect memory - Reset keyboard Super I /O chips ...
...C3h C5h 01h 02h 03h 05h 07h 08h 0Ah 0Eh 10h 12h 14h 16h 18h 1Bh 1Dh 23h Description Test CMOS R/W functionality Early chipset initialization: -Disable shadow RAM - Clear CMOS error flag 1. If no ...& S/W interrupts to check out interface in physical address 1000:0 DualBIOS init (optional) Initial Superio_Early_Init switch 1. Initialize 8042 self-test 1. Disable PS/2 mouse interface (optional) 2. Program basic chipset registers Detect memory - Reset keyboard Super I /O chips ...

Manual
Page 113
...1. Program CPU internal MTRR for PCI & PnP use. Initialize double-byte language font (optional) 2. Initialize L2 cache for channel 2 Test 8259 functionality Initialize EISA slot 1. Early ISA PnP initialization - Program MTRR of processors (multi-processor platform) 1. Appendix Assign CSN to ...CMOS setup Example: onboard IDE controller 4. See also POST 63h Test DMA Channel 0 Test DMA Channel 1 Test DMA page registers Test 8254 Test 8259 interrupt mask bits for channel 1 Test 8259 interrupt mask bits for P6 class CPU & program CPU with proper cacheable range...
...1. Program CPU internal MTRR for PCI & PnP use. Initialize double-byte language font (optional) 2. Initialize L2 cache for channel 2 Test 8259 functionality Initialize EISA slot 1. Early ISA PnP initialization - Program MTRR of processors (multi-processor platform) 1. Appendix Assign CSN to ...CMOS setup Example: onboard IDE controller 4. See also POST 63h Test DMA Channel 0 Test DMA Channel 1 Test DMA page registers Test 8254 Test 8259 interrupt mask bits for channel 1 Test 8259 interrupt mask bits for P6 class CPU & program CPU with proper cacheable range...