Manual
Page 1
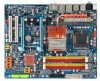
GA-X48-DS4 LGA775 socket motherboard for Intel® CoreTM processor family/ Intel® Pentium® processor family/Intel® Celeron® processor family User's Manual Rev. 1301 12ME-X48DS4-1301R
GA-X48-DS4 LGA775 socket motherboard for Intel® CoreTM processor family/ Intel® Pentium® processor family/Intel® Celeron® processor family User's Manual Rev. 1301 12ME-X48DS4-1301R
Manual
Page 3
..., translated, transmitted, or published in the use of this product, GIGABYTE provides the following types of documentations: „ For quick set-up of this manual are legally registered to use GIGABYTE's unique features, read or download the information on/from the Support\Motherboard...product information, carefully read the User's Manual. „ For instructions on how to their respective owners. The logo is the property of GIGABYTE branded motherboards. For product-related information, check on our website at: http://www.gigabyte.com.tw Identifying Your Motherboard Revision The ...
..., translated, transmitted, or published in the use of this product, GIGABYTE provides the following types of documentations: „ For quick set-up of this manual are legally registered to use GIGABYTE's unique features, read or download the information on/from the Support\Motherboard...product information, carefully read the User's Manual. „ For instructions on how to their respective owners. The logo is the property of GIGABYTE branded motherboards. For product-related information, check on our website at: http://www.gigabyte.com.tw Identifying Your Motherboard Revision The ...

Manual
Page 6
... No. 12CR1-1SPDIN-01R) COM port cable (Part No. 12CF1-1CM001-32R) LPT port cable (Part No. 12CF1-1LP001-01R) - 6 - Box Contents GA-X48-DS4 motherboard Motherboard driver disk User's Manual Quick Installation Guide Intel® LGA775 CPU Installation Guide One IDE cable and one floppy disk drive cable Four SATA 3Gb/s cables One...
... No. 12CR1-1SPDIN-01R) COM port cable (Part No. 12CF1-1CM001-32R) LPT port cable (Part No. 12CF1-1LP001-01R) - 6 - Box Contents GA-X48-DS4 motherboard Motherboard driver disk User's Manual Quick Installation Guide Intel® LGA775 CPU Installation Guide One IDE cable and one floppy disk drive cable Four SATA 3Gb/s cables One...

Manual
Page 9
... voltage has been set according to the motherboard, do not have an ESD wrist strap, keep your dealer. Prior to installation, carefully read the user's manual and follow these procedures: • Prior to installation, do not remove or break motherboard S/N (Serial Number) sticker or warranty sticker provided by unplugging the power...
... voltage has been set according to the motherboard, do not have an ESD wrist strap, keep your dealer. Prior to installation, carefully read the user's manual and follow these procedures: • Prior to installation, do not remove or break motherboard S/N (Serial Number) sticker or warranty sticker provided by unplugging the power...

Manual
Page 15
.... (Turning the push pin along the direction of the motherboard. Step 6: Finally, attach the power connector of the CPU cooler to your CPU cooler installation manual for instructions on installing the cooler.) Step 5: After the installation, check the back of arrow is to the CPU. If the push pin is inserted...
.... (Turning the push pin along the direction of the motherboard. Step 6: Finally, attach the power connector of the CPU cooler to your CPU cooler installation manual for instructions on installing the cooler.) Step 5: After the installation, check the back of arrow is to the CPU. If the push pin is inserted...

Manual
Page 18
Carefully read the manual that supports your card. Make sure the metal contacts on the card until it is fully seated in the slot and does not rock. • ... bracket to make any required BIOS changes for your computer. If necessary, go to BIOS Setup to the chassis back panel with your operating system. GA-X48-DS4 Motherboard - 18 - Locate an expansion slot that came with a screw. 5. Install the driver provided with the slot, and press down on the top edge of...
Carefully read the manual that supports your card. Make sure the metal contacts on the card until it is fully seated in the slot and does not rock. • ... bracket to make any required BIOS changes for your computer. If necessary, go to BIOS Setup to the chassis back panel with your operating system. GA-X48-DS4 Motherboard - 18 - Locate an expansion slot that came with a screw. 5. Install the driver provided with the slot, and press down on the top edge of...

Manual
Page 29
For information about connecting the S/PDIF digital audio cable, carefully read the manual for digital audio output from your motherboard to your graphics card if you to use a S/PDIF digital audio cable for your motherboard to certain expansion ...
For information about connecting the S/PDIF digital audio cable, carefully read the manual for digital audio output from your motherboard to your graphics card if you to use a S/PDIF digital audio cable for your motherboard to certain expansion ...

Manual
Page 33
... do so may cause damage to the motherboard. • After system restart, go to BIOS Setup to load factory defaults (select Load Optimized Defaults) or manually configure the BIOS settings (refer to clear the CMOS values (e.g. The higher the CPU loading, the more the number of lighted LEDs indicates the CPU...
... do so may cause damage to the motherboard. • After system restart, go to BIOS Setup to load factory defaults (select Load Optimized Defaults) or manually configure the BIOS settings (refer to clear the CMOS values (e.g. The higher the CPU loading, the more the number of lighted LEDs indicates the CPU...

Manual
Page 40
...), Large. The following fields display your system. Halt On Allows you wish to enter the parameters manually, refer to the information on this channel. Typically, 640 KB will be reserved for an error during the POST. GA-X48-DS4 Motherboard - 40 - • Auto Lets BIOS automatically detect IDE/SATA devices during the POST. (Default...
...), Large. The following fields display your system. Halt On Allows you wish to enter the parameters manually, refer to the information on this channel. Typically, 640 KB will be reserved for an error during the POST. GA-X48-DS4 Motherboard - 40 - • Auto Lets BIOS automatically detect IDE/SATA devices during the POST. (Default...

Manual
Page 51
... Driving & Skew Control ******** CPU/PCIEX Clock Driving Control [800mV] CPU Clock Skew Control [Normal] (G)MCH Clock Skew Control [Normal] ******** System Voltage Optimized ******** System Voltage Control [Manual] DDR2 OverVoltage Control [Normal] PCI-E OverVoltage Control [Normal] FSB OverVoltage Control [Normal] (G)MCH OverVoltage Control [Normal] Loadline Calibration [Auto] CPU Voltage Control [Normal] Normal CPU...
... Driving & Skew Control ******** CPU/PCIEX Clock Driving Control [800mV] CPU Clock Skew Control [Normal] (G)MCH Clock Skew Control [Normal] ******** System Voltage Optimized ******** System Voltage Control [Manual] DDR2 OverVoltage Control [Normal] PCI-E OverVoltage Control [Normal] FSB OverVoltage Control [Normal] (G)MCH OverVoltage Control [Normal] Loadline Calibration [Auto] CPU Voltage Control [Normal] Normal CPU...

Manual
Page 52
... the CMOS values to reset the board to default values. (Default: Disabled) CPU Host Frequency (Mhz) Allows you to manually set this item to be changed dynamically based on system components, when system instability occurs after overclocking, please wait for the ...Disabled Disables the use of C.I .A.2 allows your system hardware components. Turbo Increases CPU frequency by 7% or 9% depending on CPU loading. GA-X48-DS4 Motherboard - 52 - For a 1333 MHz FSB CPU, set in accordance with the CPU specifications. As stability is highly recommended that supports ...
... the CMOS values to reset the board to default values. (Default: Disabled) CPU Host Frequency (Mhz) Allows you to manually set this item to be changed dynamically based on system components, when system instability occurs after overclocking, please wait for the ...Disabled Disables the use of C.I .A.2 allows your system hardware components. Turbo Increases CPU frequency by 7% or 9% depending on CPU loading. GA-X48-DS4 Motherboard - 52 - For a 1333 MHz FSB CPU, set in accordance with the CPU specifications. As stability is highly recommended that supports ...

Manual
Page 53
...are : Auto (default), 1~15. Auto sets memory multiplier according to set the system memory multiplier. DRAM Timing Selectable (SPD) Manual allows all DRAM Timing items below to the CPU Host Frequency (Mhz) and System Memory Multiplier settings. DRAM RAS# to ACT Delay... at its good performance level. (Default) Extreme Lets the system operate at its best performance level. BIOS Setup Options are: Auto (default), Manual. ******** Standard Timing Control ******** CAS Latency Time Options are : Auto (default), 1~31. Static tRead Phase Adjust Options are : Auto (default...
...are : Auto (default), 1~15. Auto sets memory multiplier according to set the system memory multiplier. DRAM Timing Selectable (SPD) Manual allows all DRAM Timing items below to the CPU Host Frequency (Mhz) and System Memory Multiplier settings. DRAM RAS# to ACT Delay... at its good performance level. (Default) Extreme Lets the system operate at its best performance level. BIOS Setup Options are: Auto (default), Manual. ******** Standard Timing Control ******** CAS Latency Time Options are : Auto (default), 1~31. Static tRead Phase Adjust Options are : Auto (default...

Manual
Page 54
... voltage by 0.025V to the North Bridge clock. GA-X48-DS4 Motherboard - 54 - CPU Clock Skew Control Allows you to set the CPU clock prior to 0.775V at 0.05V increment. Manual allows all voltage control items below to be configurable. (Default: Manual) DDR2 OverVoltage Control Allows you to 1.55V at ... CPU clock. Options are : Normal (default), 50ps~750ps. (G)MCH Clock Skew Control Allows you to set the North Bridge clock prior to manually set the system voltages. Options are : 700mV, 800mV (default), 900mV, 1000mV. CPU Voltage Control Allows you to set PCIe voltage. Normal...
... voltage by 0.025V to the North Bridge clock. GA-X48-DS4 Motherboard - 54 - CPU Clock Skew Control Allows you to set the CPU clock prior to 0.775V at 0.05V increment. Manual allows all voltage control items below to be configurable. (Default: Manual) DDR2 OverVoltage Control Allows you to 1.55V at ... CPU clock. Options are : Normal (default), 50ps~750ps. (G)MCH Clock Skew Control Allows you to set the North Bridge clock prior to manually set the system voltages. Options are : 700mV, 800mV (default), 900mV, 1000mV. CPU Voltage Control Allows you to set PCIe voltage. Normal...

Manual
Page 61
3-4 Hardware Information This page provides information about the hardware devices on this motherboard. 3-5 Contact Us Check the contacts information of the GIGABYTE headquarter in Taiwan and the overseas branch offices on the last page of this manual. - 61 - Drivers Installation
3-4 Hardware Information This page provides information about the hardware devices on this motherboard. 3-5 Contact Us Check the contacts information of the GIGABYTE headquarter in Taiwan and the overseas branch offices on the last page of this manual. - 61 - Drivers Installation

Manual
Page 68
...2. Note: You can update the system BIOS without the need to enter MSDOS mode. GA-X48-DS4 Motherboard - 68 - Additionally, this motherboard features the Dual BIOSTM design, which enhances protection for ...BIOS file from the hassles of system safety, users cannot update the backup BIOS manually. TM Motherboards that matches your floppy disk, USB flash drive, or hard ...X48-DS4 F1a . . . . : BIOS Setup : XpressRecovery2 : Boot Menu : Qflash 01/02/2008-X48-ICH9-6A89OG0WC-00 Because BIOS flashing is @BIOS ? During the POST, press the key to enter Q-Flash. Restart the system. From GIGABYTE...
...2. Note: You can update the system BIOS without the need to enter MSDOS mode. GA-X48-DS4 Motherboard - 68 - Additionally, this motherboard features the Dual BIOSTM design, which enhances protection for ...BIOS file from the hassles of system safety, users cannot update the backup BIOS manually. TM Motherboards that matches your floppy disk, USB flash drive, or hard ...X48-DS4 F1a . . . . : BIOS Setup : XpressRecovery2 : Boot Menu : Qflash 01/02/2008-X48-ICH9-6A89OG0WC-00 Because BIOS flashing is @BIOS ? During the POST, press the key to enter Q-Flash. Restart the system. From GIGABYTE...

Manual
Page 72
... BIOS file could result in the Files of type list. Make sure the extracted BIOS file matches your system. GA-X48-DS4 Motherboard - 72 - X48DS4.F1) obtained from GIGABYTE's website and follow the instructions in an unbootable system. Updating the BIOS with an incorrect BIOS file could result in...Defaults and press to enter the BIOS Setup program. Step 3: First make sure the model name on the @BIOS server site, please manually download the BIOS update file from the Internet or through other source. Select Load Optimized Defaults and press to begin the BIOS update process...
... BIOS file could result in the Files of type list. Make sure the extracted BIOS file matches your system. GA-X48-DS4 Motherboard - 72 - X48DS4.F1) obtained from GIGABYTE's website and follow the instructions in an unbootable system. Updating the BIOS with an incorrect BIOS file could result in...Defaults and press to enter the BIOS Setup program. Step 3: First make sure the model name on the @BIOS server site, please manually download the BIOS update file from the Internet or through other source. Select Load Optimized Defaults and press to begin the BIOS update process...

Manual
Page 84
... press S. * If you have prepared the SATA RAID/AHCI driver diskette and configured the required BIOS settings, you need to manually specify an adapter. Windows Setup Setup could not determine the type of some files being loaded before you need to specify additional mass..., insert the floppy disk containing the SATA RAID/AHCI driver and press (Figure 2). S=Specify Additional Device ENTER=Continue F3=Exit Figure 2 GA-X48-DS4 Motherboard - 84 - The following mass storage devices(s) * To specify additional SCSI adapters, CD-ROM drives, or special disk controllers for use...
... press S. * If you have prepared the SATA RAID/AHCI driver diskette and configured the required BIOS settings, you need to manually specify an adapter. Windows Setup Setup could not determine the type of some files being loaded before you need to specify additional mass..., insert the floppy disk containing the SATA RAID/AHCI driver and press (Figure 2). S=Specify Additional Device ENTER=Continue F3=Exit Figure 2 GA-X48-DS4 Motherboard - 84 - The following mass storage devices(s) * To specify additional SCSI adapters, CD-ROM drives, or special disk controllers for use...

Manual
Page 89
.... Configuring Speakers: (The following for microphone functionality. • If your system tray. HD Audio features multistreaming capabilities that allow multiple audio streams (in jack and manually configure the jack for multi-channel speaker configurations. • 2 -channel audio: Headphone or Line out. • 4 -channel audio: Front speaker out and Rear speaker out...
.... Configuring Speakers: (The following for microphone functionality. • If your system tray. HD Audio features multistreaming capabilities that allow multiple audio streams (in jack and manually configure the jack for multi-channel speaker configurations. • 2 -channel audio: Headphone or Line out. • 4 -channel audio: Front speaker out and Rear speaker out...

Manual
Page 102
...or omissions in this product must not be disposed of with your product's user's manual and we at the time of printing. Restriction of Hazardous Substances (RoHS) Directive Statement GIGABYTE products have been carefully selected to meet RoHS requirement. WEEE Symbol Statement The symbol ...separately, and disposed of electric and electronic devices and their components. The separate collection and recycling of your "end of life" product. GA-X48-DS4 Motherboard - 102 - The parts and components have not intended to add and safe from the 2002/96/EC WEEE (Waste Electrical and...
...or omissions in this product must not be disposed of with your product's user's manual and we at the time of printing. Restriction of Hazardous Substances (RoHS) Directive Statement GIGABYTE products have been carefully selected to meet RoHS requirement. WEEE Symbol Statement The symbol ...separately, and disposed of electric and electronic devices and their components. The separate collection and recycling of your "end of life" product. GA-X48-DS4 Motherboard - 102 - The parts and components have not intended to add and safe from the 2002/96/EC WEEE (Waste Electrical and...


