
Manual
Page 9
... product, please consult a certified computer technician. - 9 - If you are connected tightly and securely. • When handling the motherboard, avoid touching any installation steps or have a problem related to the use of electrostatic discharge (ESD). Hardware Installation Prior to installation, carefully read the user's manual and follow these procedures: • Prior to...
... product, please consult a certified computer technician. - 9 - If you are connected tightly and securely. • When handling the motherboard, avoid touching any installation steps or have a problem related to the use of electrostatic discharge (ESD). Hardware Installation Prior to installation, carefully read the user's manual and follow these procedures: • Prior to...

Manual
Page 29
.... Hardware Installation PW+ PWSPEAK+ SPEAK- 2 20 1 19 HD+ HD- You may differ by issuing a beep code. One single short beep will be heard if no problem is in S3/S4/S5 Off S3/S4 sleep state or powered off your chassis front panel module to this header according to the pin... BIOS may issue beeps in S1 sleep state. Press the reset switch to restart the computer if the computer freezes and fails to indicate the problem. Message/Power/ Power Sleep LED Switch Speaker MSG+ MSG- If...
.... Hardware Installation PW+ PWSPEAK+ SPEAK- 2 20 1 19 HD+ HD- You may differ by issuing a beep code. One single short beep will be heard if no problem is in S3/S4/S5 Off S3/S4 sleep state or powered off your chassis front panel module to this header according to the pin... BIOS may issue beeps in S1 sleep state. Press the reset switch to restart the computer if the computer freezes and fails to indicate the problem. Message/Power/ Power Sleep LED Switch Speaker MSG+ MSG- If...

Manual
Page 37
... not alter the default settings (unless you need to) to prevent system instability or other unexpected results. To upgrade the BIOS, use either the GIGABYTE Q-Flash or @BIOS utility. • Q-Flash allows the user to quickly and easily upgrade or back up BIOS without entering the operating system.... • @BIOS is turned on using the current version of BIOS, it with caution. To flash the BIOS, do not encounter problems using the Q-Flash and @BIOS utilities, refer to Chapter 4, "BIOS Update Utilities." • Because BIOS flashing is potentially risky, if you do...
... not alter the default settings (unless you need to) to prevent system instability or other unexpected results. To upgrade the BIOS, use either the GIGABYTE Q-Flash or @BIOS utility. • Q-Flash allows the user to quickly and easily upgrade or back up BIOS without entering the operating system.... • @BIOS is turned on using the current version of BIOS, it with caution. To flash the BIOS, do not encounter problems using the Q-Flash and @BIOS utilities, refer to Chapter 4, "BIOS Update Utilities." • Because BIOS flashing is potentially risky, if you do...

Manual
Page 47
... wires, the Status field will show Short and then length shown will be the approximate distance to the fault or short. If a cable problem occurs on the LAN cable connected to the motherboard, the Status fields of all four pairs of the attached LAN cable. - 47 -...: Optimized Defaults This motherboard incorporates cable diagnostic feature designed to the fault or short. When LAN Cable Is Functioning Normally... When a Cable Problem Occurs... BIOS Setup This feature will appear: Start detecting at a speed of the attached LAN cable. Refer to the following message will detect...
... wires, the Status field will show Short and then length shown will be the approximate distance to the fault or short. If a cable problem occurs on the LAN cable connected to the motherboard, the Status fields of all four pairs of the attached LAN cable. - 47 -...: Optimized Defaults This motherboard incorporates cable diagnostic feature designed to the fault or short. When LAN Cable Is Functioning Normally... When a Cable Problem Occurs... BIOS Setup This feature will appear: Start detecting at a speed of the attached LAN cable. Refer to the following message will detect...
Manual
Page 110
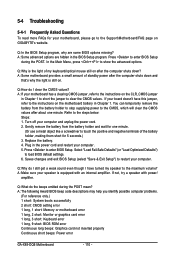
...options missing? Refer to load BIOS default settings. 6. Plug in Chapter 1 to short the jumper to the instructions on GIGABYTE's website. Q: Why do I have this jumper, refer to clear the CMOS values. A: Make sure your speaker is...problems. (For reference only.) 1 short: System boots successfully 2 short: CMOS setting error 1 long, 1 short: Memory or motherboard error 1 long, 2 short: Monitor or graphics card error 1 long, 3 short: Keyboard error 1 long, 9 short: BIOS ROM error Continuous long beeps: Graphics card not inserted properly Continuous short beeps: Power error GA-X48-DQ6...
...options missing? Refer to load BIOS default settings. 6. Plug in Chapter 1 to short the jumper to the instructions on GIGABYTE's website. Q: Why do I have this jumper, refer to clear the CMOS values. A: Make sure your speaker is...problems. (For reference only.) 1 short: System boots successfully 2 short: CMOS setting error 1 long, 1 short: Memory or motherboard error 1 long, 2 short: Monitor or graphics card error 1 long, 3 short: Keyboard error 1 long, 9 short: BIOS ROM error Continuous long beeps: Graphics card not inserted properly Continuous short beeps: Power error GA-X48-DQ6...

Manual
Page 111
...-circuit with the chassis or other metal objects. Is the power connector of the CPU cooler connected to solve the problem. Connect the ATX main power cable and the 12V power cable. Connect the CPU cooler power cable to enter BIOS Setup. The... motherboard. Select "Load Fail-Safe Defaults" (or "Load Optimized Defaults"). A (Continued...) - 111 - Secure the CPU No cooler on the CPU. The problem is attached to save changes and exit BIOS Setup. Yes Isolate the short circuit. Appendix Yes Insert the graphics card. Remove all peripherals, connecting cables...
...-circuit with the chassis or other metal objects. Is the power connector of the CPU cooler connected to solve the problem. Connect the ATX main power cable and the 12V power cable. Connect the CPU cooler power cable to enter BIOS Setup. The... motherboard. Select "Load Fail-Safe Defaults" (or "Load Optimized Defaults"). A (Continued...) - 111 - Secure the CPU No cooler on the CPU. The problem is attached to save changes and exit BIOS Setup. Yes Isolate the short circuit. Appendix Yes Insert the graphics card. Remove all peripherals, connecting cables...

Manual
Page 112
...No The graphics card, expansion slot, or monitor might fail. Select "Save & Exit Setup" to enter BIOS Setup. The problem is unable to solve your problem, contact the place of purchase or local dealer for help. Turn off the computer. Check if the system can boot successfully. ...the device works successfully). GA-X48-DQ6 Motherboard - 112 - Reinstall other devices one by one (install one device at one time and then boot the system to submit your question. A When the computer is turned on your monitor. The problem is the CPU cooler running? The problem is verified and solved...
...No The graphics card, expansion slot, or monitor might fail. Select "Save & Exit Setup" to enter BIOS Setup. The problem is unable to solve your problem, contact the place of purchase or local dealer for help. Turn off the computer. Check if the system can boot successfully. ...the device works successfully). GA-X48-DQ6 Motherboard - 112 - Reinstall other devices one by one (install one device at one time and then boot the system to submit your question. A When the computer is turned on your monitor. The problem is the CPU cooler running? The problem is verified and solved...


