

Manual
Page 5
Chapter 3 Drivers Installation 45 3-1 Install Chipset Drivers 45 3-2 SoftwareApplication 46 3-3 Software Information 46 3-4 Hardware Information 47 3-5 Contact Us ...47 Chapter 4 Appendix 49 4-1 Unique Software Utilities 49 4-1-1 EasyTune 5 Introduction 49 4-1-2 Xpress Recovery2 Introduction 50 4-1-3 Flash BIOS Method Introduction 52 4-1-4 Configuring SATA Hard Drive(s 61 4-1-5 2 / 4 / 6 Channel Audio Function Introduction 73 4-2 Troubleshooting 78 - 5 -
Chapter 3 Drivers Installation 45 3-1 Install Chipset Drivers 45 3-2 SoftwareApplication 46 3-3 Software Information 46 3-4 Hardware Information 47 3-5 Contact Us ...47 Chapter 4 Appendix 49 4-1 Unique Software Utilities 49 4-1-1 EasyTune 5 Introduction 49 4-1-2 Xpress Recovery2 Introduction 50 4-1-3 Flash BIOS Method Introduction 52 4-1-4 Configuring SATA Hard Drive(s 61 4-1-5 2 / 4 / 6 Channel Audio Function Introduction 73 4-2 Troubleshooting 78 - 5 -

Manual
Page 15
... slot bracket of the AGP slot when you try to the onboard AGP slot and press firmly down on the computer, if necessary, setup BIOS utility of expansion card from the operating system. Installing a AGP expansion card: Please carefully pull out the small whitedrawable bar at the end ...Hardware Installation Make sure your VGA card is locked by following the steps outlined below: 1. Press the expansion card firmly into the computer. 2. Install related driver from BIOS. 8. Remove your computer's chassis cover. 7. Please align the VGA card to install/uninstall the VGA card.
... slot bracket of the AGP slot when you try to the onboard AGP slot and press firmly down on the computer, if necessary, setup BIOS utility of expansion card from the operating system. Installing a AGP expansion card: Please carefully pull out the small whitedrawable bar at the end ...Hardware Installation Make sure your VGA card is locked by following the steps outlined below: 1. Press the expansion card firmly into the computer. 2. Install related driver from BIOS. 8. Remove your computer's chassis cover. 7. Please align the VGA card to install/uninstall the VGA card.
Manual
Page 20
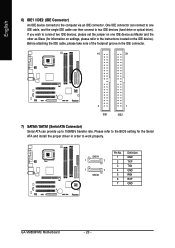
...proper driver in the IDE connector. 40 39 2 IDE1 1 IDE2 7) SATA0 / SATA1 (Serial ATA Connector) Serial ATA can then connect to two IDE devices (hard drive or optical drive). SATA1 1 7 1 7 SATA0 Pin No. 1 2 3 4 5 6 7 Definition GND TXP TXN GND RXN RXP GND GA-VM800PMC ...Motherboard - 20 - Before attaching the IDE cable, please take note of the foolproof groove in order to 150MB/s transfer rate. Please refer to the BIOS setting for information on settings, please refer to the instructions located on one...
...proper driver in the IDE connector. 40 39 2 IDE1 1 IDE2 7) SATA0 / SATA1 (Serial ATA Connector) Serial ATA can then connect to two IDE devices (hard drive or optical drive). SATA1 1 7 1 7 SATA0 Pin No. 1 2 3 4 5 6 7 Definition GND TXP TXN GND RXN RXP GND GA-VM800PMC ...Motherboard - 20 - Before attaching the IDE cable, please take note of the foolproof groove in order to 150MB/s transfer rate. Please refer to the BIOS setting for information on settings, please refer to the instructions located on one...
Manual
Page 50
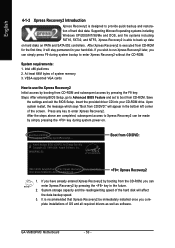
...cards How to boot from CD/DVD: : Xpress Recovery2 1. GA-VM800PMC Motherboard - 50 - After Xpress Recovery2 is recommended that Xpress Recovery2 be made by pressing the F9 key: Steps: After entering BIOS Setup, go to Advanced BIOS Feature and set to use the Xpress Recovery2 Initial access by ...is executed from CD/DVD: Press any key to run Xpress Recovery2 later, you complete installations of OS and all required drivers as well as software. Award Modular BIOS v6.00PG, An Energy Star Ally Copyright (C) 1984-2006, Award Software, Inc. Upon system restart, the message which...
...cards How to boot from CD/DVD: : Xpress Recovery2 1. GA-VM800PMC Motherboard - 50 - After Xpress Recovery2 is recommended that Xpress Recovery2 be made by pressing the F9 key: Steps: After entering BIOS Setup, go to Advanced BIOS Feature and set to use the Xpress Recovery2 Initial access by ...is executed from CD/DVD: Press any key to run Xpress Recovery2 later, you complete installations of OS and all required drivers as well as software. Award Modular BIOS v6.00PG, An Energy Star Ally Copyright (C) 1984-2006, Award Software, Inc. Upon system restart, the message which...

Manual
Page 51
... space. (This button will not appear if there is dependent on the size of the hard disk, so free space available on Nvidia chipsets, BIOS update is required for the backup file must be allocated in advance. (A minimum 4GB is recommended but the actual space is no backup file.) ...2. For the use of backing up data from the driver CD before data backup. 2. PATA IDE primary channel b. SATA IDE channel 1 d. SATA IDE channel 3 f. REBOOT: Exit the main screen and restart the system....
... space. (This button will not appear if there is dependent on the size of the hard disk, so free space available on Nvidia chipsets, BIOS update is required for the backup file must be allocated in advance. (A minimum 4GB is recommended but the actual space is no backup file.) ...2. For the use of backing up data from the driver CD before data backup. 2. PATA IDE primary channel b. SATA IDE channel 1 d. SATA IDE channel 3 f. REBOOT: Exit the main screen and restart the system....
Manual
Page 61
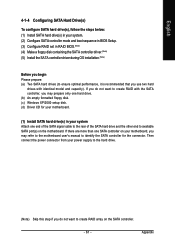
...end to identify the SATA controller for your motherboard. (1) Install SATA hard drive(s) in RAID BIOS.(Note) (4) Make a floppy disk containing the SATA controller driver.(Note) (5) Install the SATA controller driver during OS installation.(Note) Before you do not want to create RAID with identical model and capacity...(s), follow the steps below: (1) Install SATA hard drive(s) in your system. (2) Configure SATA controller mode and boot sequence in BIOS Setup. (3) Configure RAID set in your system Attach one hard drive. (b) An empty formatted floppy disk. (c) Windows XP/2000 setup disk...
...end to identify the SATA controller for your motherboard. (1) Install SATA hard drive(s) in RAID BIOS.(Note) (4) Make a floppy disk containing the SATA controller driver.(Note) (5) Install the SATA controller driver during OS installation.(Note) Before you do not want to create RAID with identical model and capacity...(s), follow the steps below: (1) Install SATA hard drive(s) in your system. (2) Configure SATA controller mode and boot sequence in BIOS Setup. (3) Configure RAID set in your system Attach one hard drive. (b) An empty formatted floppy disk. (c) Windows XP/2000 setup disk...
Manual
Page 70
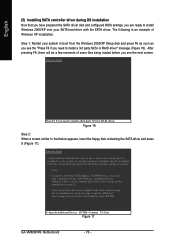
..., or special disk controllers for use with Windows, press ENTER. English (5) Installing SATA controller driver during OS installation Now that you have prepared the SATA driver disk and configured BIOS settings, you do not have any device support disks from a mass storage device manufacturer, or...your system, or you need to install a third party SCSI or RAID driver. Figure 16 Step 2: When a screen similar to manually specify an adapter. S=Specify Additional Device ENTER=Continue F3=Exit Figure 17 GA-VM800PMC Motherboard - 70 - Windows Setup Setup could not determine the type of ...
..., or special disk controllers for use with Windows, press ENTER. English (5) Installing SATA controller driver during OS installation Now that you have prepared the SATA driver disk and configured BIOS settings, you do not have any device support disks from a mass storage device manufacturer, or...your system, or you need to install a third party SCSI or RAID driver. Figure 16 Step 2: When a screen similar to manually specify an adapter. S=Specify Additional Device ENTER=Continue F3=Exit Figure 17 GA-VM800PMC Motherboard - 70 - Windows Setup Setup could not determine the type of ...


