Manual
Page 3
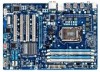
...legally registered to the specifications and features in any form or by GIGABYTE without GIGABYTE's prior written permission. Documentation Classifications In order to assist in the use of GIGABYTE. Check your motherboard looks like this manual may be made by... X.X." Example: For product-related information, check on our website at: http://www.gigabyte.com Identifying Your Motherboard Revision The revision number on your motherboard revision before updating motherboard BIOS, drivers, or when looking for technical information. All rights reserved. Changes to their respective...
...legally registered to the specifications and features in any form or by GIGABYTE without GIGABYTE's prior written permission. Documentation Classifications In order to assist in the use of GIGABYTE. Check your motherboard looks like this manual may be made by... X.X." Example: For product-related information, check on our website at: http://www.gigabyte.com Identifying Your Motherboard Revision The revision number on your motherboard revision before updating motherboard BIOS, drivers, or when looking for technical information. All rights reserved. Changes to their respective...
Manual
Page 5
... 57 3-1 Installing Chipset Drivers 57 3-2 Application Software 58 3-3 Technical Manuals 58 3-4 Contact...59 3-5 System...59 3-6 Download Center 60 3-7 New Utilities...60 Chapter 4 Unique Features 61 4-1 ......76 4-8 Cloud OC...77 Chapter 5 Appendix...79 5-1 Configuring SATA Hard Drive(s 79 5-1-1 Configuring Marvell 88SE9172 SATA Controller 79 5-1-2 Installing the SATA RAID/AHCI Driver and Operating System 86 5-2 Configuring Audio Input and Output 91 5-2-1 Configuring 2/4/5.1/7.1-Channel Audio 91 5-2-2 Configuring S/PDIF Out 93 5-2-3 Configuring Microphone Recording 94 5-2-4 Using...
... 57 3-1 Installing Chipset Drivers 57 3-2 Application Software 58 3-3 Technical Manuals 58 3-4 Contact...59 3-5 System...59 3-6 Download Center 60 3-7 New Utilities...60 Chapter 4 Unique Features 61 4-1 ......76 4-8 Cloud OC...77 Chapter 5 Appendix...79 5-1 Configuring SATA Hard Drive(s 79 5-1-1 Configuring Marvell 88SE9172 SATA Controller 79 5-1-2 Installing the SATA RAID/AHCI Driver and Operating System 86 5-2 Configuring Audio Input and Output 91 5-2-1 Configuring 2/4/5.1/7.1-Channel Audio 91 5-2-2 Configuring S/PDIF Out 93 5-2-3 Configuring Microphone Recording 94 5-2-4 Using...
Manual
Page 6
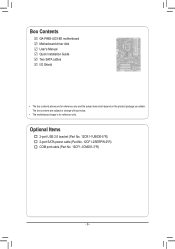
Optional Items 2-port USB 2.0 bracket (Part No. 12CR1-1UB030-5*R) 2-port SATA power cable (Part No. 12CF1-2SERPW-0*R) COM port cable (Part No. 12CF1-1CM001-3*R) - 6 - Box Contents GA-PA65-UD3-B3 motherboard Motherboard driver disk User's Manual Quick Installation Guide Two SATA cables I/O Shield • The box contents above are subject to change without notice. • The motherboard image is for reference only and the actual items shall depend on the product package you obtain. The box contents are for reference only.
Optional Items 2-port USB 2.0 bracket (Part No. 12CR1-1UB030-5*R) 2-port SATA power cable (Part No. 12CF1-2SERPW-0*R) COM port cable (Part No. 12CF1-1CM001-3*R) - 6 - Box Contents GA-PA65-UD3-B3 motherboard Motherboard driver disk User's Manual Quick Installation Guide Two SATA cables I/O Shield • The box contents above are subject to change without notice. • The motherboard image is for reference only and the actual items shall depend on the product package you obtain. The box contents are for reference only.
Manual
Page 18
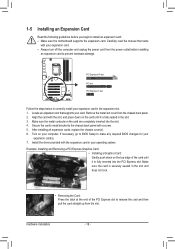
.... • Removing the Card: Press the latch at the end of the card until it is fully seated in your expansion card(s). 777 Install the driver provided with a screw. 555 After installing all expansion cards, replace the chassis cover(s). 666 Turn on the card until it is fully inserted into the...
.... • Removing the Card: Press the latch at the end of the card until it is fully seated in your expansion card(s). 777 Install the driver provided with a screw. 555 After installing all expansion cards, replace the chassis cover(s). 666 Turn on the card until it is fully inserted into the...

Manual
Page 32
Motherboard Model BIOS Version PA65-UD3-B3 E15 . . . . : BIOS Setup : XpressRecovery2 : Boot Menu : Qflash 01/21/2011-H61-7A89UG0SC-00 Function Keys Function Keys Function Keys: : POST SCREEN Press the key to ... access the Q-Flash utility in Boot Menu is effective for subsequent access to accept. In Boot Menu, use the up hard drive data using the driver disk, the key can access Boot Menu again to change the first boot device setting as needed. : Q-FLASH Press the key to show the BIOS...
Motherboard Model BIOS Version PA65-UD3-B3 E15 . . . . : BIOS Setup : XpressRecovery2 : Boot Menu : Qflash 01/21/2011-H61-7A89UG0SC-00 Function Keys Function Keys Function Keys: : POST SCREEN Press the key to ... access the Q-Flash utility in Boot Menu is effective for subsequent access to accept. In Boot Menu, use the up hard drive data using the driver disk, the key can access Boot Menu again to change the first boot device setting as needed. : Q-FLASH Press the key to show the BIOS...
Manual
Page 49
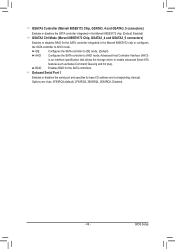
BIOS Setup Advanced Host Controller Interface (AHCI) is an interface specification that allows the storage driver to AHCI mode. Options are: Auto, 3F8/IRQ4 (default), 2F8/IRQ3, 3E8/IRQ4, 2E8/IRQ3, Disabled. - 49 - IDE Configures the SATA controller to IDE mode. (...
BIOS Setup Advanced Host Controller Interface (AHCI) is an interface specification that allows the storage driver to AHCI mode. Options are: Auto, 3F8/IRQ4 (default), 2F8/IRQ3, 3E8/IRQ4, 2E8/IRQ3, Disabled. - 49 - IDE Configures the SATA controller to IDE mode. (...
Manual
Page 57
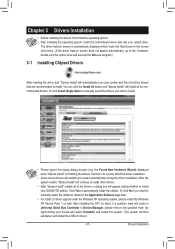
..., double-click the optical drive and execute the Run.exe program.) 3-1 Installing Chipset Drivers After inserting the driver disk, "Xpress Install" will automatically scan your system automatically during the driver installation. Click Yes to install. • Please ignore the popup dialog box(es...motherboard driver disk into your mouse and select Uninstall) and restart the system. (The system will then autodetect and install the USB 2.0 driver.) - 57 - Or click Install Single Items to manually select the drivers you want to manually select the utilities to install new GIGABYTE ...
..., double-click the optical drive and execute the Run.exe program.) 3-1 Installing Chipset Drivers After inserting the driver disk, "Xpress Install" will automatically scan your system automatically during the driver installation. Click Yes to install. • Please ignore the popup dialog box(es...motherboard driver disk into your mouse and select Uninstall) and restart the system. (The system will then autodetect and install the USB 2.0 driver.) - 57 - Or click Install Single Items to manually select the drivers you want to manually select the utilities to install new GIGABYTE ...
Manual
Page 58
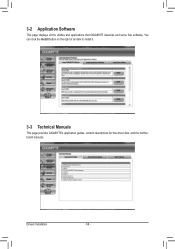
Drivers Installation - 58 - You can click the Install button on the right of an item to install it. 3-3 Technical Manuals This page provides GIGABYTE's application guides, content descriptions for this driver disk, and the motherboard manuals. 3-2 Application Software This page displays all the utilities and applications that GIGABYTE develops and some free software.
Drivers Installation - 58 - You can click the Install button on the right of an item to install it. 3-3 Technical Manuals This page provides GIGABYTE's application guides, content descriptions for this driver disk, and the motherboard manuals. 3-2 Application Software This page displays all the utilities and applications that GIGABYTE develops and some free software.
Manual
Page 59
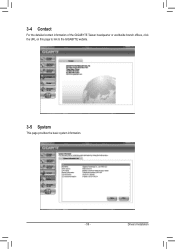
Drivers Installation 3-4 Contact For the detailed contact information of the GIGABYTE Taiwan headquarter or worldwide branch offices, click the URL on this page to link to the GIGABYTE website. 3-5 System This page provides the basic system information. - 59 -
Drivers Installation 3-4 Contact For the detailed contact information of the GIGABYTE Taiwan headquarter or worldwide branch offices, click the URL on this page to link to the GIGABYTE website. 3-5 System This page provides the basic system information. - 59 -

Manual
Page 60
You can click the Install button on the right of the BIOS, drivers, or applications will be displayed. 3-7 New Utilities This page provides a quick link to GIGABYTE's lately developed utilities for users to install. 3-6 Download Center To update the BIOS, drivers, or applications, click the Download Center button to link to install it. The latest version of an item to the GIGABYTE website. Drivers Installation - 60 -
You can click the Install button on the right of the BIOS, drivers, or applications will be displayed. 3-7 New Utilities This page provides a quick link to GIGABYTE's lately developed utilities for users to install. 3-6 Download Center To update the BIOS, drivers, or applications, click the Download Center button to link to install it. The latest version of an item to the GIGABYTE website. Drivers Installation - 60 -

Manual
Page 61
... at which the data is backed up/ restored. • It takes longer to back up data on your system soon after the operating system and drivers are installed. • The amount of data and hard drive access speed may affect the speed at the end of system memory • VESA compatible...
... at which the data is backed up/ restored. • It takes longer to back up data on your system soon after the operating system and drivers are installed. • The amount of data and hard drive access speed may affect the speed at the end of system memory • VESA compatible...

Manual
Page 62
... the first time. Step 2: When finished, go to Disk Management to check disk allocation. Step 4: After the operating system is recommended; Boot from the motherboard driver disk to store the backup image file. Unique Features - 62 - Step 5: Xpress Recovery2 will automatically create a new partition to access Xpress Recovery2 for the first...
... the first time. Step 2: When finished, go to Disk Management to check disk allocation. Step 4: After the operating system is recommended; Boot from the motherboard driver disk to store the backup image file. Unique Features - 62 - Step 5: Xpress Recovery2 will automatically create a new partition to access Xpress Recovery2 for the first...

Manual
Page 71
... with computers on this icon Figure 1. Enable Incoming Folder ... 4-5 Q-Share Q-Share is NOT enabled. - 71 - Directions for using Q-Share After installing Q-Share from the motherboard driver disk, go to be shared (Note) Updates Q-Share online Displays the current Q-Share version Exits Q-Share (Note) This option is available only when data sharing... your data with data sharing enabled Enables data sharing Disables data sharing Accesses the shared data folder Changes the data folder to Start>All Programs>GIGABYTE>Q-Share.
... with computers on this icon Figure 1. Enable Incoming Folder ... 4-5 Q-Share Q-Share is NOT enabled. - 71 - Directions for using Q-Share After installing Q-Share from the motherboard driver disk, go to be shared (Note) Updates Q-Share online Displays the current Q-Share version Exits Q-Share (Note) This option is available only when data sharing... your data with data sharing enabled Enables data sharing Disables data sharing Accesses the shared data folder Changes the data folder to Start>All Programs>GIGABYTE>Q-Share.
Manual
Page 79
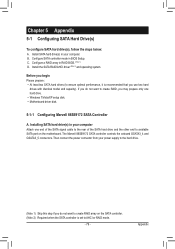
... signal cable to the rear of the SATA hard drive and the other end to AHCI or RAID mode. - 79 - Install the SATA RAID/AHCI driver (Note 2) and operating system. Install SATA hard drive(s) in your computer Attach one hard drive. • Windows 7/Vista/XP setup disk. • Motherboard...
... signal cable to the rear of the SATA hard drive and the other end to AHCI or RAID mode. - 79 - Install the SATA RAID/AHCI driver (Note 2) and operating system. Install SATA hard drive(s) in your computer Attach one hard drive. • Windows 7/Vista/XP setup disk. • Motherboard...
Manual
Page 85
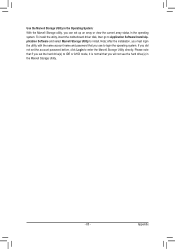
... the Marvell Storage Utility. - 85 - Appendix If you will not see the hard drive(s) in the operating system. To install the utility, insert the motherboard driver disk, then go to Application Software\Install Application Software and select Marvell Storage Utility to IDE or AHCI mode, it is normal that you can...
... the Marvell Storage Utility. - 85 - Appendix If you will not see the hard drive(s) in the operating system. To install the utility, insert the motherboard driver disk, then go to Application Software\Install Application Software and select Marvell Storage Utility to IDE or AHCI mode, it is normal that you can...
Manual
Page 86
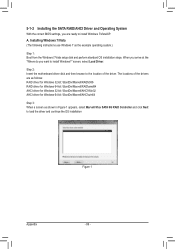
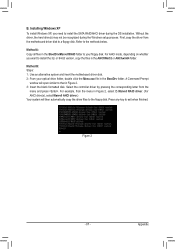
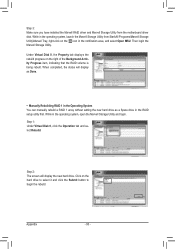
...at the "Where do you are as follows: RAID driver for Windows 32-bit: \BootDrv\Marvell\RAID\i386 RAID driver for Windows 64-bit: \BootDrv\Marvell\RAID\amd64 AHCI driver for Windows 32-bit: \BootDrv\Marvell\AHCI\Win32 AHCI driver for Windows 64-bit: \BootDrv\Marvell\AHCI\win64 ...screen as the example operating system.) Step 1: Boot from the Windows 7/Vista setup disk and perform standard OS installation steps. screen, select Load Driver. Installing Windows 7/Vista (The following instructions use Windows 7 as shown in Figure 1 appears, select Marvell 91xx SATA 6G RAID Controller and click...
...at the "Where do you are as follows: RAID driver for Windows 32-bit: \BootDrv\Marvell\RAID\i386 RAID driver for Windows 64-bit: \BootDrv\Marvell\RAID\amd64 AHCI driver for Windows 32-bit: \BootDrv\Marvell\AHCI\Win32 AHCI driver for Windows 64-bit: \BootDrv\Marvell\AHCI\win64 ...screen as the example operating system.) Step 1: Boot from the Windows 7/Vista setup disk and perform standard OS installation steps. screen, select Load Driver. Installing Windows 7/Vista (The following instructions use Windows 7 as shown in Figure 1 appears, select Marvell 91xx SATA 6G RAID Controller and click...
Manual
Page 87
... all files in the AHCI\Win32 or AHCI\win64 folder. For example, from the menu in Figure 2, select 7) Marvell RAID driver. (For AHCI drive(s), select Marvell AHCI driver.) Your system will open similar to your optical drive folder, double click the Menu.exe file in Figure 2. 3: Insert the ...blank formatted disk. Appendix Select the controller driver by pressing the corresponding letter from the motherboard driver disk to the methods below. or 64-bit version, copy the files in the \BootDrv\Marvell\RAID folder to ...
... all files in the AHCI\Win32 or AHCI\win64 folder. For example, from the menu in Figure 2, select 7) Marvell RAID driver. (For AHCI drive(s), select Marvell AHCI driver.) Your system will open similar to your optical drive folder, double click the Menu.exe file in Figure 2. 3: Insert the ...blank formatted disk. Appendix Select the controller driver by pressing the corresponding letter from the motherboard driver disk to the methods below. or 64-bit version, copy the files in the \BootDrv\Marvell\RAID folder to ...

Manual
Page 88
...the following for 32bit (install first) and press . Step 1: Restart your computer. Step 2: Insert the floppy disk containing the SATA RAID/AHCI driver and press . Select the SCSI Adapter you want from the Windows XP setup disk and press as soon as you see the message "Press ...manufacturer. On the next screen, press to return to your system to the previous screen. First select Marvell shared library for installing the driver during the Windows setup process. Select either the 32-bit or 64-bit items depending on the confirmation screen, press to specify an ...
...the following for 32bit (install first) and press . Step 1: Restart your computer. Step 2: Insert the floppy disk containing the SATA RAID/AHCI driver and press . Select the SCSI Adapter you want from the Windows XP setup disk and press as soon as you see the message "Press ...manufacturer. On the next screen, press to return to your system to the previous screen. First select Marvell shared library for installing the driver during the Windows setup process. Select either the 32-bit or 64-bit items depending on the confirmation screen, press to specify an ...
Manual
Page 90
... as a Spare drive in the operating system, open the Marvell Storage Utility and login. Appendix - 90 - Step 3: Make sure you have installed the Marvell RAID driver and Marvell Storage Utility from Start\All Programs\Marvell Storage Utility\Marvell Tray, right-click on the icon in the notification area, and select Open... first. Step 1: Under Virtual Disk 0, click the Operation tab and select Rebuild. While in the operating system, launch the Marvell Storage Utility from the motherboard driver disk. Then login the Marvell Storage Utility.
... as a Spare drive in the operating system, open the Marvell Storage Utility and login. Appendix - 90 - Step 3: Make sure you have installed the Marvell RAID driver and Marvell Storage Utility from Start\All Programs\Marvell Storage Utility\Marvell Tray, right-click on the icon in the notification area, and select Open... first. Step 1: Under Virtual Disk 0, click the Operation tab and select Rebuild. While in the operating system, launch the Marvell Storage Utility from the motherboard driver disk. Then login the Marvell Storage Utility.
Manual
Page 91
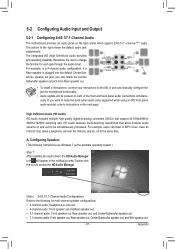
... an HD front panel audio module), refer to change Center/Subwoofer Speaker Out Line In the function for each jack through the audio driver. High Definition Audio (HD Audio) HD Audio includes multiple high quality digital-to-analog converters (DACs) that allows the user to ...(Note) 2/4/5.1/7.1-Channel Audio Configurations: Refer to the following instructions use Windows 7 as the example operating system.) Step 1: After installing the audio driver, the HD Audio Manager icon will be present on both of the front and back panel audio connections simultaneously. If you can listen to the...
... an HD front panel audio module), refer to change Center/Subwoofer Speaker Out Line In the function for each jack through the audio driver. High Definition Audio (HD Audio) HD Audio includes multiple high quality digital-to-analog converters (DACs) that allows the user to ...(Note) 2/4/5.1/7.1-Channel Audio Configurations: Refer to the following instructions use Windows 7 as the example operating system.) Step 1: After installing the audio driver, the HD Audio Manager icon will be present on both of the front and back panel audio connections simultaneously. If you can listen to the...


