
Manual
Page 3
...Manual. Example: Disclaimer Information in this : "REV: X.X." Documentation Classifications In order to the specifications and features in this product, GIGABYTE provides the following types of documentations: For quick set-up of this manual are legally registered to their respective owners....For product-related information, check on our website at: http://www.gigabyte.com Identifying Your Motherboard Revision The revision number on your motherboard revision before updating motherboard BIOS, drivers, or when looking for technical information. Check your motherboard looks ...
...Manual. Example: Disclaimer Information in this : "REV: X.X." Documentation Classifications In order to the specifications and features in this product, GIGABYTE provides the following types of documentations: For quick set-up of this manual are legally registered to their respective owners....For product-related information, check on our website at: http://www.gigabyte.com Identifying Your Motherboard Revision The revision number on your motherboard revision before updating motherboard BIOS, drivers, or when looking for technical information. Check your motherboard looks ...
Manual
Page 5
... 63 3-1 Installing Chipset Drivers 63 3-2 Application Software 64 3-3 Technical Manuals 64 3-4 Contact...65 3-5 System...65 3-6 Download Center 66 3-7 New Utilities...66 Chapter 4 Unique Features 67 4-1 ...Appendix...87 5-1 Configuring SATA Hard Drive(s 87 5-1-1 Configuring Intel P67 SATA Controllers 87 5-1-2 Configuring Marvell 88SE9128 SATA Controllers 95 5-1-3 Installing the SATA RAID/AHCI Driver and Operating System 100 5-2 Configuring Audio Input and Output 107 5-2-1 Configuring 2/4/5.1/7.1-Channel Audio 107 5-2-2 Configuring S/PDIF Out 109 5-2-3 Enabling the Dolby Home Theater...
... 63 3-1 Installing Chipset Drivers 63 3-2 Application Software 64 3-3 Technical Manuals 64 3-4 Contact...65 3-5 System...65 3-6 Download Center 66 3-7 New Utilities...66 Chapter 4 Unique Features 67 4-1 ...Appendix...87 5-1 Configuring SATA Hard Drive(s 87 5-1-1 Configuring Intel P67 SATA Controllers 87 5-1-2 Configuring Marvell 88SE9128 SATA Controllers 95 5-1-3 Installing the SATA RAID/AHCI Driver and Operating System 100 5-2 Configuring Audio Input and Output 107 5-2-1 Configuring 2/4/5.1/7.1-Channel Audio 107 5-2-2 Configuring S/PDIF Out 109 5-2-3 Enabling the Dolby Home Theater...
Manual
Page 6
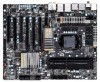
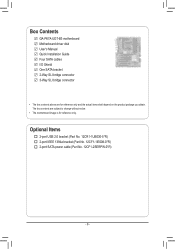
... IEEE 1394a bracket (Part No. 12CF1-1IE008-0*R) 2-port SATA power cable (Part No. 12CF1-2SERPW-0*R) - 6 - The box contents are for reference only. Box Contents GA-P67A-UD7-B3 motherboard Motherboard driver disk User's Manual Quick Installation Guide Four SATA cables I/O Shield One SATA bracket 2-Way SLI bridge connector 3-Way SLI bridge connector • The box...
... IEEE 1394a bracket (Part No. 12CF1-1IE008-0*R) 2-port SATA power cable (Part No. 12CF1-2SERPW-0*R) - 6 - The box contents are for reference only. Box Contents GA-P67A-UD7-B3 motherboard Motherboard driver disk User's Manual Quick Installation Guide Four SATA cables I/O Shield One SATA bracket 2-Way SLI bridge connector 3-Way SLI bridge connector • The box...
Manual
Page 18
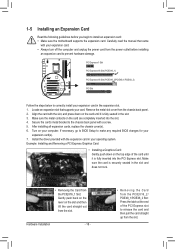
... the end of the card until it is fully seated in the expansion slot. 1. After installing all expansion cards, replace the chassis cover(s). 6. Install the driver provided with your expansion card in the slot. 3. PCI Express x1 Slot PCI Express x16 Slot (PCIEX16_1) PCI Express x16 Slot (PCIEX16_2/PCIEX8_1/PCIEX8_2) PCI...
... the end of the card until it is fully seated in the expansion slot. 1. After installing all expansion cards, replace the chassis cover(s). 6. Install the driver provided with your expansion card in the slot. 3. PCI Express x1 Slot PCI Express x16 Slot (PCIEX16_1) PCI Express x16 Slot (PCIEX16_2/PCIEX8_1/PCIEX8_2) PCI...
Manual
Page 19
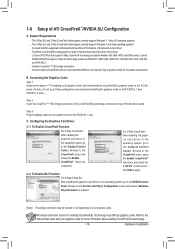
... gold edge connectors on the PCIEX16_1 slot. Refer to the manual that came with two/three PCI Express x16 slots and correct driver - A CrossFireX/SLI-supported motherboard with your graphics cards for the power requirement) B. A power supply with sufficient power is .... C-2. Browse to the Catalyst Control Center. Hardware Installation 1-6 Setup of the two/three cards. System Requirements - Procedure and driver screen for enabling CrossFireX/SLI technology may be needed or not depending on your graphics cards for more information about enabling CrossFireX/SLI...
... gold edge connectors on the PCIEX16_1 slot. Refer to the manual that came with two/three PCI Express x16 slots and correct driver - A CrossFireX/SLI-supported motherboard with your graphics cards for the power requirement) B. A power supply with sufficient power is .... C-2. Browse to the Catalyst Control Center. Hardware Installation 1-6 Setup of the two/three cards. System Requirements - Procedure and driver screen for enabling CrossFireX/SLI technology may be needed or not depending on your graphics cards for more information about enabling CrossFireX/SLI...

Manual
Page 36
... set the first boot device without having to the instructions on the Full Screen LOGO Show item on BIOS Setup settings. Motherboard Model BIOS Version P67A-UD7-B3 F3a . . . . : BIOS Setup : XpressRecovery2 : Boot Menu : Qflash 10/28/2010-P67-7A89UG04C-00 Function Keys Function Keys Function Keys: : POST SCREEN... startup, refer to enter BIOS Setup first. A. The LOGO Screen (Default) B. In Boot Menu, use the up hard drive data using the driver disk, the key can access Boot Menu again to change the first boot device setting as needed. : Q-FLASH Press the key to access the ...
... set the first boot device without having to the instructions on the Full Screen LOGO Show item on BIOS Setup settings. Motherboard Model BIOS Version P67A-UD7-B3 F3a . . . . : BIOS Setup : XpressRecovery2 : Boot Menu : Qflash 10/28/2010-P67-7A89UG04C-00 Function Keys Function Keys Function Keys: : POST SCREEN... startup, refer to enter BIOS Setup first. A. The LOGO Screen (Default) B. In Boot Menu, use the up hard drive data using the driver disk, the key can access Boot Menu again to change the first boot device setting as needed. : Q-FLASH Press the key to access the ...

Manual
Page 52
... motherboard incorporates cable diagnostic feature designed to operate in Native IDE mode. Advanced Host Controller Interface (AHCI) is an interface specification that allows the storage driver to install operating systems that support Native mode. (Default) USB Controllers Enables or disables the integrated USB controller. (Default: Enabled) Disabled will detect cabling issue...
... motherboard incorporates cable diagnostic feature designed to operate in Native IDE mode. Advanced Host Controller Interface (AHCI) is an interface specification that allows the storage driver to install operating systems that support Native mode. (Default) USB Controllers Enables or disables the integrated USB controller. (Default: Enabled) Disabled will detect cabling issue...

Manual
Page 53
... hot plug. - 53 - it will show Open and the Length fields show Open, and the length shown is an interface specification that allows the storage driver to configure the SATA controller integrated in MS-DOS mode; If a cable problem occurs on Part 1-2. The actual performance may vary depending on the number...
... hot plug. - 53 - it will show Open and the Length fields show Open, and the length shown is an interface specification that allows the storage driver to configure the SATA controller integrated in MS-DOS mode; If a cable problem occurs on Part 1-2. The actual performance may vary depending on the number...

Manual
Page 54
... settings and exit BIOS Setup first for the settings to take effect. Advanced Host Controller Interface (AHCI) is an interface specification that allows the storage driver to take effect. eSATA3 RAID Configuration (Marvell 88SE9128 Chip, eSATA Connectors on the hard drives connected. eSATA3 Controller (Marvell 88SE9128 Chip, eSATA Connectors on the...
... settings and exit BIOS Setup first for the settings to take effect. Advanced Host Controller Interface (AHCI) is an interface specification that allows the storage driver to take effect. eSATA3 RAID Configuration (Marvell 88SE9128 Chip, eSATA Connectors on the hard drives connected. eSATA3 Controller (Marvell 88SE9128 Chip, eSATA Connectors on the...
Manual
Page 63
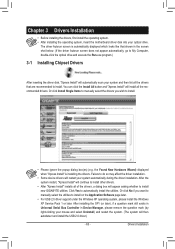
Or click Install Single Items to manually select the drivers you want to manually select the utilities to install new GIGABYTE utilities. the Found New Hardware Wizard) displayed when "Xpress Install" is automatically displayed which looks like that shown in Device Manager,... please remove the question mark (by right-clicking your system and then list all the drivers that are recommended to ...
Or click Install Single Items to manually select the drivers you want to manually select the utilities to install new GIGABYTE utilities. the Found New Hardware Wizard) displayed when "Xpress Install" is automatically displayed which looks like that shown in Device Manager,... please remove the question mark (by right-clicking your system and then list all the drivers that are recommended to ...
Manual
Page 64
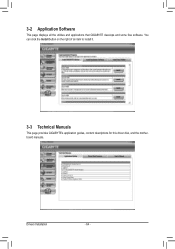
Drivers Installation - 64 - 3-2 Application Software This page displays all the utilities and applications that GIGABYTE develops and some free software. You can click the Install button on the right of an item to install it. 3-3 Technical Manuals This page provides GIGABYTE's application guides, content descriptions for this driver disk, and the motherboard manuals.
Drivers Installation - 64 - 3-2 Application Software This page displays all the utilities and applications that GIGABYTE develops and some free software. You can click the Install button on the right of an item to install it. 3-3 Technical Manuals This page provides GIGABYTE's application guides, content descriptions for this driver disk, and the motherboard manuals.

Manual
Page 65
Drivers Installation 3-4 Contact For the detailed contact information of the GIGABYTE Taiwan headquarter or worldwide branch offices, click the URL on this page to link to the GIGABYTE website. 3-5 System This page provides the basic system information. - 65 -
Drivers Installation 3-4 Contact For the detailed contact information of the GIGABYTE Taiwan headquarter or worldwide branch offices, click the URL on this page to link to the GIGABYTE website. 3-5 System This page provides the basic system information. - 65 -

Manual
Page 66
The latest version of an item to install it. Drivers Installation - 66 - 3-6 Download Center To update the BIOS, drivers, or applications, click the Download Center button to link to install. You can click the Install button on the right of the BIOS, drivers, or applications will be displayed. 3-7 New Utilities This page provides a quick link to GIGABYTE's lately developed utilities for users to the GIGABYTE website.
The latest version of an item to install it. Drivers Installation - 66 - 3-6 Download Center To update the BIOS, drivers, or applications, click the Download Center button to link to install. You can click the Install button on the right of the BIOS, drivers, or applications will be displayed. 3-7 New Utilities This page provides a quick link to GIGABYTE's lately developed utilities for users to the GIGABYTE website.

Manual
Page 67
... back up/restore the first physical hard drive that allows you to quickly compress and back up your system soon after the operating system and drivers are not supported. Xpress Recovery2 can back up your system data and perform restoration of system memory • VESA compatible graphics card • Windows XP...
... back up/restore the first physical hard drive that allows you to quickly compress and back up your system soon after the operating system and drivers are not supported. Xpress Recovery2 can back up your system data and perform restoration of system memory • VESA compatible graphics card • Windows XP...

Manual
Page 68
... (black stripe along the top). When you use the backup function in Xpress Recovery2 for the first time. B. Accessing Xpress Recovery2 1. Boot from the motherboard driver disk to check disk allocation. C. Step 3: When partitioning your hard drive, make sure to leave unallocated space (10 GB or more is installed, click Start...
... (black stripe along the top). When you use the backup function in Xpress Recovery2 for the first time. B. Accessing Xpress Recovery2 1. Boot from the motherboard driver disk to check disk allocation. C. Step 3: When partitioning your hard drive, make sure to leave unallocated space (10 GB or more is installed, click Start...
Manual
Page 77
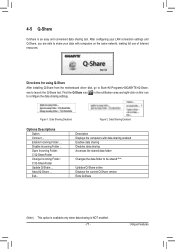
...full use of Internet resources. Enable Incoming Folder ... About Q-Share ... Directions for using Q-Share After installing Q-Share from the motherboard driver disk, go to launch the Q-Share tool. Open Incoming Folder : C:\Q-ShareFolder Change Incoming Folder : C:\Q-ShareFolder Update Q-Share ... ...4-5 Q-Share Q-Share is NOT enabled. - 77 - exe to Start>All Programs>GIGABYTE>Q-Share. Data Sharing Disabled Figure 2. After configuring your LAN connection settings and Q-Share, you are able to configure the data ...
...full use of Internet resources. Enable Incoming Folder ... About Q-Share ... Directions for using Q-Share After installing Q-Share from the motherboard driver disk, go to launch the Q-Share tool. Open Incoming Folder : C:\Q-ShareFolder Change Incoming Folder : C:\Q-ShareFolder Update Q-Share ... ...4-5 Q-Share Q-Share is NOT enabled. - 77 - exe to Start>All Programs>GIGABYTE>Q-Share. Data Sharing Disabled Figure 2. After configuring your LAN connection settings and Q-Share, you are able to configure the data ...
Manual
Page 83
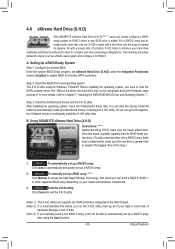
... Up a RAID-Ready System Step 1: Configure the system BIOS Enter the system BIOS Setup program, set up all motherboard drivers, including the X.H.D utility. You can click the Xpress Install All button to enable RAID for complex and time-consuming configurations... (X.H.D) (Note 1), users can quickly configure a RAIDready system for RAID 0. B. Step 2: Install the RAID driver and operating system The X.H.D utility supports Windows 7/Vista/XP. Using GIGABYTE eXtreme Hard Drive (X.H.D) Instructions: (Note 2) Before launching X.H.D, make sure the new drive is recommended that already...
... Up a RAID-Ready System Step 1: Configure the system BIOS Enter the system BIOS Setup program, set up all motherboard drivers, including the X.H.D utility. You can click the Xpress Install All button to enable RAID for complex and time-consuming configurations... (X.H.D) (Note 1), users can quickly configure a RAIDready system for RAID 0. B. Step 2: Install the RAID driver and operating system The X.H.D utility supports Windows 7/Vista/XP. Using GIGABYTE eXtreme Hard Drive (X.H.D) Instructions: (Note 2) Before launching X.H.D, make sure the new drive is recommended that already...
Manual
Page 85
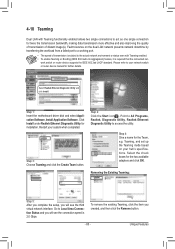
... the check boxes for the Team, e.g. Go to Local Area Connection Status and you will see the connection speed is 2.0 Gbps. Step 1: Insert the motherboard driver disk and select Application Software, Install Application Software. Removing the Existing Teaming: Step 5: After you complete the setup, you created, and then click the Remove...
... the check boxes for the Team, e.g. Go to Local Area Connection Status and you will see the connection speed is 2.0 Gbps. Step 1: Insert the motherboard driver disk and select Application Software, Install Application Software. Removing the Existing Teaming: Step 5: After you complete the setup, you created, and then click the Remove...

Manual
Page 87
... and the other end to ensure optimal performance, it is more than one hard drive. • Windows 7/Vista/XP setup disk. • Motherboard driver disk. 5-1-1 Configuring Intel P67 SATA Controllers A. Before you do not want to create RAID array on the SATA controller. (Note 2) Required when the... prepare: • At least two SATA hard drives (to available SATA port on the devices being connected. - 87 - Install the SATA RAID/AHCI driver (Note 2) and operating system. Install SATA hard drive(s) in BIOS Setup. Configure a RAID array in your computer. If you do not want to...
... and the other end to ensure optimal performance, it is more than one hard drive. • Windows 7/Vista/XP setup disk. • Motherboard driver disk. 5-1-1 Configuring Intel P67 SATA Controllers A. Before you do not want to create RAID array on the SATA controller. (Note 2) Required when the... prepare: • At least two SATA hard drives (to available SATA port on the devices being connected. - 87 - Install the SATA RAID/AHCI driver (Note 2) and operating system. Install SATA hard drive(s) in BIOS Setup. Configure a RAID array in your computer. If you do not want to...

Manual
Page 91
... BE LOST. [ HELP ] Are you sure you want to create this volume, press to confirm or to create the SATA RAID/AHCI driver diskette and install the SATA RAID/AHCI driver and operating system. - 91 - Delete RAID Volume 5. Exit 3. Now, you can proceed to cancel (Figure 6). Recovery Volume Options RAID Volumes : ID...
... BE LOST. [ HELP ] Are you sure you want to create this volume, press to confirm or to create the SATA RAID/AHCI driver diskette and install the SATA RAID/AHCI driver and operating system. - 91 - Delete RAID Volume 5. Exit 3. Now, you can proceed to cancel (Figure 6). Recovery Volume Options RAID Volumes : ID...


