Manual
Page 9
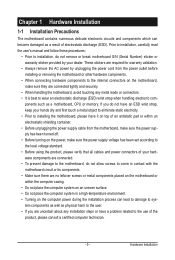
... an ESD wrist strap, keep your hands dry and first touch a metal object to eliminate static electricity. • Prior to installing the motherboard, please have a problem related to wear an electrostatic discharge (ESD) wrist strap when handling electronic com-
... an ESD wrist strap, keep your hands dry and first touch a metal object to eliminate static electricity. • Prior to installing the motherboard, please have a problem related to wear an electrostatic discharge (ESD) wrist strap when handling electronic com-
Manual
Page 31
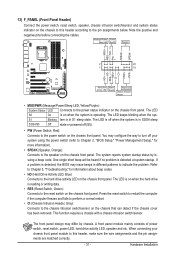
... assignments below. Hardware Installation S1 Blinking tem is in different patterns to the power status indicator on the chassis front panel. If a problem is detected, the BIOS may differ by issuing a beep code. A front panel module mainly consists of power switch, reset switch, power... Switch Power LED Chassis Intrusion Header • MSG/PWR (Message/Power/Sleep LED, Yellow/Purple): System Status LED Connects to indicate the problem. The LED keeps blinking when the sys- This function requires a chassis with a chassis intrusion switch/sensor. When connecting your system using ...
... assignments below. Hardware Installation S1 Blinking tem is in different patterns to the power status indicator on the chassis front panel. If a problem is detected, the BIOS may differ by issuing a beep code. A front panel module mainly consists of power switch, reset switch, power... Switch Power LED Chassis Intrusion Header • MSG/PWR (Message/Power/Sleep LED, Yellow/Purple): System Status LED Connects to indicate the problem. The LED keeps blinking when the sys- This function requires a chassis with a chassis intrusion switch/sensor. When connecting your system using ...

Manual
Page 37
To upgrade the BIOS, use either the GIGABYTE Q-Flash or @BIOS utility. • Q-Flash allows the user to clear the CMOS values.) - 37 - If this occurs, try to clear the CMOS values and ... altering the settings may result in the main menu of BIOS from the Internet and updates the BIOS. To flash the BIOS, do not encounter problems using the Q-Flash and @BIOS utilities, refer to boot. Refer to Chapter 5, "Troubleshooting," for how to quickly and easily upgrade or back up BIOS without...
To upgrade the BIOS, use either the GIGABYTE Q-Flash or @BIOS utility. • Q-Flash allows the user to clear the CMOS values.) - 37 - If this occurs, try to clear the CMOS values and ... altering the settings may result in the main menu of BIOS from the Internet and updates the BIOS. To flash the BIOS, do not encounter problems using the Q-Flash and @BIOS utilities, refer to boot. Refer to Chapter 5, "Troubleshooting," for how to quickly and easily upgrade or back up BIOS without...
Manual
Page 57
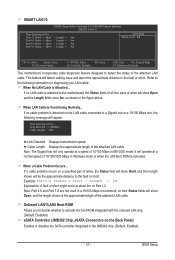
.... (Default: Disabled) eSATA Controller (JMB362 Chip, eSATA Connectors on the LAN cable connected to detect the status of the attached LAN cable. If no cable problem is attached to the fault or short. Note: The Gigabit hub will appear: Start detecting at about 2m on a specified pair of wires will be...-Copyright (C) 1984-2009 Award Software SMART LAN1/2 Start detecting at a speed of 10/100/1000 Mbps in the JMB362 chip. (Default: Enabled) - 57 - When a Cable Problem Occurs... If a cable problem occurs on Part 1-2.
.... (Default: Disabled) eSATA Controller (JMB362 Chip, eSATA Connectors on the LAN cable connected to detect the status of the attached LAN cable. If no cable problem is attached to the fault or short. Note: The Gigabit hub will appear: Start detecting at about 2m on a specified pair of wires will be...-Copyright (C) 1984-2009 Award Software SMART LAN1/2 Start detecting at a speed of 10/100/1000 Mbps in the JMB362 chip. (Default: Enabled) - 57 - When a Cable Problem Occurs... If a cable problem occurs on Part 1-2.
Manual
Page 121
...eral > System). Appendix If your motherboard, please go to the Support&Downloads\Motherboard\FAQ page on GIGABYTE's website. If not, please update it from GIGABYTE's website to install. Then install the onboard HD audio driver from the motherboard driver disk or download ...the audio driver from Microsoft's website. A: The following Award BIOS beep code descriptions may help you identify possible computer problems. (For reference only.)...
...eral > System). Appendix If your motherboard, please go to the Support&Downloads\Motherboard\FAQ page on GIGABYTE's website. If not, please update it from GIGABYTE's website to install. Then install the onboard HD audio driver from the motherboard driver disk or download ...the audio driver from Microsoft's website. A: The following Award BIOS beep code descriptions may help you identify possible computer problems. (For reference only.)...

Manual
Page 122
...verified and solved. Insert the graphics card. Connect the ATX main power cable and the 12V power cable. Turn on the power to solve the problem. A (Continued...) Appendix - 122 - 5-3-2 Troubleshooting Procedure If you encounter any troubles during system startup, follow the troubleshooting procedure below to start... the computer. Is the power connector of the CPU cooler connected to the motherboard. Yes The problem is verified and solved. Make sure the graphics card is attached to the CPU securely. No Check if the CPU cooler is ...
...verified and solved. Insert the graphics card. Connect the ATX main power cable and the 12V power cable. Turn on the power to solve the problem. A (Continued...) Appendix - 122 - 5-3-2 Troubleshooting Procedure If you encounter any troubles during system startup, follow the troubleshooting procedure below to start... the computer. Is the power connector of the CPU cooler connected to the motherboard. Yes The problem is verified and solved. Make sure the graphics card is attached to the CPU securely. No Check if the CPU cooler is ...

Manual
Page 123
...can boot successfully. Reinstall other devices one by one (install one device at one time and then boot the system to solve your problem, contact the place of purchase or local dealer for help. Check if the keyboard is verified and solved. END If the procedure ... might fail. Select "Save & Exit Setup" to enter BIOS Setup. Yes Reinstall the operating system. The problem is the CPU cooler running? The problem is verified and solved. Turn off the computer. The problem is verified and solved. No The IDE/SATA device, connector, or cable might fail. Appendix
...can boot successfully. Reinstall other devices one by one (install one device at one time and then boot the system to solve your problem, contact the place of purchase or local dealer for help. Check if the keyboard is verified and solved. END If the procedure ... might fail. Select "Save & Exit Setup" to enter BIOS Setup. Yes Reinstall the operating system. The problem is the CPU cooler running? The problem is verified and solved. Turn off the computer. The problem is verified and solved. No The IDE/SATA device, connector, or cable might fail. Appendix


