
Manual
Page 9
...on an uneven surface. • Do not place the computer system in a high-temperature environment. • Turning on the power, make sure the power supply voltage has been set according to the use of electrostatic discharge (ESD). If you do not remove or break motherboard S/N ... the motherboard or within an electrostatic shielding container. • Before unplugging the power supply cable from the motherboard, make sure the power supply has been turned off. • Before turning on the computer power during the installation process can become damaged as a motherboard, CPU or memory....
...on an uneven surface. • Do not place the computer system in a high-temperature environment. • Turning on the power, make sure the power supply voltage has been set according to the use of electrostatic discharge (ESD). If you do not remove or break motherboard S/N ... the motherboard or within an electrostatic shielding container. • Before unplugging the power supply cable from the motherboard, make sure the power supply has been turned off. • Before turning on the computer power during the installation process can become damaged as a motherboard, CPU or memory....

Manual
Page 22
... meet expansion requirements, it is compatible with power supplies with 2x10 power connectors. The 12V power connector mainly supplies power to an unstable or unbootable system. • The main power connector is recommended that a power supply that does not provide the required power, the result can lead to the CPU. When using a 2x10 power supply. 31 42 ATX_12V ATX_12V: Pin No. 1 2 3 4 Definition...
... meet expansion requirements, it is compatible with power supplies with 2x10 power connectors. The 12V power connector mainly supplies power to an unstable or unbootable system. • The main power connector is recommended that a power supply that does not provide the required power, the result can lead to the CPU. When using a 2x10 power supply. 31 42 ATX_12V ATX_12V: Pin No. 1 2 3 4 Definition...
Manual
Page 31
...in the CMOS on . To upgrade the BIOS, use either the GIGABYTE Q-Flash or @BIOS utility. • Q-Flash allows the user to keep the configuration values in the CMOS. For instructions on the motherboard supplies the necessary power to the CMOS to quickly and easily upgrade or back up BIOS ... system parameters and loading operating system, etc. Its major functions include conducting the Power-On Self-Test (POST) during the POST when the power is potentially risky, if you not flash the BIOS. When the power is turned off, the battery on using the current version of BIOS, it with...
...in the CMOS on . To upgrade the BIOS, use either the GIGABYTE Q-Flash or @BIOS utility. • Q-Flash allows the user to keep the configuration values in the CMOS. For instructions on the motherboard supplies the necessary power to the CMOS to quickly and easily upgrade or back up BIOS ... system parameters and loading operating system, etc. Its major functions include conducting the Power-On Self-Test (POST) during the POST when the power is potentially risky, if you not flash the BIOS. When the power is turned off, the battery on using the current version of BIOS, it with...

Manual
Page 47
...) Double Click Double click on left button on the PS/2 mouse to turn on this item. Disabled Disables this function, you need an ATX power supply providing at a desired time. (Default: Disabled) If enabled, set to accept. Memory The system returns to clear the password settings. Note:... you need an ATX power supply providing at least 1A on the +5VSB lead. (Default: Enabled) HPET Support (Note) Enables or disables High Precision Event Timer (HPET) for...
...) Double Click Double click on left button on the PS/2 mouse to turn on this item. Disabled Disables this function, you need an ATX power supply providing at a desired time. (Default: Disabled) If enabled, set to accept. Memory The system returns to clear the password settings. Note:... you need an ATX power supply providing at least 1A on the +5VSB lead. (Default: Enabled) HPET Support (Note) Enables or disables High Precision Event Timer (HPET) for...
Manual
Page 69
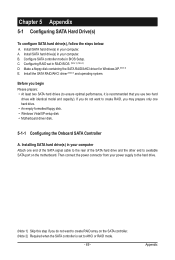
... Configure SATA controller mode in your computer. B. Install the SATA RAID/AHCI driver (Note 2) and operating system. Installing SATA hard drive(s) in your power supply to the hard drive. (Note 1) Skip this step if you begin Please prepare: • At least two SATA hard drives (to ensure optimal ...performance, it is set in your computer. A. Then connect the power connector from your computer Attach one hard drive. • An empty formatted floppy disk. • Windows Vista/XP setup disk. • ...
... Configure SATA controller mode in your computer. B. Install the SATA RAID/AHCI driver (Note 2) and operating system. Installing SATA hard drive(s) in your power supply to the hard drive. (Note 1) Skip this step if you begin Please prepare: • At least two SATA hard drives (to ensure optimal ...performance, it is set in your computer. A. Then connect the power connector from your computer Attach one hard drive. • An empty formatted floppy disk. • Windows Vista/XP setup disk. • ...

Manual
Page 88
...? You can temporarily remove the battery from the battery holder to stop supplying power to the CMOS, which will clear the CMOS values after the computer shuts down ? If not, please update it from GIGABYTE's website to install. Press to enter BIOS Setup during the POST mean...? (For Windows XP only) A: Step 1: First, make sure the Microsoft UAA Bus Driver for your motherboard, please go to the instructions on GIGABYTE's website. For more FAQs for High Definition Audio has been installed successfully (check in the BIOS Setup program. Q: What do I have a CMOS_SW...
...? You can temporarily remove the battery from the battery holder to stop supplying power to the CMOS, which will clear the CMOS values after the computer shuts down ? If not, please update it from GIGABYTE's website to install. Press to enter BIOS Setup during the POST mean...? (For Windows XP only) A: Step 1: First, make sure the Microsoft UAA Bus Driver for your motherboard, please go to the instructions on GIGABYTE's website. For more FAQs for High Definition Audio has been installed successfully (check in the BIOS Setup program. Q: What do I have a CMOS_SW...
Manual
Page 90
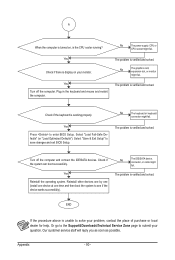
... you as soon as possible. Appendix - 90 - Yes Press to see if the device works successfully). Check if the system can boot successfully. No The power supply, CPU or CPU socket might fail. No The graphics card, expansion slot, or monitor might fail. No The keyboard or keyboard connector might fail. Yes...
... you as soon as possible. Appendix - 90 - Yes Press to see if the device works successfully). Check if the system can boot successfully. No The power supply, CPU or CPU socket might fail. No The graphics card, expansion slot, or monitor might fail. No The keyboard or keyboard connector might fail. Yes...


