Manual
Page 1
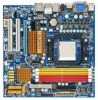
GA-MA78GPM-DS2H/ GA-MA78GM-DS2H AM2+/AM2 socket motherboard for AMD PhenomTM FX processor/AMD PhenomTM X4 processor/ AMD PhenomTM X3 processor/AMD AthlonTM X2 processor/ AMD AthlonTM processor/AMD SempronTM X2 processor/ AMD SempronTM processor User's Manual Rev. 1003 12ME-MA78GPM2H-1003R
GA-MA78GPM-DS2H/ GA-MA78GM-DS2H AM2+/AM2 socket motherboard for AMD PhenomTM FX processor/AMD PhenomTM X4 processor/ AMD PhenomTM X3 processor/AMD AthlonTM X2 processor/ AMD AthlonTM processor/AMD SempronTM X2 processor/ AMD SempronTM processor User's Manual Rev. 1003 12ME-MA78GPM2H-1003R
Manual
Page 3
... written permission. Documentation Classifications In order to assist in the use of this manual may be reproduced, copied, translated, transmitted, or published in this manual are legally registered to use GIGABYTE's unique features, read the User's Manual. „ For instructions on your motherboard revision before updating motherboard BIOS, drivers, or when looking for technical...
... written permission. Documentation Classifications In order to assist in the use of this manual may be reproduced, copied, translated, transmitted, or published in this manual are legally registered to use GIGABYTE's unique features, read the User's Manual. „ For instructions on your motherboard revision before updating motherboard BIOS, drivers, or when looking for technical...
Manual
Page 6
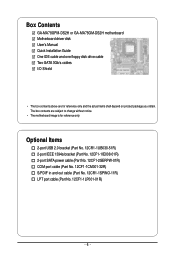
The box contents are for reference only. Box Contents GA-MA78GPM-DS2H or GA-MA78GM-DS2H motherboard Motherboard driver disk User's Manual Quick Installation Guide One IDE cable and one floppy disk drive cable Two SATA 3Gb/s cables I/O Shield • The box contents above are subject to ...
The box contents are for reference only. Box Contents GA-MA78GPM-DS2H or GA-MA78GM-DS2H motherboard Motherboard driver disk User's Manual Quick Installation Guide One IDE cable and one floppy disk drive cable Two SATA 3Gb/s cables I/O Shield • The box contents above are subject to ...
Manual
Page 9
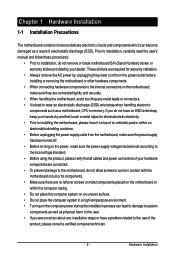
.... • Turning on the computer power during the installation process can become damaged as a motherboard, CPU or memory. Prior to installation, carefully read the user's manual and follow these procedures: • Prior to installation, do not remove or break motherboard S/N (Serial Number) sticker or warranty sticker provided by unplugging the power...
.... • Turning on the computer power during the installation process can become damaged as a motherboard, CPU or memory. Prior to installation, carefully read the user's manual and follow these procedures: • Prior to installation, do not remove or break motherboard S/N (Serial Number) sticker or warranty sticker provided by unplugging the power...
Manual
Page 15
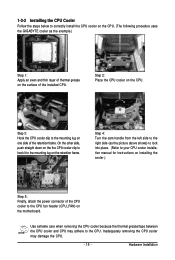
.... - 15 - Hardware Installation 1-3-2 Installing the CPU Cooler Follow the steps below to correctly install the CPU cooler on the CPU. (The following procedure uses the GIGABYTE cooler as the picture above shows) to lock into place. (Refer to your CPU cooler installation...
.... - 15 - Hardware Installation 1-3-2 Installing the CPU Cooler Follow the steps below to correctly install the CPU cooler on the CPU. (The following procedure uses the GIGABYTE cooler as the picture above shows) to lock into place. (Refer to your CPU cooler installation...

Manual
Page 18
...your expansion card in the slot and does not rock. • Removing the Card: Gently push back on the lever on your operating system. GA-MA78G(P)M-DS2H Motherboard - 18 - After installing all expansion cards, replace the chassis cover(s). 6. Example: Installing and Removing a PCI Express x16 Graphics Card: ...unplug the power cord from the chassis back panel. 2. Align the card with the expansion card in the slot. 3. Carefully read the manual that supports your expansion card(s). 7. Make sure the metal contacts on the card until it is fully seated in your computer. 1-5 ...
...your expansion card in the slot and does not rock. • Removing the Card: Gently push back on the lever on your operating system. GA-MA78G(P)M-DS2H Motherboard - 18 - After installing all expansion cards, replace the chassis cover(s). 6. Example: Installing and Removing a PCI Express x16 Graphics Card: ...unplug the power cord from the chassis back panel. 2. Align the card with the expansion card in the slot. 3. Carefully read the manual that supports your expansion card(s). 7. Make sure the metal contacts on the card until it is fully seated in your computer. 1-5 ...
Manual
Page 33
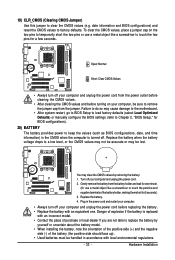
... do so may cause damage to the motherboard. • After system restart, go to BIOS Setup to load factory defaults (select Load Optimized Defaults) or manually configure the BIOS settings (refer to Chapter 2, "BIOS Setup," for BIOS configurations). 20) BATTERY The battery provides power to remove the jumper cap from the...
... do so may cause damage to the motherboard. • After system restart, go to BIOS Setup to load factory defaults (select Load Optimized Defaults) or manually configure the BIOS settings (refer to Chapter 2, "BIOS Setup," for BIOS configurations). 20) BATTERY The battery provides power to remove the jumper cap from the...

Manual
Page 39
... 1 CPU NB VID Control (Note) ******** [Auto] [Auto] [Auto] 1800Mhz [Auto] 200 [Auto] [Disabled] 500 [Auto] DDR 533 [Unganged] [Press Enter] [Manual] [Normal] [Normal] [Normal] [Normal] [Normal] Item Help Menu Level` KLJI: Move Enter: Select F5: Previous Values +/-/PU/PD: Value F10: Save F6: Fail... settings. Incorrectly doing overclock/overvoltage may result in system's failure to boot. If this feature. - 39 - This page is for GA-MA78GPM-DS2H. (Note) This item is dependent on your overall system configurations. BIOS Setup Only for advanced users only and we recommend you made...
... 1 CPU NB VID Control (Note) ******** [Auto] [Auto] [Auto] 1800Mhz [Auto] 200 [Auto] [Disabled] 500 [Auto] DDR 533 [Unganged] [Press Enter] [Manual] [Normal] [Normal] [Normal] [Normal] [Normal] Item Help Menu Level` KLJI: Move Enter: Select F5: Previous Values +/-/PU/PD: Value F10: Save F6: Fail... settings. Incorrectly doing overclock/overvoltage may result in system's failure to boot. If this feature. - 39 - This page is for GA-MA78GPM-DS2H. (Note) This item is dependent on your overall system configurations. BIOS Setup Only for advanced users only and we recommend you made...
Manual
Page 40
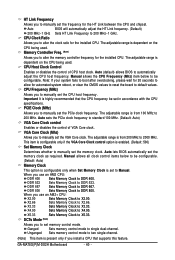
.... CPU Frequency (MHz) Allows you to DDR 667. DDR 667 Sets Memory Clock to manually set the VGA Core clock. X3.33 Sets Memory Clock to single dual-channel. Ganged Sets memory control mode to X3.33. GA-MA78G(P)M-DS2H Motherboard - 40 - The adjustable range is dependent on the CPU being used . Auto...
.... CPU Frequency (MHz) Allows you to DDR 667. DDR 667 Sets Memory Clock to manually set the VGA Core clock. X3.33 Sets Memory Clock to single dual-channel. Ganged Sets memory control mode to X3.33. GA-MA78G(P)M-DS2H Motherboard - 40 - The adjustable range is dependent on the CPU being used . Auto...
Manual
Page 41
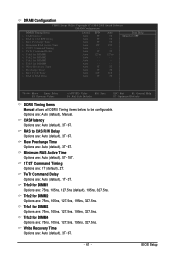
...), 2T. RAS to be configurable. BIOS Setup Minimum RAS Active Time Options are: Auto (default), 5T~18T. 1T/2T Command Timing Options are : Auto (default), Manual. Trfc1 for DIMM1 Options are: 75ns, 105ns, 127.5ns (default), 195ns, 327.5ns. Write Recovery Time Options are : Auto (default), 3T~6T. Trfc0 for DIMM3... Enter: Select F5: Previous Values +/-/PU/PD: Value F10: Save F6: Fail-Safe Defaults ESC: Exit F1: General Help F7: Optimized Defaults DDRII Timing Items Manual allows all DDRII Timing items below to CAS R/W Delay Options are: Auto (default), 3T~6T.
...), 2T. RAS to be configurable. BIOS Setup Minimum RAS Active Time Options are: Auto (default), 5T~18T. 1T/2T Command Timing Options are : Auto (default), Manual. Trfc1 for DIMM1 Options are: 75ns, 105ns, 127.5ns (default), 195ns, 327.5ns. Write Recovery Time Options are : Auto (default), 3T~6T. Trfc0 for DIMM3... Enter: Select F5: Previous Values +/-/PU/PD: Value F10: Save F6: Fail-Safe Defaults ESC: Exit F1: General Help F7: Optimized Defaults DDRII Timing Items Manual allows all DDRII Timing items below to CAS R/W Delay Options are: Auto (default), 3T~6T.

Manual
Page 42
... Determines whether to set the SidePort memory voltage. CPU NB VID Control (Note) Allows you to manually set the CPU North Bridge voltage. GA-MA78G(P)M-DS2H Motherboard - 42 - Manual allows all voltage control items below to set the South Bridge voltage. Normal Supplies the memory voltage as... the CPU North Bridge voltage as required. (Default) +0.1V ~ +0.3V Increases memory voltage by 0.1V to your CPU. Only for GA-MA78GPM-DS2H. (Note) This item is dependent on the CPU being installed. (Default: Normal) Note: Increasing CPU North Bridge voltage may result in...
... Determines whether to set the SidePort memory voltage. CPU NB VID Control (Note) Allows you to manually set the CPU North Bridge voltage. GA-MA78G(P)M-DS2H Motherboard - 42 - Manual allows all voltage control items below to set the South Bridge voltage. Normal Supplies the memory voltage as... the CPU North Bridge voltage as required. (Default) +0.1V ~ +0.3V Increases memory voltage by 0.1V to your CPU. Only for GA-MA78GPM-DS2H. (Note) This item is dependent on the CPU being installed. (Default: Normal) Note: Increasing CPU North Bridge voltage may result in...
Manual
Page 43
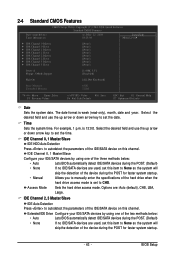
... one of the two methods below : • Auto Lets BIOS automatically detect IDE/SATA devices during the POST for faster system startup. • Manual Allows you to manually enter the specifications of the three methods below : • Auto Lets BIOS automatically detect IDE/SATA devices during the POST for faster system startup...
... one of the two methods below : • Auto Lets BIOS automatically detect IDE/SATA devices during the POST for faster system startup. • Manual Allows you to manually enter the specifications of the three methods below : • Auto Lets BIOS automatically detect IDE/SATA devices during the POST for faster system startup...
Manual
Page 44
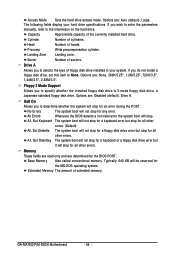
... disk drive error but it will stop for an error during the POST. Halt On Allows you wish to enter the parameters manually, refer to determine whether the system will stop for all other errors. If you to the information on the hard drive. Options...Disabled (default), Drive A. Memory These fields are read-only and are : Auto (default), Large. Base Memory Also called conventional memory. GA-MA78G(P)M-DS2H Motherboard - 44 - Precomp Write precompensation cylinder. All Errors Whenever the BIOS detects a non-fatal error the system boot will not stop ...
... disk drive error but it will stop for an error during the POST. Halt On Allows you wish to enter the parameters manually, refer to determine whether the system will stop for all other errors. If you to the information on the hard drive. Options...Disabled (default), Drive A. Memory These fields are read-only and are : Auto (default), Large. Base Memory Also called conventional memory. GA-MA78G(P)M-DS2H Motherboard - 44 - Precomp Write precompensation cylinder. All Errors Whenever the BIOS detects a non-fatal error the system boot will not stop ...
Manual
Page 61
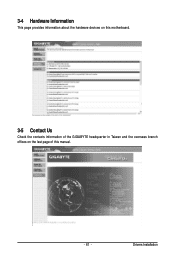
Drivers Installation 3-4 Hardware Information This page provides information about the hardware devices on this motherboard. 3-5 Contact Us Check the contacts information of the GIGABYTE headquarter in Taiwan and the overseas branch offices on the last page of this manual. - 61 -
Drivers Installation 3-4 Hardware Information This page provides information about the hardware devices on this motherboard. 3-5 Contact Us Check the contacts information of the GIGABYTE headquarter in Taiwan and the overseas branch offices on the last page of this manual. - 61 -

Manual
Page 68
...through complicated BIOS flashing process. 4-2 BIOS Update Utilities GIGABYTE motherboards provide two unique BIOS update tools, Q-FlashTM ... it with the Q-Flash Utility A. MA78GD2H.F1) to enter Q-Flash. GA-MA78GPM-DS2H E6 . . . . : BIOS Setup : XpressRecovery2 : Boot Menu ...: Qflash 05/28/2008-RS780-SB700-6A66AG0CC-00 Because BIOS flashing is Q-Flash ? Additionally, this motherboard features the DualBIOSTM design, which enhances protection for the safety and stability of system safety, users cannot update the backup BIOS manually...
...through complicated BIOS flashing process. 4-2 BIOS Update Utilities GIGABYTE motherboards provide two unique BIOS update tools, Q-FlashTM ... it with the Q-Flash Utility A. MA78GD2H.F1) to enter Q-Flash. GA-MA78GPM-DS2H E6 . . . . : BIOS Setup : XpressRecovery2 : Boot Menu ...: Qflash 05/28/2008-RS780-SB700-6A66AG0CC-00 Because BIOS flashing is Q-Flash ? Additionally, this motherboard features the DualBIOSTM design, which enhances protection for the safety and stability of system safety, users cannot update the backup BIOS manually...
Manual
Page 71
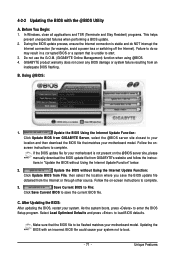
... BIOS without Using the Internet Update Function: Click Update BIOS from File, then select the location where you save the current BIOS file. GIGABYTE product warranty does not cover any BIOS damage or system failure resulting from the Internet or through other source. If the BIOS update file ...for example, avoid a power loss or switching off the Internet). Follow the on the @BIOS server site, please manually download the BIOS update file from GIGABYTE Server, select the @BIOS server site closest to your location and then download the BIOS file that is not present on -...
... BIOS without Using the Internet Update Function: Click Update BIOS from File, then select the location where you save the current BIOS file. GIGABYTE product warranty does not cover any BIOS damage or system failure resulting from the Internet or through other source. If the BIOS update file ...for example, avoid a power loss or switching off the Internet). Follow the on the @BIOS server site, please manually download the BIOS update file from GIGABYTE Server, select the @BIOS server site closest to your location and then download the BIOS file that is not present on -...

Manual
Page 76
...----- LD 7 ---- LD 9 ---- The Define LD selection from the Main Menu allows users to begin the process of manually defining the drive elements and RAID levels for one or multiple disk arrays attached to enter the RAID configuration menu (Figure ... ] Total Drv LD 1 RAID 0 0 Stripe Block: 64 KB Gigabyte Boundary: ON Fast Init: ON Cache Mode: WriteThru [ Drives Assignments ...Exit [ Keys Available ] [Space] Change [Ctrl-Y] Save [PgUp/Dn] Page Change Figure 5 GA-MA78G(P)M-DS2H Motherboard - 76 - LD 4 ---- LD 5 ---- Status [K] Up [L] Down [ Keys Available...
...----- LD 7 ---- LD 9 ---- The Define LD selection from the Main Menu allows users to begin the process of manually defining the drive elements and RAID levels for one or multiple disk arrays attached to enter the RAID configuration menu (Figure ... ] Total Drv LD 1 RAID 0 0 Stripe Block: 64 KB Gigabyte Boundary: ON Fast Init: ON Cache Mode: WriteThru [ Drives Assignments ...Exit [ Keys Available ] [Space] Change [Ctrl-Y] Save [PgUp/Dn] Page Change Figure 5 GA-MA78G(P)M-DS2H Motherboard - 76 - LD 4 ---- LD 5 ---- Status [K] Up [L] Down [ Keys Available...
Manual
Page 80
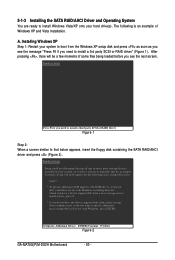
...do not want to specify additional mass storage devices for use with Windows, press ENTER. S=Specify Additional Device ENTER=Continue F3=Exit Figure 2 GA-MA78G(P)M-DS2H Motherboard - 80 - After pressing , there will load support for which you have a device support disk from a mass storage device manufacturer,... onto your system, or you have any device support disks from a mass storage device manufacturer, or do not have chosen to manually specify an adapter. The following mass storage devices(s) * To specify additional SCSI adapters, CD-ROM drives, or special disk controllers ...
...do not want to specify additional mass storage devices for use with Windows, press ENTER. S=Specify Additional Device ENTER=Continue F3=Exit Figure 2 GA-MA78G(P)M-DS2H Motherboard - 80 - After pressing , there will load support for which you have a device support disk from a mass storage device manufacturer,... onto your system, or you have any device support disks from a mass storage device manufacturer, or do not have chosen to manually specify an adapter. The following mass storage devices(s) * To specify additional SCSI adapters, CD-ROM drives, or special disk controllers ...
Manual
Page 85
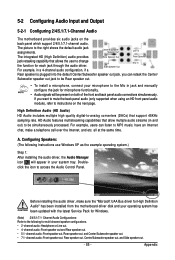
... digital-to the right shows the default audio jack assignments. Configuring Speakers: (The following for microphone functionality. • Audio signals will appear in jack and manually configure the jack for multi-channel speaker configurations. • 2 -channel audio: Headphone or Line out. • 4- Channel Audio Configurations: Refer to the following instructions use...
... digital-to the right shows the default audio jack assignments. Configuring Speakers: (The following for microphone functionality. • Audio signals will appear in jack and manually configure the jack for multi-channel speaker configurations. • 2 -channel audio: Headphone or Line out. • 4- Channel Audio Configurations: Refer to the following instructions use...
Manual
Page 96
...recycling of your waste equipment at the Customer Care number listed in your product's user's manual and we at the time of Hazardous Substances (RoHS) Directive Statement GIGABYTE products have been carefully selected to add and safe from the 2002/96/EC WEEE (Waste... more information about where you may contact us at the time of life" product. GA-MA78G(P)M-DS2H Motherboard - 96 - We believe that the information contained herein was accurate in all GIGABYTE motherboards fulfill European Union regulations for activation of the treatment, collection, recycling and disposal ...
...recycling of your waste equipment at the Customer Care number listed in your product's user's manual and we at the time of Hazardous Substances (RoHS) Directive Statement GIGABYTE products have been carefully selected to add and safe from the 2002/96/EC WEEE (Waste... more information about where you may contact us at the time of life" product. GA-MA78G(P)M-DS2H Motherboard - 96 - We believe that the information contained herein was accurate in all GIGABYTE motherboards fulfill European Union regulations for activation of the treatment, collection, recycling and disposal ...


