Manual
Page 1
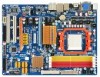
GA-MA78G-DS3H AM2+/AM2 socket motherboard for AMD PhenomTM FX processor/ AMD PhenomTM processor/ AMD AthlonTM 64 FX processor/ AMD AthlonTM 64 X2 Dual-Core processor/ AMD AthlonTM 64 processor/AMD SempronTM processor User's Manual Rev. 1002 12ME-MA78GDS3H-1002R
GA-MA78G-DS3H AM2+/AM2 socket motherboard for AMD PhenomTM FX processor/ AMD PhenomTM processor/ AMD AthlonTM 64 FX processor/ AMD AthlonTM 64 X2 Dual-Core processor/ AMD AthlonTM 64 processor/AMD SempronTM processor User's Manual Rev. 1002 12ME-MA78GDS3H-1002R

Manual
Page 3
... of the product, read the Quick Installation Guide included with the product. „ For detailed product information, carefully read the User's Manual. „ For instructions on how to use GIGABYTE's unique features, read or download the information on/from the Support\Motherboard\Technology Guide page on your motherboard revision before updating motherboard...
... of the product, read the Quick Installation Guide included with the product. „ For detailed product information, carefully read the User's Manual. „ For instructions on how to use GIGABYTE's unique features, read or download the information on/from the Support\Motherboard\Technology Guide page on your motherboard revision before updating motherboard...
Manual
Page 6
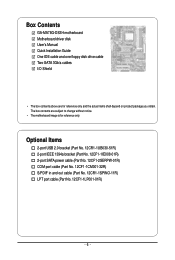
Box Contents GA-MA78G-DS3H motherboard Motherboard driver disk User's Manual Quick Installation Guide One IDE cable and one floppy disk drive cable Two SATA 3Gb/s cables I/O Shield • The box contents above are subject to ...
Box Contents GA-MA78G-DS3H motherboard Motherboard driver disk User's Manual Quick Installation Guide One IDE cable and one floppy disk drive cable Two SATA 3Gb/s cables I/O Shield • The box contents above are subject to ...
Manual
Page 9
...; Before turning on the computer power during the installation process can become damaged as a motherboard, CPU or memory. Prior to installation, carefully read the user's manual and follow these procedures: • Prior to installation, do not remove or break motherboard S/N (Serial Number) sticker or warranty sticker provided by unplugging the power...
...; Before turning on the computer power during the installation process can become damaged as a motherboard, CPU or memory. Prior to installation, carefully read the user's manual and follow these procedures: • Prior to installation, do not remove or break motherboard S/N (Serial Number) sticker or warranty sticker provided by unplugging the power...
Manual
Page 15
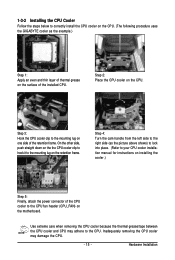
... the steps below to correctly install the CPU cooler on the CPU. (The following procedure uses the GIGABYTE cooler as the picture above shows) to lock into place. (Refer to your CPU cooler installation manual for instructions on installing the cooler.) Step 5: Finally, attach the power connector of the CPU cooler to...
... the steps below to correctly install the CPU cooler on the CPU. (The following procedure uses the GIGABYTE cooler as the picture above shows) to lock into place. (Refer to your CPU cooler installation manual for instructions on installing the cooler.) Step 5: Finally, attach the power connector of the CPU cooler to...
Manual
Page 18
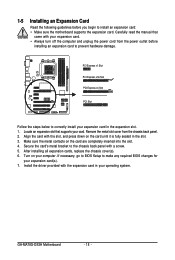
... system. 1-5 Installing an Expansion Card Read the following guidelines before installing an expansion card to prevent hardware damage. Carefully read the manual that supports your card. After installing all expansion cards, replace the chassis cover(s). 6. PCI Express x1 Slot PCI Express x16 Slot...expansion slot. 1. If necessary, go to BIOS Setup to install an expansion card: • Make sure the motherboard supports the expansion card. GA-MA78G-DS3H Motherboard - 18 - Locate an expansion slot that came with a screw. 5. Remove the metal slot cover from the power outlet before you...
... system. 1-5 Installing an Expansion Card Read the following guidelines before installing an expansion card to prevent hardware damage. Carefully read the manual that supports your card. After installing all expansion cards, replace the chassis cover(s). 6. PCI Express x1 Slot PCI Express x16 Slot...expansion slot. 1. If necessary, go to BIOS Setup to install an expansion card: • Make sure the motherboard supports the expansion card. GA-MA78G-DS3H Motherboard - 18 - Locate an expansion slot that came with a screw. 5. Remove the metal slot cover from the power outlet before you...
Manual
Page 33
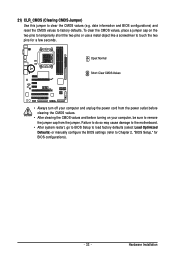
... do so may cause damage to the motherboard. • After system restart, go to BIOS Setup to load factory defaults (select Load Optimized Defaults) or manually configure the BIOS settings (refer to factory defaults. Hardware Installation date information and BIOS configurations) and reset the CMOS values to Chapter 2, "BIOS Setup," for...
... do so may cause damage to the motherboard. • After system restart, go to BIOS Setup to load factory defaults (select Load Optimized Defaults) or manually configure the BIOS settings (refer to factory defaults. Hardware Installation date information and BIOS configurations) and reset the CMOS values to Chapter 2, "BIOS Setup," for...
Manual
Page 39
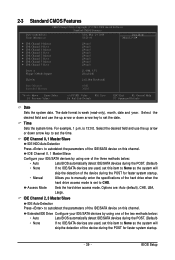
... using one of the three methods below : • Auto Lets BIOS automatically detect IDE/SATA devices during the POST for faster system startup. • Manual Allows you to manually enter the specifications of the device during the POST. (Default) • None If no IDE/SATA devices are used, set this channel. Access...
... using one of the three methods below : • Auto Lets BIOS automatically detect IDE/SATA devices during the POST for faster system startup. • Manual Allows you to manually enter the specifications of the device during the POST. (Default) • None If no IDE/SATA devices are used, set this channel. Access...
Manual
Page 40
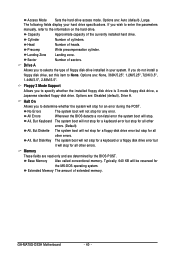
... the system will stop for an error during the POST. Landing Zone Landing zone. Halt On Allows you wish to enter the parameters manually, refer to specify whether the installed floppy disk drive is 3-mode floppy disk drive, a Japanese standard floppy disk drive. All, But... but stop . Options are : Auto (default), Large. All, But Keyboard The system boot will not stop for the MS-DOS operating system. GA-MA78G-DS3H Motherboard - 40 - Sector Number of extended memory. Options are determined by the BIOS POST. All Errors Whenever the BIOS detects a non-fatal error...
... the system will stop for an error during the POST. Landing Zone Landing zone. Halt On Allows you wish to enter the parameters manually, refer to specify whether the installed floppy disk drive is 3-mode floppy disk drive, a Japanese standard floppy disk drive. All, But... but stop . Options are : Auto (default), Large. All, But Keyboard The system boot will not stop for the MS-DOS operating system. GA-MA78G-DS3H Motherboard - 40 - Sector Number of extended memory. Options are determined by the BIOS POST. All Errors Whenever the BIOS detects a non-fatal error...
Manual
Page 51
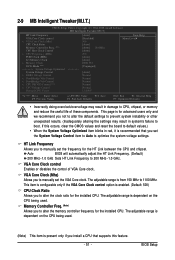
...HT Link between the CPU and chipset. This item is configurable only if the VGA Core Clock control option is present only if you to manually set the System Voltage Control item to Auto to optimize the system voltage settings. Memory Controller Freq. (Note) Allows you to alter the ...F1: General Help F7: Optimized Defaults • Incorrectly doing overclock/overvoltage may result in system's failure to boot. HT Link Frequency Allows you to manually set the frequency for advanced users only and we recommend you set the VGA Core clock. The adjustable range is dependent on the CPU being...
...HT Link between the CPU and chipset. This item is configurable only if the VGA Core Clock control option is present only if you to manually set the System Voltage Control item to Auto to optimize the system voltage settings. Memory Controller Freq. (Note) Allows you to alter the ...F1: General Help F7: Optimized Defaults • Incorrectly doing overclock/overvoltage may result in system's failure to boot. HT Link Frequency Allows you to manually set the frequency for advanced users only and we recommend you set the VGA Core clock. The adjustable range is dependent on the CPU being...
Manual
Page 52
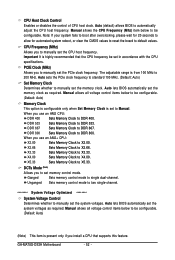
...Set Memory Clock Determines whether to X4.00. Auto lets BIOS automatically set the memory clock. X4.00 Sets Memory Clock to manually set the memory clock as required. Unganged Sets memory control mode to two single-channel. ******** System Voltage Optimized ******** System ...Memory Clock to manually set the system voltages as required. Manual allows the CPU Frequency (Mhz) item below to be configurable. (Default: Auto) Memory Clock This option is configurable only when Set Memory Clock is highly recommended that supports this feature. GA-MA78G-DS3H Motherboard - 52 ...
...Set Memory Clock Determines whether to X4.00. Auto lets BIOS automatically set the memory clock. X4.00 Sets Memory Clock to manually set the memory clock as required. Unganged Sets memory control mode to two single-channel. ******** System Voltage Optimized ******** System ...Memory Clock to manually set the system voltages as required. Manual allows the CPU Frequency (Mhz) item below to be configurable. (Default: Auto) Memory Clock This option is configurable only when Set Memory Clock is highly recommended that supports this feature. GA-MA78G-DS3H Motherboard - 52 ...

Manual
Page 59
3-4 Hardware Information This page provides information about the hardware devices on this motherboard. 3-5 Contact Us Check the contacts information of the GIGABYTE headquarter in Taiwan and the overseas branch offices on the last page of this manual. - 59 - Drivers Installation
3-4 Hardware Information This page provides information about the hardware devices on this motherboard. 3-5 Contact Us Check the contacts information of the GIGABYTE headquarter in Taiwan and the overseas branch offices on the last page of this manual. - 59 - Drivers Installation
Manual
Page 66
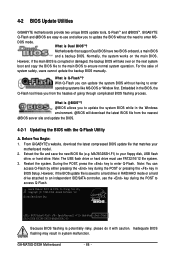
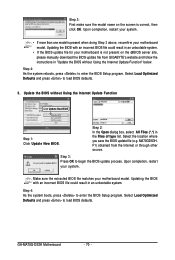
...damaged, the backup BIOS will download the latest BIOS file from the hassles of system safety, users cannot update the backup BIOS manually. What is potentially risky, please do it with the Q-Flash Utility A. DOS mode. Note: The USB flash drive or ...flashing may result in the Windows environment. @BIOS will take over on the main BIOS. GA-MA78G-DS3H Motherboard - 66 - 4-2 BIOS Update Utilities GIGABYTE motherboards provide two unique BIOS update tools, Q-FlashTM and @BIOSTM. GIGABYTE Q-Flash and @BIOS are easy-to-use FAT32/16/12 file system. 3. However,...
...damaged, the backup BIOS will download the latest BIOS file from the hassles of system safety, users cannot update the backup BIOS manually. What is potentially risky, please do it with the Q-Flash Utility A. DOS mode. Note: The USB flash drive or ...flashing may result in the Windows environment. @BIOS will take over on the main BIOS. GA-MA78G-DS3H Motherboard - 66 - 4-2 BIOS Update Utilities GIGABYTE motherboards provide two unique BIOS update tools, Q-FlashTM and @BIOSTM. GIGABYTE Q-Flash and @BIOS are easy-to-use FAT32/16/12 file system. 3. However,...
Manual
Page 70
F1) obtained from GIGABYTE's website and follow the instructions in "Update the BIOS without Using the Internet Update Function Click Update...As the system boots, press to load BIOS defaults. 3. Step 4: As the system reboots, press to enter the BIOS Setup program. GA-MA78G-DS3H Motherboard - 70 - Upon completion, restart your system. • If more than one model is correct, then click OK. Updating the ... update file (e.g. Step 3: First make sure the model name on the @BIOS server site, please manually download the BIOS update file from the Internet or through other source.
F1) obtained from GIGABYTE's website and follow the instructions in "Update the BIOS without Using the Internet Update Function Click Update...As the system boots, press to load BIOS defaults. 3. Step 4: As the system reboots, press to enter the BIOS Setup program. GA-MA78G-DS3H Motherboard - 70 - Upon completion, restart your system. • If more than one model is correct, then click OK. Updating the ... update file (e.g. Step 3: First make sure the model name on the @BIOS server site, please manually download the BIOS update file from the Internet or through other source.
Manual
Page 76
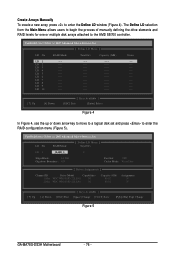
...Gigabyte Boundary: ON Fast Init: OFF Cache Mode: WriteThru [ Drives Assignments ] Channel:ID Drive Model Capabilities 1:Mas WDC WD800JD-22LSA0 3G 2:Mas WDC WD800JD-22LSA0 3G Capacity (GB) 80.02 80.02 Assignment N N [K] Up [L] Down [ESC] Exit [ Keys Available ] [Space] Change [Ctrl-Y] Save [PgUp/Dn] Page Change Figure 5 GA-MA78G-DS3H... Motherboard - 76 - Create Arrays Manually To create a new array, press to enter the Define LD window (Figure 4). LD 2 ---- LD 9 ----...
...Gigabyte Boundary: ON Fast Init: OFF Cache Mode: WriteThru [ Drives Assignments ] Channel:ID Drive Model Capabilities 1:Mas WDC WD800JD-22LSA0 3G 2:Mas WDC WD800JD-22LSA0 3G Capacity (GB) 80.02 80.02 Assignment N N [K] Up [L] Down [ESC] Exit [ Keys Available ] [Space] Change [Ctrl-Y] Save [PgUp/Dn] Page Change Figure 5 GA-MA78G-DS3H... Motherboard - 76 - Create Arrays Manually To create a new array, press to enter the Define LD window (Figure 4). LD 2 ---- LD 9 ----...
Manual
Page 80
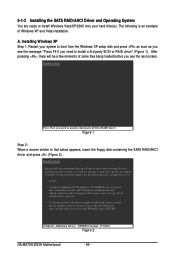
...are ready to install Windows Vista/XP/2000 onto your system to boot from a mass storage device manufacturer, or do not have chosen to manually specify an adapter. After pressing , there will load support for the following is an example of Windows XP and Vista installation. Currently, ...press as soon as you see the message "Press F6 if you see the next screen. S=Specify Additional Device ENTER=Continue F3=Exit Figure 2 GA-MA78G-DS3H Motherboard - 80 - Installing Windows XP Step 1: Restart your hard drive(s). Windows Setup Setup could not determine the type of some files being ...
...are ready to install Windows Vista/XP/2000 onto your system to boot from a mass storage device manufacturer, or do not have chosen to manually specify an adapter. After pressing , there will load support for the following is an example of Windows XP and Vista installation. Currently, ...press as soon as you see the message "Press F6 if you see the next screen. S=Specify Additional Device ENTER=Continue F3=Exit Figure 2 GA-MA78G-DS3H Motherboard - 80 - Installing Windows XP Step 1: Restart your hard drive(s). Windows Setup Setup could not determine the type of some files being ...

Manual
Page 85
... retask the Center/Subwoofer speaker out jack to be Rear speaker out. • To install a microphone, connect your microphone to the Mic in jack and manually configure the jack for microphone functionality. • Audio signals will appear in and out) to MP3 music, have an Internet chat, make sure the "Microsoft...
... retask the Center/Subwoofer speaker out jack to be Rear speaker out. • To install a microphone, connect your microphone to the Mic in jack and manually configure the jack for microphone functionality. • Audio signals will appear in and out) to MP3 music, have an Internet chat, make sure the "Microsoft...
Manual
Page 95
... not be taken to maximize the use internationally banned toxic chemicals. The separate collection and recycling of your product's user's manual and we at the time of printing. Appendix To prevent releases of harmful substances into the environment and to the waste ... collection, recycling and disposal procedure. Contravention will fulfill the national laws as most of electric and electronic devices and their components. GIGABYTE cannot, however, assume any unauthorized purpose. The WEEE Directive specifies the treatment, collection, recycling and disposal of the materials in ...
... not be taken to maximize the use internationally banned toxic chemicals. The separate collection and recycling of your product's user's manual and we at the time of printing. Appendix To prevent releases of harmful substances into the environment and to the waste ... collection, recycling and disposal procedure. Contravention will fulfill the national laws as most of electric and electronic devices and their components. GIGABYTE cannot, however, assume any unauthorized purpose. The WEEE Directive specifies the treatment, collection, recycling and disposal of the materials in ...


