
Manual
Page 3
... rights reserved. For product-related information, check on our website at: http://www.gigabyte.com.tw Identifying Your Motherboard Revision The revision number on your motherboard revision before updating motherboard BIOS, drivers, or when looking for technical information. Example: The logo is 1.0. Disclaimer Information in this manual may be reproduced, copied, translated...
... rights reserved. For product-related information, check on our website at: http://www.gigabyte.com.tw Identifying Your Motherboard Revision The revision number on your motherboard revision before updating motherboard BIOS, drivers, or when looking for technical information. Example: The logo is 1.0. Disclaimer Information in this manual may be reproduced, copied, translated...
Manual
Page 5
... 57 3-1 Installing Chipset Drivers 57 3-2 Software Applications 58 3-3 Driver CD Information 58 3-4 Hardware Information 59 3-5 Contact Us ...59 Chapter 4 Unique Features 61 4-1 Xpress Recovery2 61 4-2 BIOS Update Utilities 66 4-2-1...Chapter 5 Appendix ...73 5-1 Configuring SATA Hard Drive(s 73 5-1-1 Configuring the Onboard SATA Controller 73 5-1-2 Making a SATA RAID/AHCI Driver Diskette 79 5-1-3 Installing the SATA RAID/AHCI Driver and Operating System 80 5-2 Configuring Audio Input and Output 85 5-2-1 Configuring 2/4/5.1/7.1-Channel Audio 85 5-2-2 Installing the S/PDIF In and Out...
... 57 3-1 Installing Chipset Drivers 57 3-2 Software Applications 58 3-3 Driver CD Information 58 3-4 Hardware Information 59 3-5 Contact Us ...59 Chapter 4 Unique Features 61 4-1 Xpress Recovery2 61 4-2 BIOS Update Utilities 66 4-2-1...Chapter 5 Appendix ...73 5-1 Configuring SATA Hard Drive(s 73 5-1-1 Configuring the Onboard SATA Controller 73 5-1-2 Making a SATA RAID/AHCI Driver Diskette 79 5-1-3 Installing the SATA RAID/AHCI Driver and Operating System 80 5-2 Configuring Audio Input and Output 85 5-2-1 Configuring 2/4/5.1/7.1-Channel Audio 85 5-2-2 Installing the S/PDIF In and Out...
Manual
Page 6
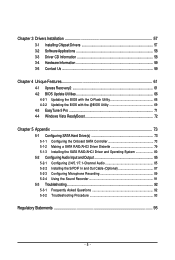
... out cable (Part No. 12CR1-1SPINO-11R) LPT port cable (Part No. 12CF1-1LP001-01R) - 6 - The box contents are for reference only. Box Contents GA-MA78G-DS3H motherboard Motherboard driver disk User's Manual Quick Installation Guide One IDE cable and one floppy disk drive cable Two SATA 3Gb/s cables I/O Shield • The box contents...
... out cable (Part No. 12CR1-1SPINO-11R) LPT port cable (Part No. 12CF1-1LP001-01R) - 6 - The box contents are for reference only. Box Contents GA-MA78G-DS3H motherboard Motherboard driver disk User's Manual Quick Installation Guide One IDE cable and one floppy disk drive cable Two SATA 3Gb/s cables I/O Shield • The box contents...
Manual
Page 18
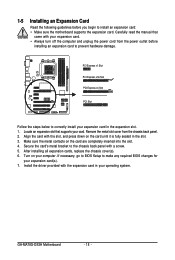
...completely inserted into the slot. 4. 1-5 Installing an Expansion Card Read the following guidelines before installing an expansion card to prevent hardware damage. GA-MA78G-DS3H Motherboard - 18 - Remove the metal slot cover from the power outlet before you begin to make any required BIOS changes for your ... card: • Make sure the motherboard supports the expansion card. Locate an expansion slot that came with a screw. 5. Install the driver provided with the slot, and press down on the card until it is fully seated in the slot. 3. After installing all expansion cards...
...completely inserted into the slot. 4. 1-5 Installing an Expansion Card Read the following guidelines before installing an expansion card to prevent hardware damage. GA-MA78G-DS3H Motherboard - 18 - Remove the metal slot cover from the power outlet before you begin to make any required BIOS changes for your ... card: • Make sure the motherboard supports the expansion card. Locate an expansion slot that came with a screw. 5. Install the driver provided with the slot, and press down on the card until it is fully seated in the slot. 3. After installing all expansion cards...
Manual
Page 36
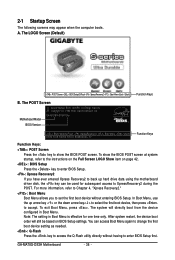
... Model BIOS Version Award Modular BIOS v6.00PG, An Energy Star Ally Copyright (C) 1984-2008, Award Software, Inc. To exit Boot Menu, press . GA-MA78G-DS3H Motherboard - 36 - 2-1 Startup Screen The following screens may appear when the computer boots. To show the BIOS POST screen. You can be based on...Function Keys B. The system will still be used for one time only. In Boot Menu, use the up hard drive data using the motherboard driver disk, the key can access Boot Menu again to change the first boot device setting as needed. : Q-Flash Press the key to enter BIOS...
... Model BIOS Version Award Modular BIOS v6.00PG, An Energy Star Ally Copyright (C) 1984-2008, Award Software, Inc. To exit Boot Menu, press . GA-MA78G-DS3H Motherboard - 36 - 2-1 Startup Screen The following screens may appear when the computer boots. To show the BIOS POST screen. You can be based on...Function Keys B. The system will still be used for one time only. In Boot Menu, use the up hard drive data using the motherboard driver disk, the key can access Boot Menu again to change the first boot device setting as needed. : Q-Flash Press the key to enter BIOS...
Manual
Page 41
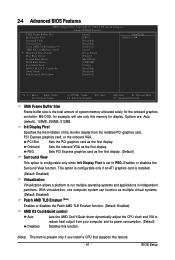
... Erratum (Note) Enables or disables the Patch AMD TLB Erratum function. (Default: Enabled) AMD K8 Cool&Quiet control Auto Disabled Lets the AMD Cool'n'Quiet driver dynamically adjust the CPU clock and VIA to reduce heat output from the installed PCI graphics card, PCI Express graphics card, or the onboard VGA...
... Erratum (Note) Enables or disables the Patch AMD TLB Erratum function. (Default: Enabled) AMD K8 Cool&Quiet control Auto Disabled Lets the AMD Cool'n'Quiet driver dynamically adjust the CPU clock and VIA to reduce heat output from the installed PCI graphics card, PCI Express graphics card, or the onboard VGA...
Manual
Page 43
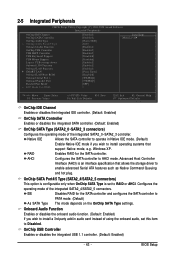
... mode if you wish to Disabled. BIOS Setup Advanced Host Controller Interface (AHCI) is set this item to install operating systems that allows the storage driver to AHCI mode. AHCI Configures the SATA controller to enable advanced Serial ATA features such as Native Command Queuing and hot plug. Configures the operating...
... mode if you wish to Disabled. BIOS Setup Advanced Host Controller Interface (AHCI) is set this item to install operating systems that allows the storage driver to AHCI mode. AHCI Configures the SATA controller to enable advanced Serial ATA features such as Native Command Queuing and hot plug. Configures the operating...
Manual
Page 57
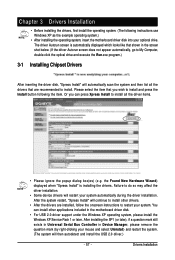
... your mouse and select Uninstall) and restart the system. (The system will continue to install other applications included in the screen shot below. (If the driver Autorun screen does not appear automatically, go to My Computer, double-click the optical drive and execute the Run.exe program.) 3-1 Installing Chipset...
... your mouse and select Uninstall) and restart the system. (The system will continue to install other applications included in the screen shot below. (If the driver Autorun screen does not appear automatically, go to My Computer, double-click the optical drive and execute the Run.exe program.) 3-1 Installing Chipset...
Manual
Page 58
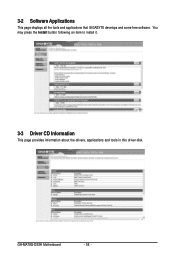
3-2 Software Applications This page displays all the tools and applications that GIGABYTE develops and some free software. GA-MA78G-DS3H Motherboard - 58 - You may press the Install button following an item to install it. 3-3 Driver CD Information This page provides information about the drivers, applications and tools in this driver disk.
3-2 Software Applications This page displays all the tools and applications that GIGABYTE develops and some free software. GA-MA78G-DS3H Motherboard - 58 - You may press the Install button following an item to install it. 3-3 Driver CD Information This page provides information about the drivers, applications and tools in this driver disk.

Manual
Page 59
Drivers Installation 3-4 Hardware Information This page provides information about the hardware devices on this motherboard. 3-5 Contact Us Check the contacts information of the GIGABYTE headquarter in Taiwan and the overseas branch offices on the last page of this manual. - 59 -
Drivers Installation 3-4 Hardware Information This page provides information about the hardware devices on this motherboard. 3-5 Contact Us Check the contacts information of the GIGABYTE headquarter in Taiwan and the overseas branch offices on the last page of this manual. - 59 -
Manual
Page 61
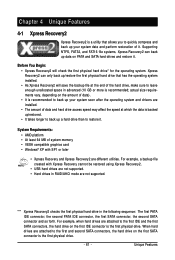
... back up/restore the first physical hard drive that allows you to quickly compress and back up your system soon after the operating system and drivers are installed. • The amount of data and hard drive access speed may affect the speed at the end of the hard drive, make sure...
... back up/restore the first physical hard drive that allows you to quickly compress and back up your system soon after the operating system and drivers are installed. • The amount of data and hard drive access speed may affect the speed at the end of the hard drive, make sure...

Manual
Page 64
...to access Xpress Recovery2 for the first time, Xpress Recovery2 will begin to enter Xpress Recovery2. . . Boot from the motherboard driver disk to start backing up your hard drive. If you wish to check disk allocation. When finished, go to Disk Management ... will stay permanent in Xpress Recovery2 1. Accessing Xpress Recovery2 1. Xpress Recovery2 will automatically create a new partition to startup XpressRecovery2..... GA-MA78G-DS3H D6a . . . . : BIOS Setup/Q-Flash : XpressRecovery2 : Boot Menu : Qflash 03/24/2008-RS780-SB700-6A66AG0AC-00 Figure 9 C. Figure 12...
...to access Xpress Recovery2 for the first time, Xpress Recovery2 will begin to enter Xpress Recovery2. . . Boot from the motherboard driver disk to start backing up your hard drive. If you wish to check disk allocation. When finished, go to Disk Management ... will stay permanent in Xpress Recovery2 1. Accessing Xpress Recovery2 1. Xpress Recovery2 will automatically create a new partition to startup XpressRecovery2..... GA-MA78G-DS3H D6a . . . . : BIOS Setup/Q-Flash : XpressRecovery2 : Boot Menu : Qflash 03/24/2008-RS780-SB700-6A66AG0AC-00 Figure 9 C. Figure 12...
Manual
Page 69
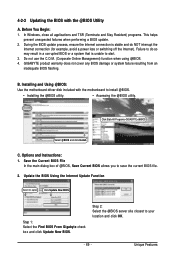
... the Internet connection (for example, avoid a power loss or switching off the Internet). Installing and Using @BIOS: Use the motherboard driver disk included with the @BIOS Utility A. Save the Current BIOS File In the main dialog box of @BIOS, Save Current BIOS...applications and TSR (Terminate and Stay Resident) programs. This helps prevent unexpected failures when performing a BIOS update. 2. Click Start>All Programs>GIGABYTE>@BIOS Select @BIOS and click Install. Options and Instructions: 1. Update the BIOS Using the Internet Update Function Select this option Click Update ...
... the Internet connection (for example, avoid a power loss or switching off the Internet). Installing and Using @BIOS: Use the motherboard driver disk included with the @BIOS Utility A. Save the Current BIOS File In the main dialog box of @BIOS, Save Current BIOS...applications and TSR (Terminate and Stay Resident) programs. This helps prevent unexpected failures when performing a BIOS update. 2. Click Start>All Programs>GIGABYTE>@BIOS Select @BIOS and click Install. Options and Instructions: 1. Update the BIOS Using the Internet Update Function Select this option Click Update ...

Manual
Page 73
...A. B. Install SATA hard drive(s) in RAID BIOS. (Note 1) D. Configure a RAID array in your computer. C . Install the SATA RAID/AHCI driver and operating system. (Note 2) Before you begin Please prepare: • At least two SATA hard drives (to ensure optimal performance, it is recommended ...from your computer Attach one hard drive. • An empty formatted floppy disk. • Windows Vista/XP setup disk. • Motherboard driver disk. 5-1-1 Configuring the Onboard SATA Controller A. Configure SATA controller mode in your power supply to the hard drive. (Note 1) Skip ...
...A. B. Install SATA hard drive(s) in RAID BIOS. (Note 1) D. Configure a RAID array in your computer. C . Install the SATA RAID/AHCI driver and operating system. (Note 2) Before you begin Please prepare: • At least two SATA hard drives (to ensure optimal performance, it is recommended ...from your computer Attach one hard drive. • An empty formatted floppy disk. • Windows Vista/XP setup disk. • Motherboard driver disk. 5-1-1 Configuring the Onboard SATA Controller A. Configure SATA controller mode in your power supply to the hard drive. (Note 1) Skip ...
Manual
Page 79
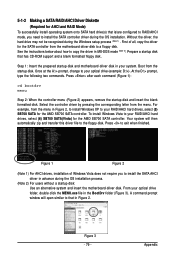
... folder, double click the MENU.exe file in Figure 2. Prepare a startup disk that is/are configured to RAID/AHCI mode, you to copy the driver in advance during the Windows setup process (Note 1) . Once at the A:\> prompt, change to your RAID/AHCI hard drives, select (6) SB700 SATA...SB700 SATA controller. To install Windows Vista to exit when finished. Boot from the menu. Press to your optical drive (example: D:\>). Without the driver, the hard drive may not be recognized during the OS installation process. (Note 2) For users without a startup disk: Use an alternative system and...
... folder, double click the MENU.exe file in Figure 2. Prepare a startup disk that is/are configured to RAID/AHCI mode, you to copy the driver in advance during the Windows setup process (Note 1) . Once at the A:\> prompt, change to your RAID/AHCI hard drives, select (6) SB700 SATA...SB700 SATA controller. To install Windows Vista to exit when finished. Boot from the menu. Press to your optical drive (example: D:\>). Without the driver, the hard drive may not be recognized during the OS installation process. (Note 2) For users without a startup disk: Use an alternative system and...
Manual
Page 80
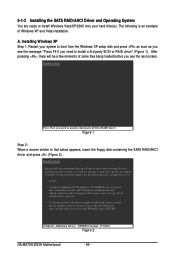
...manually specify an adapter. Figure 1 Step 2: When a screen similar to install a third party SCSI or RAID driver. S=Specify Additional Device ENTER=Continue F3=Exit Figure 2 GA-MA78G-DS3H Motherboard - 80 - After pressing , there will load support for the following is an example of one or ...a mass storage device manufacturer, press S. * If you need to that below appears, insert the floppy disk containing the SATA RAID/AHCI driver and press (Figure 2). Windows Setup Setup could not determine the type of Windows XP and Vista installation. Installing Windows XP Step 1: Restart...
...manually specify an adapter. Figure 1 Step 2: When a screen similar to install a third party SCSI or RAID driver. S=Specify Additional Device ENTER=Continue F3=Exit Figure 2 GA-MA78G-DS3H Motherboard - 80 - After pressing , there will load support for the following is an example of one or ...a mass storage device manufacturer, press S. * If you need to that below appears, insert the floppy disk containing the SATA RAID/AHCI driver and press (Figure 2). Windows Setup Setup could not determine the type of Windows XP and Vista installation. Installing Windows XP Step 1: Restart...
Manual
Page 81
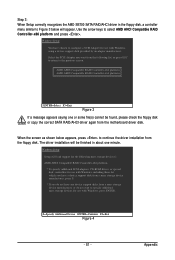
... want to specify additional mass storage devices for which you have chosen to select AMD AHCI Compatible RAID Controller-x86 platform and press . The driver installation will appear. S=Specify Additional Device ENTER=Continue F3=Exit Figure 4 - 81 - Select the SCSI Adapter you do not have any ...the floppy disk, a controller menu similar to Figure 3 below appears, press to continue the driver installation from the floppy disk. Step 3: When Setup correctly recognizes the AMD SB700 SATA RAID/AHCI driver in about one or some file(s) cannot be found, please check the floppy disk or ...
... want to specify additional mass storage devices for which you have chosen to select AMD AHCI Compatible RAID Controller-x86 platform and press . The driver installation will appear. S=Specify Additional Device ENTER=Continue F3=Exit Figure 4 - 81 - Select the SCSI Adapter you do not have any ...the floppy disk, a controller menu similar to Figure 3 below appears, press to continue the driver installation from the floppy disk. Step 3: When Setup correctly recognizes the AMD SB700 SATA RAID/AHCI driver in about one or some file(s) cannot be found, please check the floppy disk or ...
Manual
Page 82
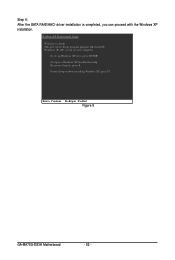
To repair a Windows XP installation using Recovery Console, press R. To quit Setup without installing Windows XP, press F3. Enter= Continue R=Repair F3=Exit Figure 5 GA-MA78G-DS3H Motherboard - 82 - This port of the Setup program prepares Microsoft(R) Windows (R) XP to Setup. To set up Windows XP now, press ENTER. WindowsXP Professional Setup Welcome to run on your computer. Step 4: After the SATA RAID/AHCI driver installation is completed, you can proceed with the Windows XP installation.
To repair a Windows XP installation using Recovery Console, press R. To quit Setup without installing Windows XP, press F3. Enter= Continue R=Repair F3=Exit Figure 5 GA-MA78G-DS3H Motherboard - 82 - This port of the Setup program prepares Microsoft(R) Windows (R) XP to Setup. To set up Windows XP now, press ENTER. WindowsXP Professional Setup Welcome to run on your computer. Step 4: After the SATA RAID/AHCI driver installation is completed, you can proceed with the Windows XP installation.
Manual
Page 83
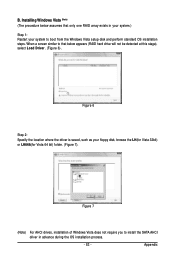
When a screen similar to install the SATA AHCI driver in your system.) Step 1: Restart your floppy disk, browse the LH(for Vista 32bit) or LH64A(for Vista 64 bit) folder. (Figure 7). Appendix Figure 7 (Note) ... process. - 83 - Installing Windows Vista (Note) (The procedure below appears (RAID hard drive will not be detected at this stage), select Load Driver. (Figure 6). Figure 6 Step 2: Specify the location where the driver is saved, such as your system to boot from the Windows Vista setup disk and perform standard OS installation steps. B.
When a screen similar to install the SATA AHCI driver in your system.) Step 1: Restart your floppy disk, browse the LH(for Vista 32bit) or LH64A(for Vista 64 bit) folder. (Figure 7). Appendix Figure 7 (Note) ... process. - 83 - Installing Windows Vista (Note) (The procedure below appears (RAID hard drive will not be detected at this stage), select Load Driver. (Figure 6). Figure 6 Step 2: Specify the location where the driver is saved, such as your system to boot from the Windows Vista setup disk and perform standard OS installation steps. B.
Manual
Page 84
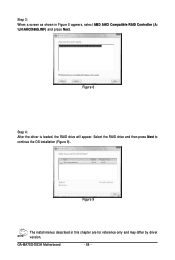
GA-MA78G-DS3H Motherboard - 84 - Figure 8 Step 4: After the driver is loaded, the RAID drive will appear. Select the RAID drive and then press Next to continue the OS installation (Figure 9). Figure 9 The install menus described in Figure 8 appears, select AMD AHCI Compatible RAID Controller (A: \LH\AHCIX86S.INF) and press Next. Step 3: When a screen as shown in this chapter are for reference only and may differ by driver version.
GA-MA78G-DS3H Motherboard - 84 - Figure 8 Step 4: After the driver is loaded, the RAID drive will appear. Select the RAID drive and then press Next to continue the OS installation (Figure 9). Figure 9 The install menus described in Figure 8 appears, select AMD AHCI Compatible RAID Controller (A: \LH\AHCIX86S.INF) and press Next. Step 3: When a screen as shown in this chapter are for reference only and may differ by driver version.


