Manual
Page 6
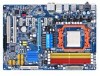
... cable (Part No. 12CR1-1SPDIN-01R) LPT port cable (Part No. 12CF1-1LP001-01R) - 6 - The box contents are for reference only. Box Contents GA-MA770-UD3 or GA-MA770-US3 motherboard Motherboard driver disk User's Manual Quick Installation Guide One IDE cable and one floppy disk drive cable Two SATA 3Gb/s cables I/O Shield • The box contents...
... cable (Part No. 12CR1-1SPDIN-01R) LPT port cable (Part No. 12CF1-1LP001-01R) - 6 - The box contents are for reference only. Box Contents GA-MA770-UD3 or GA-MA770-US3 motherboard Motherboard driver disk User's Manual Quick Installation Guide One IDE cable and one floppy disk drive cable Two SATA 3Gb/s cables I/O Shield • The box contents...
Manual
Page 18
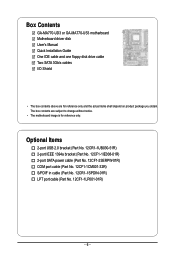
... is fully inserted into the slot. 4. Secure the card's metal bracket to the chassis back panel with the expansion card in your computer. Install the driver provided with a screw. 5. Make sure the card is securely seated in the slot and does not rock. • Removing the Card: Gently push back on... press down on the slot and then lift the card straight out from the chassis back panel. 2. Remove the metal slot cover from the slot. GA-MA770-UD3/US3 Motherboard - 18 -
... is fully inserted into the slot. 4. Secure the card's metal bracket to the chassis back panel with the expansion card in your computer. Install the driver provided with a screw. 5. Make sure the card is securely seated in the slot and does not rock. • Removing the Card: Gently push back on... press down on the slot and then lift the card straight out from the chassis back panel. 2. Remove the metal slot cover from the slot. GA-MA770-UD3/US3 Motherboard - 18 -
Manual
Page 34
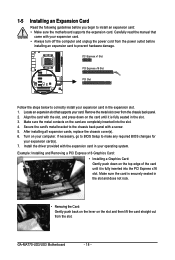
... the down arrow key< > to select the first boot device, then press to XpressRecovery2 during the POST. Note: The setting in Boot Menu. GA-MA770-UD3/US3 Motherboard - 34 - Function Keys : BIOS Setup : XpressRecovery2 : Boot Menu : Qflash 11/06/2008-RD780-SB700-6A66AG09C-00 Function Keys Function Keys... drive data using the motherboard driver disk, the key can access Boot Menu again to change the first boot device setting as needed. : Q-FLASH Press the key to access the Q-Flash utility directly without entering BIOS Setup. You can be used for GA-MA770-UD3 E1 . . . . ...
... the down arrow key< > to select the first boot device, then press to XpressRecovery2 during the POST. Note: The setting in Boot Menu. GA-MA770-UD3/US3 Motherboard - 34 - Function Keys : BIOS Setup : XpressRecovery2 : Boot Menu : Qflash 11/06/2008-RD780-SB700-6A66AG09C-00 Function Keys Function Keys... drive data using the motherboard driver disk, the key can access Boot Menu again to change the first boot device setting as needed. : Q-FLASH Press the key to access the Q-Flash utility directly without entering BIOS Setup. You can be used for GA-MA770-UD3 E1 . . . . ...
Manual
Page 58
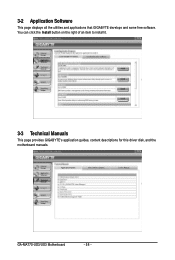
GA-MA770-UD3/US3 Motherboard - 58 - You can click the Install button on the right of an item to install it. 3-3 Technical Manuals This page provides GIGABYTE's application guides, content descriptions for this driver disk, and the motherboard manuals. 3-2 Application Software This page displays all the utilities and applications that GIGABYTE develops and some free software.
GA-MA770-UD3/US3 Motherboard - 58 - You can click the Install button on the right of an item to install it. 3-3 Technical Manuals This page provides GIGABYTE's application guides, content descriptions for this driver disk, and the motherboard manuals. 3-2 Application Software This page displays all the utilities and applications that GIGABYTE develops and some free software.

Manual
Page 60
GA-MA770-UD3/US3 Motherboard - 60 - The latest version of the BIOS, drivers, or applications will be displayed. 3-6 Download Center To update the BIOS, drivers, or applications, click the Download Center button to link to the GIGABYTE Web site.
GA-MA770-UD3/US3 Motherboard - 60 - The latest version of the BIOS, drivers, or applications will be displayed. 3-6 Download Center To update the BIOS, drivers, or applications, click the Download Center button to link to the GIGABYTE Web site.
Manual
Page 64
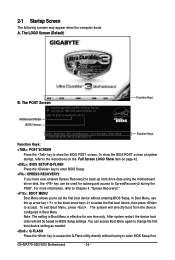
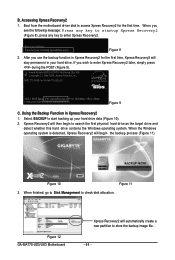
...physical hard drive as the target d rive and detect whether this hard drive contains the Windows operating system. Figure 12 GA-MA770-UD3/US3 Motherboard Xpress Recovery2 will begin to start backing up your hard drive. Boot from CD/DVD: Press any key to access Xpress ...Recovery2 for GA-MA770-UD3 E1 . . . . : BIOS Setup : XpressRecovery2 : Boot Menu : Qflash 11/06/2008-RD780-SB700-6A66AG09C-00 Figure 9 C. Boot from the motherboard driver disk to enter Xpress Recovery2. . . When the Windows operating system is ...
...physical hard drive as the target d rive and detect whether this hard drive contains the Windows operating system. Figure 12 GA-MA770-UD3/US3 Motherboard Xpress Recovery2 will begin to start backing up your hard drive. Boot from CD/DVD: Press any key to access Xpress ...Recovery2 for GA-MA770-UD3 E1 . . . . : BIOS Setup : XpressRecovery2 : Boot Menu : Qflash 11/06/2008-RD780-SB700-6A66AG09C-00 Figure 9 C. Boot from the motherboard driver disk to enter Xpress Recovery2. . . When the Windows operating system is ...
Manual
Page 80
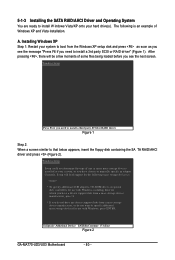
... soon as you see the next screen. S=Specify Additional Device ENTER=Continue F3=Exit Figure 2 GA-MA770-UD3/US3 Motherboard - 80 - Figure 1 Step 2: When a screen similar to install a 3rd party SCSI or RAID driver" (Figure 1). 5-1-3 Installing the SATA RAID/AHCI Driver and Operating System You are ready to install W indows Vista/XP onto your system, or...
... soon as you see the next screen. S=Specify Additional Device ENTER=Continue F3=Exit Figure 2 GA-MA770-UD3/US3 Motherboard - 80 - Figure 1 Step 2: When a screen similar to install a 3rd party SCSI or RAID driver" (Figure 1). 5-1-3 Installing the SATA RAID/AHCI Driver and Operating System You are ready to install W indows Vista/XP onto your system, or...
Manual
Page 82
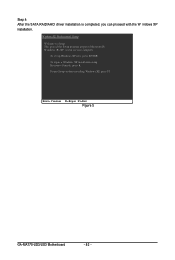
WindowsXP Professional Setup Welcome to run on your computer. This port of the Setup program prepares Microsoft(R) Windows (R) XP to Setup. Enter= Continue R=Repair F3=Exit Figure 5 GA-MA770-UD3/US3 Motherboard - 82 - Step 4: After the SATA RAID/AHCI driver installation is completed, you can proceed with the W indows XP installation. To repair a Windows XP installation using Recovery Console, press R. To set up Windows XP now, press ENTER. To quit Setup without installing Windows XP, press F3.
WindowsXP Professional Setup Welcome to run on your computer. This port of the Setup program prepares Microsoft(R) Windows (R) XP to Setup. Enter= Continue R=Repair F3=Exit Figure 5 GA-MA770-UD3/US3 Motherboard - 82 - Step 4: After the SATA RAID/AHCI driver installation is completed, you can proceed with the W indows XP installation. To repair a Windows XP installation using Recovery Console, press R. To set up Windows XP now, press ENTER. To quit Setup without installing Windows XP, press F3.

Manual
Page 84
Step 3: When a screen as shown in this chapter are for reference only and may differ by driver version. Figure 9 The install menus described in Figure 8 appears, select AMD AHCI Compatible RAID Controller and press Next. Select the RAID drive and then press Next to continue the OS installation (Figure 9). GA-MA770-UD3/US3 Motherboard - 84 - Figure 8 Step 4: After the driver is loaded, the RAID drive will appear.
Step 3: When a screen as shown in this chapter are for reference only and may differ by driver version. Figure 9 The install menus described in Figure 8 appears, select AMD AHCI Compatible RAID Controller and press Next. Select the RAID drive and then press Next to continue the OS installation (Figure 9). GA-MA770-UD3/US3 Motherboard - 84 - Figure 8 Step 4: After the driver is loaded, the RAID drive will appear.

Manual
Page 88
... configuration. 5-2-3 Configuring Microphone Recording Step 1: After installing the audio driver, the Audio Manager icon will appear in your system tray and click it to open the volume control panel. Step 3: Locate the Volume icon in your microphone to access the Audio Control Panel. GA-MA770-UD3/US3 Motherboard - 88 - Note: The microphone functions on the...
... configuration. 5-2-3 Configuring Microphone Recording Step 1: After installing the audio driver, the Audio Manager icon will appear in your system tray and click it to open the volume control panel. Step 3: Locate the Volume icon in your microphone to access the Audio Control Panel. GA-MA770-UD3/US3 Motherboard - 88 - Note: The microphone functions on the...


