Manual
Page 3
... For detailed product information, carefully read the User's Manual. For instructions on how to use GIGABYTE's unique features, read or download the information on/from the Support&Downloads\Motherboard\Technology Guide page on your motherboard revision...reserved. Disclaimer Information in this manual are legally registered to the specifications and features in this manual may be reproduced, copied, translated, transmitted, or published in this manual is protected by GIGABYTE without GIGABYTE's prior written permission. Check your motherboard looks like this: "REV...
... For detailed product information, carefully read the User's Manual. For instructions on how to use GIGABYTE's unique features, read or download the information on/from the Support&Downloads\Motherboard\Technology Guide page on your motherboard revision...reserved. Disclaimer Information in this manual are legally registered to the specifications and features in this manual may be reproduced, copied, translated, transmitted, or published in this manual is protected by GIGABYTE without GIGABYTE's prior written permission. Check your motherboard looks like this: "REV...
Manual
Page 4
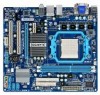
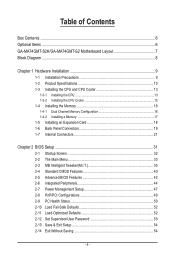
Table of Contents Box Contents...6 Optional Items...6 GA-MA74GMT-S2H/GA-MA74GMT-S2 Motherboard Layout 7 Block Diagram...8 Chapter 1 Hardware Installation 9 1-1 Installation Precautions 9 1-2 Product Specifications 10 1-3 Installing the CPU and CPU Cooler 13 1-3-1 Installing the CPU 13 1-3-2 Installing the CPU Cooler 15 1-4 Installing the Memory 16 1-4-1 Dual Channel Memory Configuration ...
Table of Contents Box Contents...6 Optional Items...6 GA-MA74GMT-S2H/GA-MA74GMT-S2 Motherboard Layout 7 Block Diagram...8 Chapter 1 Hardware Installation 9 1-1 Installation Precautions 9 1-2 Product Specifications 10 1-3 Installing the CPU and CPU Cooler 13 1-3-1 Installing the CPU 13 1-3-2 Installing the CPU Cooler 15 1-4 Installing the Memory 16 1-4-1 Dual Channel Memory Configuration ...
Manual
Page 10
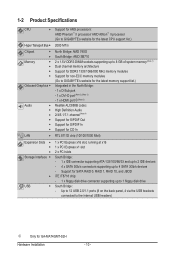
1-2 Product Specifications CPU Support for AM3 processors: AMD Phenom™ II processor/ AMD Athlon™ II processor (Go to GIGABYTE's website for the latest CPU support list.) Hyper Transport Bus 2000 MT/s Chipset Memory Onboard Graphics Audio &#...1, RAID 10, and JBOD iTE IT8718 chip: - 1 x floppy disk drive connector supporting up to 1 floppy disk drive USB South Bridge: - Support for GA-MA74GMT-S2H Hardware Installation - 10 -
1-2 Product Specifications CPU Support for AM3 processors: AMD Phenom™ II processor/ AMD Athlon™ II processor (Go to GIGABYTE's website for the latest CPU support list.) Hyper Transport Bus 2000 MT/s Chipset Memory Onboard Graphics Audio &#...1, RAID 10, and JBOD iTE IT8718 chip: - 1 x floppy disk drive connector supporting up to 1 floppy disk drive USB South Bridge: - Support for GA-MA74GMT-S2H Hardware Installation - 10 -
Manual
Page 13
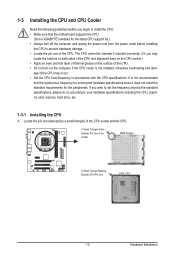
...Make sure that the system bus frequency be inserted if oriented incorrectly. (Or you wish to set the frequency beyond the standard specifications, please do so according to your hardware specifications including the CPU, graphics card, memory, hard drive, etc. 1-3-1 Installing the CPU A. A Small Triangle Mark Denotes Pin... CPU. • Do not turn on the computer if the CPU cooler is not recommended that the motherboard supports the CPU. (Go to GIGABYTE's website for the peripherals. age of the Socket AM3 Socket A Small Triangle Marking Denotes CPU Pin One AM3 CPU - 13 - It is...
...Make sure that the system bus frequency be inserted if oriented incorrectly. (Or you wish to set the frequency beyond the standard specifications, please do so according to your hardware specifications including the CPU, graphics card, memory, hard drive, etc. 1-3-1 Installing the CPU A. A Small Triangle Mark Denotes Pin... CPU. • Do not turn on the computer if the CPU cooler is not recommended that the motherboard supports the CPU. (Go to GIGABYTE's website for the peripherals. age of the Socket AM3 Socket A Small Triangle Marking Denotes CPU Pin One AM3 CPU - 13 - It is...
Manual
Page 16
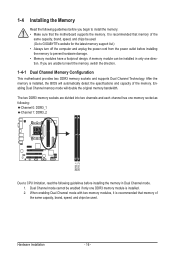
... Configuration This motherboard provides two DDR3 memory sockets and supports Dual Channel Technology. Dual Channel mode cannot be used . (Go to GIGABYTE's website for the latest memory support list.) • Always turn off the computer and unplug the power cord from the power outlet...: • Make sure that memory of the memory. A memory module can be used . Enabling Dual Channel memory mode will automatically detect the specifications and capacity of the same capacity, brand, speed, and chips be installed in Dual Channel mode. 1. Hardware Installation - 16 - 1-4 Installing...
... Configuration This motherboard provides two DDR3 memory sockets and supports Dual Channel Technology. Dual Channel mode cannot be used . (Go to GIGABYTE's website for the latest memory support list.) • Always turn off the computer and unplug the power cord from the power outlet...: • Make sure that memory of the memory. A memory module can be used . Enabling Dual Channel memory mode will automatically detect the specifications and capacity of the same capacity, brand, speed, and chips be installed in Dual Channel mode. 1. Hardware Installation - 16 - 1-4 Installing...
Manual
Page 19
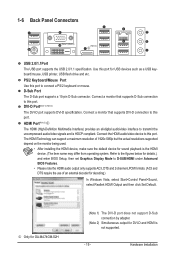
... to the figures below for decoding.) In Windows Vista, select Start>Control Panel>Sound, select Realtek HDMI Output and then click Set Default. j Only for GA-MA74GM-S2H (Note 1) The DVI-D port does not support D-Sub connection by adapter. (Note 2) Simultaneous output for USB devices such as a USB keyboard/mouse, USB... the HDMI device. (The item name may differ from operating system. 1-6 Back Panel Connectors (Note 1) (Note 2) (Note 2) j USB 2.0/1.1Port The USB port supports the USB 2.0/1.1 specification.
... to the figures below for decoding.) In Windows Vista, select Start>Control Panel>Sound, select Realtek HDMI Output and then click Set Default. j Only for GA-MA74GM-S2H (Note 1) The DVI-D port does not support D-Sub connection by adapter. (Note 2) Simultaneous output for USB devices such as a USB keyboard/mouse, USB... the HDMI device. (The item name may differ from operating system. 1-6 Back Panel Connectors (Note 1) (Note 2) (Note 2) j USB 2.0/1.1Port The USB port supports the USB 2.0/1.1 specification.

Manual
Page 27
... installing the USB bracket, be sure to turn off your computer and unplug the power cord from the power outlet to prevent damage to USB 2.0/1.1 specification. Hardware Installation For purchasing the optional S/PDIF In and Out cable, please contact the local dealer. 6 5 2 1 Pin No. 1 2 3 4 5 6 Definition Power No Pin SPDIF SPDIFI GND...
... installing the USB bracket, be sure to turn off your computer and unplug the power cord from the power outlet to prevent damage to USB 2.0/1.1 specification. Hardware Installation For purchasing the optional S/PDIF In and Out cable, please contact the local dealer. 6 5 2 1 Pin No. 1 2 3 4 5 6 Definition Power No Pin SPDIF SPDIFI GND...
Manual
Page 36
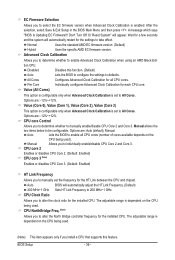
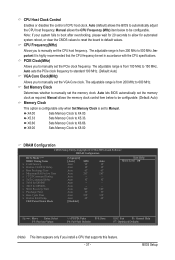
... Main Menu and then press . Don't Turn Off Or Reset System" will appear. Normal Uses the standard AMD EC firmware version. (Default) Hybrid Uses the specific AMD EC firmware version. CPU core 2 Enables or disables CPU Core 2. (Default: Enabled) CPU core 3 (Note) Enables or disables CPU Core 3. (Default: Enabled) HT Link...
... Main Menu and then press . Don't Turn Off Or Reset System" will appear. Normal Uses the standard AMD EC firmware version. (Default) Hybrid Uses the specific AMD EC firmware version. CPU core 2 Enables or disables CPU Core 2. (Default: Enabled) CPU core 3 (Note) Enables or disables CPU Core 3. (Default: Enabled) HT Link...
Manual
Page 37
... to manually set the PCIe clock frequency. PCIE Clock(MHz) Allows you to default values. Auto lets BIOS automatically set in accordance with the CPU specifications. X4.00 Sets Memory Clock to manually set the CPU host frequency. Note: If your system fails to boot after overclocking, please wait for 20...
... to manually set the PCIe clock frequency. PCIE Clock(MHz) Allows you to default values. Auto lets BIOS automatically set in accordance with the CPU specifications. X4.00 Sets Memory Clock to manually set the CPU host frequency. Note: If your system fails to boot after overclocking, please wait for 20...
Manual
Page 41
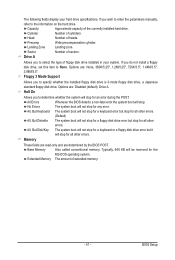
...) All, But Diskette The system boot will stop for an error during the POST. Head Number of floppy disk drive installed in your hard drive specifications. Options are: Disabled (default), Drive A. All, But Keyboard The system boot will not stop for a keyboard error but stop . If you to the information on...
...) All, But Diskette The system boot will stop for an error during the POST. Head Number of floppy disk drive installed in your hard drive specifications. Options are: Disabled (default), Drive A. All, But Keyboard The system boot will not stop for a keyboard error but stop . If you to the information on...
Manual
Page 44
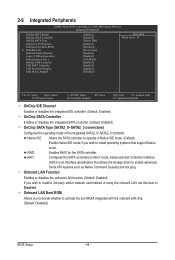
Advanced Host Controller Interface (AHCI) is an interface specification that support Native mode. AHCI Configures the SATA controllers to enable advanced Serial ATA features such as Native Command Queuing and hot plug. Onboard LAN ...
Advanced Host Controller Interface (AHCI) is an interface specification that support Native mode. AHCI Configures the SATA controllers to enable advanced Serial ATA features such as Native Command Queuing and hot plug. Onboard LAN ...

Manual
Page 48
Disabled Disables this item. Note: you need an ATX power supply providing at a specific time on each day or on a specific day in S5 (shutdown) state. (Default: Disabled) Note: When this function. (Default) Password Set a password with up , power on by mouse, power on by Alarm ...
Disabled Disables this item. Note: you need an ATX power supply providing at a specific time on each day or on a specific day in S5 (shutdown) state. (Default: Disabled) Note: When this function. (Default) Password Set a password with up , power on by mouse, power on by Alarm ...
Manual
Page 66
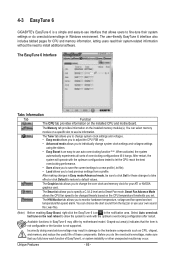
4-3 EasyTune 6 GIGABYTE's EasyTune 6 is a simple and easy-to-use interface that allows users to fine-tune their system-related information without the need to specify a C.I.A.2 level and a ... Memory tab provides information on the installed CPU and motherboard. The Smart tab allows you to install additional software. You can select memory module on a specific slot to change the core clock and memory clock for these components. Select Auto overclock last tune on the CPU temperature thresholds you to individually...
4-3 EasyTune 6 GIGABYTE's EasyTune 6 is a simple and easy-to-use interface that allows users to fine-tune their system-related information without the need to specify a C.I.A.2 level and a ... Memory tab provides information on the installed CPU and motherboard. The Smart tab allows you to install additional software. You can select memory module on a specific slot to change the core clock and memory clock for these components. Select Auto overclock last tune on the CPU temperature thresholds you to individually...