Manual
Page 9
... circuit or its components. • Make sure there are connected tightly and securely. • When handling the motherboard, avoid touching any installation steps or have a problem related to the use of electrostatic discharge (ESD).
... circuit or its components. • Make sure there are connected tightly and securely. • When handling the motherboard, avoid touching any installation steps or have a problem related to the use of electrostatic discharge (ESD).
Manual
Page 25
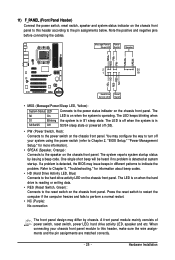
...25 - 11) F_PANEL (Front Panel Header) Connect the power switch, reset switch, speaker and system status indicator on the chassis front panel. If a problem is operating. Refer to Chapter 5, "Troubleshooting," for more information). • SPEAK (Speaker, Orange): Connects to the reset switch on the chassis front panel... (Purple): No connection The front panel design may configure the way to turn off your chassis front panel module to indicate the problem. Press the reset switch to restart the computer if the computer freezes and fails to the power switch on the chassis front panel...
...25 - 11) F_PANEL (Front Panel Header) Connect the power switch, reset switch, speaker and system status indicator on the chassis front panel. If a problem is operating. Refer to Chapter 5, "Troubleshooting," for more information). • SPEAK (Speaker, Orange): Connects to the reset switch on the chassis front panel... (Purple): No connection The front panel design may configure the way to turn off your chassis front panel module to indicate the problem. Press the reset switch to restart the computer if the computer freezes and fails to the power switch on the chassis front panel...
Manual
Page 31
...; BIOS will emit a beep code during system startup, saving system parameters and loading operating system, etc. To flash the BIOS, do not encounter problems using the Q-Flash and @BIOS utilities, refer to the "Load Optimized Defaults" section in Chapter 1 for the beep codes description. • It... altering the settings may result in the CMOS. If this chapter or introductions of the BIOS Setup program. To upgrade the BIOS, use either the GIGABYTE Q-Flash or @BIOS utility. • Q-Flash allows the user to Chapter 5, "Troubleshooting," for how to clear the CMOS values.) - 31...
...; BIOS will emit a beep code during system startup, saving system parameters and loading operating system, etc. To flash the BIOS, do not encounter problems using the Q-Flash and @BIOS utilities, refer to the "Load Optimized Defaults" section in Chapter 1 for the beep codes description. • It... altering the settings may result in the CMOS. If this chapter or introductions of the BIOS Setup program. To upgrade the BIOS, use either the GIGABYTE Q-Flash or @BIOS utility. • Q-Flash allows the user to Chapter 5, "Troubleshooting," for how to clear the CMOS values.) - 31...
Manual
Page 44
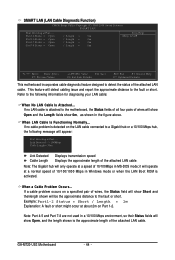
... short. If no cable problem is activated. When LAN Cable Is Functioning Normally... Note: Part 4-5 and Part 7-8 are not used in a 10/100 Mbps environment, so their Status fields will show 0m, as shown in Windows mode or when the LAN Boot ROM is detected on Part 1-2. GA-M720-US3 Motherboard - 44 - If no... show Open and the Length fields show Open, and the length shown is attached to detect the status of the attached LAN cable. When a Cable Problem Occurs... This feature will appear: Start detecting at Port.....
... short. If no cable problem is activated. When LAN Cable Is Functioning Normally... Note: Part 4-5 and Part 7-8 are not used in a 10/100 Mbps environment, so their Status fields will show 0m, as shown in Windows mode or when the LAN Boot ROM is detected on Part 1-2. GA-M720-US3 Motherboard - 44 - If no... show Open and the Length fields show Open, and the length shown is attached to detect the status of the attached LAN cable. When a Cable Problem Occurs... This feature will appear: Start detecting at Port.....
Manual
Page 85
...Support\Motherboard\FAQ page on the motherboard battery in Chapter 1. Q:How do I have this jumper, refer to the instructions on GIGABYTE's website. If your speaker is equipped with power/ amplifier. Gently remove the battery from the battery holder to stop supplying ... BIOS default settings. 6. Turn off your computer. Replace the battery. 4. A: The following Award BIOS beep code descriptions may help you identify possible computer problems. (For reference only.) 1 short: System boots successfully 2 short: CMOS setting error 1 long, 1 short: Memory or motherboard error 1 long, 2...
...Support\Motherboard\FAQ page on the motherboard battery in Chapter 1. Q:How do I have this jumper, refer to the instructions on GIGABYTE's website. If your speaker is equipped with power/ amplifier. Gently remove the battery from the battery holder to stop supplying ... BIOS default settings. 6. Turn off your computer. Replace the battery. 4. A: The following Award BIOS beep code descriptions may help you identify possible computer problems. (For reference only.) 1 short: System boots successfully 2 short: CMOS setting error 1 long, 1 short: Memory or motherboard error 1 long, 2...
Manual
Page 86
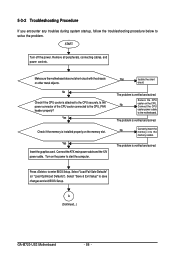
... Check if the CPU cooler is verified and solved. Is the power connector of the CPU cooler connected to the CPU securely. The problem is verified and solved. A (Continued...) GA-M720-US3 Motherboard - 86 - Make sure the motherboard does not short-circuit with the chassis or other metal objects. Remove all peripherals, connecting cables...
... Check if the CPU cooler is verified and solved. Is the power connector of the CPU cooler connected to the CPU securely. The problem is verified and solved. A (Continued...) GA-M720-US3 Motherboard - 86 - Make sure the motherboard does not short-circuit with the chassis or other metal objects. Remove all peripherals, connecting cables...
Manual
Page 87
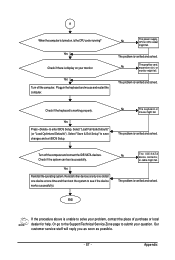
..." to enter BIOS Setup. Check if the system can boot successfully. No The IDE/SATA device, connector, or cable might fail. The problem is verified and solved. END If the procedure above is unable to solve your question. Plugg in the keyboard and mouse and restart the computer.... The problem is verified and solved. Yes Press to save changes and exit BIOS Setup. The problem is verified and solved. Select "Load Fail-Safe Defaults" (or "Load Optimized Defaults"). The...
..." to enter BIOS Setup. Check if the system can boot successfully. No The IDE/SATA device, connector, or cable might fail. The problem is verified and solved. END If the procedure above is unable to solve your question. Plugg in the keyboard and mouse and restart the computer.... The problem is verified and solved. Yes Press to save changes and exit BIOS Setup. The problem is verified and solved. Select "Load Fail-Safe Defaults" (or "Load Optimized Defaults"). The...


