Manual
Page 3
...by copyright laws and is designated by GIGA-BYTE TECHNOLOGY CO., LTD. For example, "REV: 1.0" means the revision of GIGABYTE branded motherboards. Copyright © 2007 GIGA-BYTE TECHNOLOGY CO., LTD. Example: The trademarks mentioned in any means without prior ...\Technology Guide page on your motherboard revision before updating motherboard BIOS, drivers, or when looking for technical information. Disclaimer Information in this manual may be made by GIGABYTE without GIGABYTE's prior written permission. For product-related information, check on our website...
...by copyright laws and is designated by GIGA-BYTE TECHNOLOGY CO., LTD. For example, "REV: 1.0" means the revision of GIGABYTE branded motherboards. Copyright © 2007 GIGA-BYTE TECHNOLOGY CO., LTD. Example: The trademarks mentioned in any means without prior ...\Technology Guide page on your motherboard revision before updating motherboard BIOS, drivers, or when looking for technical information. Disclaimer Information in this manual may be made by GIGABYTE without GIGABYTE's prior written permission. For product-related information, check on our website...

Manual
Page 5
... 51 3-1 Installing Chipset Drivers 51 3-2 SoftwareApplications 52 3-3 Driver CD Information 52 3-4 Hardware Information 53 3-5 Contact Us ...53 Chapter 4 Unique Features 55 4-1 Xpress Recovery2 55 4-2 BIOS Update Utilities 60 4-2-1...Chapter 5 Appendix ...67 5-1 Configuring SATA Hard Drive(s 67 5-1-1 Configuring the Onboard SATA Controller 67 5-1-2 Making a SATA RAID/AHCI Driver Diskette 72 5-1-3 Installing the SATA RAID/AHCI Driver and Operating System 73 5-2 Configuring Audio Input and Output 78 5-2-1 Configuring 2/4/5.1/7.1-Channel Audio 78 5-2-2 Installing the S/PDIF In and Out ...
... 51 3-1 Installing Chipset Drivers 51 3-2 SoftwareApplications 52 3-3 Driver CD Information 52 3-4 Hardware Information 53 3-5 Contact Us ...53 Chapter 4 Unique Features 55 4-1 Xpress Recovery2 55 4-2 BIOS Update Utilities 60 4-2-1...Chapter 5 Appendix ...67 5-1 Configuring SATA Hard Drive(s 67 5-1-1 Configuring the Onboard SATA Controller 67 5-1-2 Making a SATA RAID/AHCI Driver Diskette 72 5-1-3 Installing the SATA RAID/AHCI Driver and Operating System 73 5-2 Configuring Audio Input and Output 78 5-2-1 Configuring 2/4/5.1/7.1-Channel Audio 78 5-2-2 Installing the S/PDIF In and Out ...

Manual
Page 6
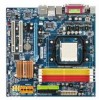
... No.12CF1-3SATPW-11R) COM port cable (Part No. 12CF1-1CM001-31/R) S/PDIF in and out cable (Part No. 12CR1-1SPINO-11/R) - 6 - Box Contents GA-M68SM-S2 motherboard Motherboard driver disk User's Manual One IDE cable and one floppy disk drive cable Two SATA 3Gb/s cables I/O Shield The box contents above are subject to...
... No.12CF1-3SATPW-11R) COM port cable (Part No. 12CF1-1CM001-31/R) S/PDIF in and out cable (Part No. 12CR1-1SPINO-11/R) - 6 - Box Contents GA-M68SM-S2 motherboard Motherboard driver disk User's Manual One IDE cable and one floppy disk drive cable Two SATA 3Gb/s cables I/O Shield The box contents above are subject to...
Manual
Page 18
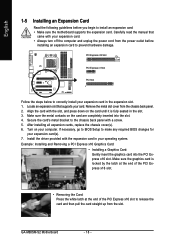
... and then pull the card straight up from the slot. GA-M68SM-S2 Motherboard - 18 - Remove the metal slot cover from the power outlet before you begin to install an expansion card: • Make sure the motherboard supports the expansion card. Install the driver provided with your card. Carefully read the manual that supports...
... and then pull the card straight up from the slot. GA-M68SM-S2 Motherboard - 18 - Remove the metal slot cover from the power outlet before you begin to install an expansion card: • Make sure the motherboard supports the expansion card. Install the driver provided with your card. Carefully read the manual that supports...
Manual
Page 32
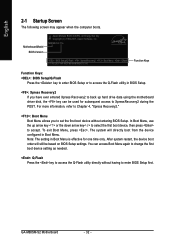
...driver disk, the key can access Boot Menu again to change the first boot device setting as needed. : Q-Flash Press the key to accept. The system will still be used for one time only. After system restart, the device boot order will directly boot from the device configured in Boot Menu. M68SM-S2... for subsequent access to enter BIOS Setup first. English 2-1 Startup Screen The following screen may appear when the computer boots. GA-M68SM-S2 Motherboard - 32 - Motherboard Model BIOS Version Award Modular BIOS v6.00PG, An Energy Star Ally Copyright (C) 1984-2007, Award...
...driver disk, the key can access Boot Menu again to change the first boot device setting as needed. : Q-Flash Press the key to accept. The system will still be used for one time only. After system restart, the device boot order will directly boot from the device configured in Boot Menu. M68SM-S2... for subsequent access to enter BIOS Setup first. English 2-1 Startup Screen The following screen may appear when the computer boots. GA-M68SM-S2 Motherboard - 32 - Motherboard Model BIOS Version Award Modular BIOS v6.00PG, An Energy Star Ally Copyright (C) 1984-2007, Award...
Manual
Page 37
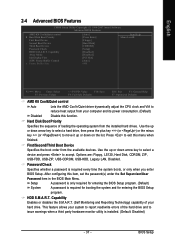
... F10: Save F6: Fail-Safe Defaults ESC: Exit F1: General Help F7: Optimized Defaults AMD K8 Cool&Quiet control Auto Lets the AMD Cool'n'Quiet driver dynamically adjust the CPU clock and VIA to move it up or down on the list. Use the up or down arrow key to select...
... F10: Save F6: Fail-Safe Defaults ESC: Exit F1: General Help F7: Optimized Defaults AMD K8 Cool&Quiet control Auto Lets the AMD Cool'n'Quiet driver dynamically adjust the CPU clock and VIA to move it up or down on the list. Use the up or down arrow key to select...
Manual
Page 40
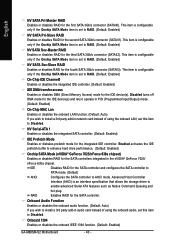
... hot plug. Onboard 1394 Enables or disables the onboard IEEE 1394 function. (Default: Enabled) GA-M68SM-S2 Motherboard - 40 - This item is configurable only if the Onchip SATA Mode item is an interface specification that allows the storage driver to RAID. (Default: Enabled) On-Chip IDE Channel0 Enables or disables the integrated IDE controller...
... hot plug. Onboard 1394 Enables or disables the onboard IEEE 1394 function. (Default: Enabled) GA-M68SM-S2 Motherboard - 40 - This item is configurable only if the Onchip SATA Mode item is an interface specification that allows the storage driver to RAID. (Default: Enabled) On-Chip IDE Channel0 Enables or disables the integrated IDE controller...
Manual
Page 51
... button following instructions use Windows XP as the example operating system.) • After installing the operating system, insert the motherboard driver disk into your mouse and select Uninstall) and restart the system. (The system will restart your system. You can press Xpress...install. Please select the item that are installed, follow the onscreen instructions to install other applications included in the motherboard driver disk. • For USB 2.0 driver support under the Windows XP operating system, please install the Windows XP Service Pack 1 or later. After the system...
... button following instructions use Windows XP as the example operating system.) • After installing the operating system, insert the motherboard driver disk into your mouse and select Uninstall) and restart the system. (The system will restart your system. You can press Xpress...install. Please select the item that are installed, follow the onscreen instructions to install other applications included in the motherboard driver disk. • For USB 2.0 driver support under the Windows XP operating system, please install the Windows XP Service Pack 1 or later. After the system...
Manual
Page 52
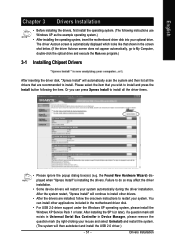
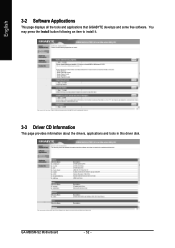
You may press the Install button following an item to install it. 3-3 Driver CD Information This page provides information about the drivers, applications and tools in this driver disk. English 3-2 Software Applications This page displays all the tools and applications that GIGABYTE develops and some free software. GA-M68SM-S2 Motherboard - 52 -
You may press the Install button following an item to install it. 3-3 Driver CD Information This page provides information about the drivers, applications and tools in this driver disk. English 3-2 Software Applications This page displays all the tools and applications that GIGABYTE develops and some free software. GA-M68SM-S2 Motherboard - 52 -

Manual
Page 53
Drivers Installation English 3-4 Hardware Information This page provides information about the hardware devices on this motherboard. 3-5 Contact Us Check the contacts information of the GIGABYTE headquarter in Taiwan and the overseas branch offices on the last page of this manual. - 53 -
Drivers Installation English 3-4 Hardware Information This page provides information about the hardware devices on this motherboard. 3-5 Contact Us Check the contacts information of the GIGABYTE headquarter in Taiwan and the overseas branch offices on the last page of this manual. - 53 -
Manual
Page 55
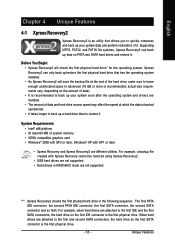
... back up your system data and perform restoration of data). • It is recommended to back up your system soon after the operating system and drivers are attached to quickly compress and back up /restore the first physical hard drive that allows you to the first and second SATA connectors, the...
... back up your system data and perform restoration of data). • It is recommended to back up your system soon after the operating system and drivers are attached to quickly compress and back up /restore the first physical hard drive that allows you to the first and second SATA connectors, the...
Manual
Page 58
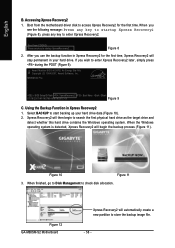
... Recovery2 for the first time, Xpress Recovery2 will then begin the backup process (Figure 11). Boot from the motherboard driver disk to enter Xpress Recovery2 later, simply press during the POST (Figure 9). M68SM-S2 F1a . . . . : BIOS Setup/Q-Flash : XpressRecovery2 : Boot Menu : Qflash 07/16/2007-NF-MCP68-6A61MG01C-00 Figure 9 C. Boot...Recovery2 (Figure 8), press any key to start backing up your hard drive. Figure 10 Figure 11 3. Select BACKUP to startup XpressRecovery2..... Figure 12 GA-M68SM-S2 Motherboard Xpress Recovery2 will begin to check disk allocation.
... Recovery2 for the first time, Xpress Recovery2 will then begin the backup process (Figure 11). Boot from the motherboard driver disk to enter Xpress Recovery2 later, simply press during the POST (Figure 9). M68SM-S2 F1a . . . . : BIOS Setup/Q-Flash : XpressRecovery2 : Boot Menu : Qflash 07/16/2007-NF-MCP68-6A61MG01C-00 Figure 9 C. Boot...Recovery2 (Figure 8), press any key to start backing up your hard drive. Figure 10 Figure 11 3. Select BACKUP to startup XpressRecovery2..... Figure 12 GA-M68SM-S2 Motherboard Xpress Recovery2 will begin to check disk allocation.
Manual
Page 63
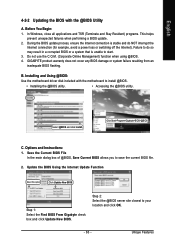
... NOT interrupt the Internet connection (for example, avoid a power loss or switching off the Internet). Installing and Using @BIOS: Use the motherboard driver disk included with the @BIOS Utility A. Save the Current BIOS File In the main dialog box of @BIOS, Save Current BIOS allows you...and click Install. Update the BIOS Using the Internet Update Function Select this option Click Update New BIOS Step 1: Select the Find BIOS From Gigabyte check box and click Update New BIOS. During the BIOS update process, ensure the Internet connection is unable to install @BIOS. • ...
... NOT interrupt the Internet connection (for example, avoid a power loss or switching off the Internet). Installing and Using @BIOS: Use the motherboard driver disk included with the @BIOS Utility A. Save the Current BIOS File In the main dialog box of @BIOS, Save Current BIOS allows you...and click Install. Update the BIOS Using the Internet Update Function Select this option Click Update New BIOS Step 1: Select the Find BIOS From Gigabyte check box and click Update New BIOS. During the BIOS update process, ensure the Internet connection is unable to install @BIOS. • ...
Manual
Page 67
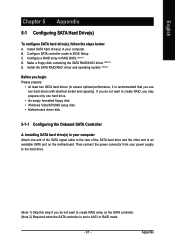
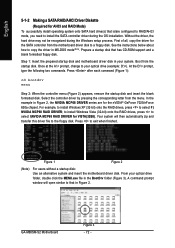
...(s) in RAID BIOS. (Note 1) D. B. C . Make a floppy disk containing the SATA RAID/AHCI driver. (Note 2) E. Configure a RAID array in your computer. Install the SATA RAID/AHCI driver and operating system. (Note 2) Before you begin Please prepare: • At least two SATA hard drives ...computer Attach one hard drive. • An empty formatted floppy disk. • Windows Vista/XP/2000 setup disk. • Motherboard driver disk. 5-1-1 Configuring the Onboard SATA Controller A. Configure SATA controller mode in your power supply to create RAID array on the motherboard. English...
...(s) in RAID BIOS. (Note 1) D. B. C . Make a floppy disk containing the SATA RAID/AHCI driver. (Note 2) E. Configure a RAID array in your computer. Install the SATA RAID/AHCI driver and operating system. (Note 2) Before you begin Please prepare: • At least two SATA hard drives ...computer Attach one hard drive. • An empty formatted floppy disk. • Windows Vista/XP/2000 setup disk. • Motherboard driver disk. 5-1-1 Configuring the Onboard SATA Controller A. Configure SATA controller mode in your power supply to create RAID array on the motherboard. English...
Manual
Page 71
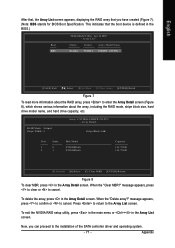
This indicates that you can proceed to the installation of the SATA controller driver and operating system. - 71 - Array List - To delete the array, press in the BIOS.) Boot BBS MediaShield Utility Apr 16 2007 - When the "Clear MBR?" ...
This indicates that you can proceed to the installation of the SATA controller driver and operating system. - 71 - Array List - To delete the array, press in the BIOS.) Boot BBS MediaShield Utility Apr 16 2007 - When the "Clear MBR?" ...
Manual
Page 72
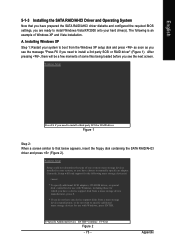
... Windows setup process. Figure 1 Figure 2 (Note) For users without a startup disk: Use an alternative system and insert the motherboard driver disk. GA-M68SM-S2 Motherboard Figure 3 - 72 - At the D:\> prompt, type the following two commands. Your system will open similar to the floppy disk.... From your system. A command prompt window will then automatically zip and transfer this driver file to that has CD-ROM support and a blank...
... Windows setup process. Figure 1 Figure 2 (Note) For users without a startup disk: Use an alternative system and insert the motherboard driver disk. GA-M68SM-S2 Motherboard Figure 3 - 72 - At the D:\> prompt, type the following two commands. Your system will open similar to the floppy disk.... From your system. A command prompt window will then automatically zip and transfer this driver file to that has CD-ROM support and a blank...
Manual
Page 73
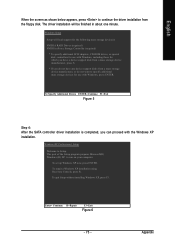
...Setup Setup could not determine the type of some files being loaded before you have chosen to install a third party SCSI or RAID driver. After pressing , there will load support for the following is an example of Windows XP and Vista installation. Appendix S=Specify Additional... your system, or you see the next screen. English 5-1-3 Installing the SATA RAID/AHCI Driver and Operating System Now that below appears, insert the floppy disk containing the SATA RAID/AHCI driver and press (Figure 2). The following mass storage devices(s) * To specify additional SCSI adapters,...
...Setup Setup could not determine the type of some files being loaded before you have chosen to install a third party SCSI or RAID driver. After pressing , there will load support for the following is an example of Windows XP and Vista installation. Appendix S=Specify Additional... your system, or you see the next screen. English 5-1-3 Installing the SATA RAID/AHCI Driver and Operating System Now that below appears, insert the floppy disk containing the SATA RAID/AHCI driver and press (Figure 2). The following mass storage devices(s) * To specify additional SCSI adapters,...
Manual
Page 74
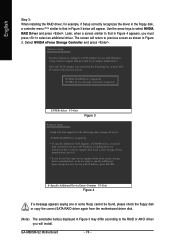
... 3 below will appear. Select the SCSI Adapter you want to that in Figure 3 may differ according to the RAID or AHCI driver you will install. GA-M68SM-S2 Motherboard - 74 - Later, when a screen similar to specify additional mass storage devices for use with Windows, using a device support... support for the following list, or press ESC to return to configure a SCSI Adapter for use with Windows, press ENTER. NVIDIA RAID Driver (required) NVIDIA nForce Storage Controller (required) ENTER=Select F3=Exit Figure 3 Windows Setup Setup will return to previous screen as shown in...
... 3 below will appear. Select the SCSI Adapter you want to that in Figure 3 may differ according to the RAID or AHCI driver you will install. GA-M68SM-S2 Motherboard - 74 - Later, when a screen similar to specify additional mass storage devices for use with Windows, using a device support... support for the following list, or press ESC to return to configure a SCSI Adapter for use with Windows, press ENTER. NVIDIA RAID Driver (required) NVIDIA nForce Storage Controller (required) ENTER=Select F3=Exit Figure 3 Windows Setup Setup will return to previous screen as shown in...
Manual
Page 75
... using Recovery Console, press R. Windows Setup Setup will be finished in about one minute. Appendix The driver installation will load support for the following mass storage device(s): NVIDIA RAID Driver (required) NVIDIA nForce Storage Controller (required) * To specify additional SCSI adapters, CD-ROM drives, ... F3. To set up Windows XP now, press ENTER. English When the screen as shown below appears, press to continue the driver installation from a mass storage device manufacturer, or do not want to specify additional mass storage devices for use with Windows, including ...
... using Recovery Console, press R. Windows Setup Setup will be finished in about one minute. Appendix The driver installation will load support for the following mass storage device(s): NVIDIA RAID Driver (required) NVIDIA nForce Storage Controller (required) * To specify additional SCSI adapters, CD-ROM drives, ... F3. To set up Windows XP now, press ENTER. English When the screen as shown below appears, press to continue the driver installation from a mass storage device manufacturer, or do not want to specify additional mass storage devices for use with Windows, including ...

Manual
Page 76
Figure 6 Step 2: Specify the location where the driver is saved, such as your system to that below appears (RAID or AHCI hard drive(s) will not be detected at this stage), select Load Drivers. (Figure 6). Installing Windows Vista Step 1: Restart your floppy disk (Figure 7). Figure 7 GA-M68SM-S2 Motherboard - 76 - English B. When a screen similar to boot from the Windows Vista setup disk and perform standard OS installation steps.
Figure 6 Step 2: Specify the location where the driver is saved, such as your system to that below appears (RAID or AHCI hard drive(s) will not be detected at this stage), select Load Drivers. (Figure 6). Installing Windows Vista Step 1: Restart your floppy disk (Figure 7). Figure 7 GA-M68SM-S2 Motherboard - 76 - English B. When a screen similar to boot from the Windows Vista setup disk and perform standard OS installation steps.


