Manual
Page 3
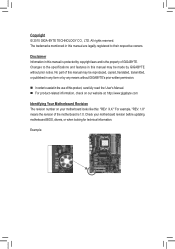
... to assist in this manual is protected by GIGABYTE without GIGABYTE's prior written permission. In order to their respective owners. No part of GIGABYTE. For example, "REV: 1.0" means the revision of the motherboard is the property of this manual may be...'s Manual. For product-related information, check on our website at: http://www.gigabyte.com Identifying Your Motherboard Revision The revision number on your motherboard revision before updating motherboard BIOS, drivers, or when looking for technical information. Copyright © 2010 GIGA-BYTE TECHNOLOGY CO., LTD...
... to assist in this manual is protected by GIGABYTE without GIGABYTE's prior written permission. In order to their respective owners. No part of GIGABYTE. For example, "REV: 1.0" means the revision of the motherboard is the property of this manual may be...'s Manual. For product-related information, check on our website at: http://www.gigabyte.com Identifying Your Motherboard Revision The revision number on your motherboard revision before updating motherboard BIOS, drivers, or when looking for technical information. Copyright © 2010 GIGA-BYTE TECHNOLOGY CO., LTD...
Manual
Page 4
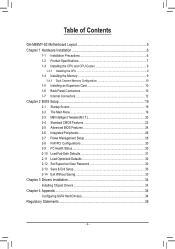
Table of Contents GA-M68MT-S2 Motherboard Layout 5 Chapter 1 Hardware Installation 6 1-1 Installation Precautions 6 1-2 Product Specifications 7 1-3 Installing the CPU and CPU Cooler 9 1-3-1 Installing the CPU...9 1-4 Installing the Memory 9 1-4-1 Dual Channel Memory Configuration 10 1-5 ...-Safe Defaults 31 2-11 Load Optimized Defaults 32 2-12 Set Supervisor/User Password 32 2-13 Save & Exit Setup 33 2-14 Exit Without Saving 33 Chapter 3 Drivers Installation 34 Installing Chipset Drivers 34 Chapter 4 Appendix...34 Configuring SATA Hard Drive(s 34 Regulatory Statements 36 - 4 -
Table of Contents GA-M68MT-S2 Motherboard Layout 5 Chapter 1 Hardware Installation 6 1-1 Installation Precautions 6 1-2 Product Specifications 7 1-3 Installing the CPU and CPU Cooler 9 1-3-1 Installing the CPU...9 1-4 Installing the Memory 9 1-4-1 Dual Channel Memory Configuration 10 1-5 ...-Safe Defaults 31 2-11 Load Optimized Defaults 32 2-12 Set Supervisor/User Password 32 2-13 Save & Exit Setup 33 2-14 Exit Without Saving 33 Chapter 3 Drivers Installation 34 Installing Chipset Drivers 34 Chapter 4 Appendix...34 Configuring SATA Hard Drive(s 34 Regulatory Statements 36 - 4 -
Manual
Page 5
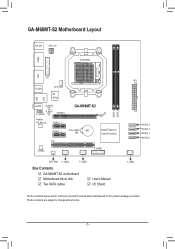
... COMA VGA LPT R_USB CPU_FAN iTE IT8720 LAN USB AUDIO M_BIOS B_BIOS F_AUDIO PCIEX16 Realtek RTL8211CL PCIEX1_1 GA-M68MT-S2 PCIEX1_2 CLR_CMOS BAT NVIDIA® GeForce 7025/nForce 630a PCI CODEC F_PANEL SYS_FAN F_USB3 F_USB2 Box Contents GA-M68MT-S2 motherboard Motherboard driver disk Two SATA cables User's Manual I/O Shield DDR3_1 DDR3_2 ATX SATA2_3 SATA2_2 SATA2_1 SATA2_0 F_USB1 The...
... COMA VGA LPT R_USB CPU_FAN iTE IT8720 LAN USB AUDIO M_BIOS B_BIOS F_AUDIO PCIEX16 Realtek RTL8211CL PCIEX1_1 GA-M68MT-S2 PCIEX1_2 CLR_CMOS BAT NVIDIA® GeForce 7025/nForce 630a PCI CODEC F_PANEL SYS_FAN F_USB3 F_USB2 Box Contents GA-M68MT-S2 motherboard Motherboard driver disk Two SATA cables User's Manual I/O Shield DDR3_1 DDR3_2 ATX SATA2_3 SATA2_2 SATA2_1 SATA2_0 F_USB1 The...
Manual
Page 11
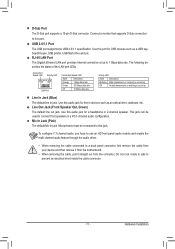
... configuration. To configure 7.1-channel audio, you have to use an HD front panel audio module and enable the multi-channel audio feature through the audio driver. • When removing the cable connected to a back panel connector, first remove the cable from your device and then remove it from the connector. D-Sub.... Microphones must be used to prevent an electrical short inside the cable connector. - 11 - Use this jack. Do not rock it straight out from the motherboard. • When removing the cable, pull it side to side to connect front speakers in jack.
... configuration. To configure 7.1-channel audio, you have to use an HD front panel audio module and enable the multi-channel audio feature through the audio driver. • When removing the cable connected to a back panel connector, first remove the cable from your device and then remove it from the connector. D-Sub.... Microphones must be used to prevent an electrical short inside the cable connector. - 11 - Use this jack. Do not rock it straight out from the motherboard. • When removing the cable, pull it side to side to connect front speakers in jack.
Manual
Page 34
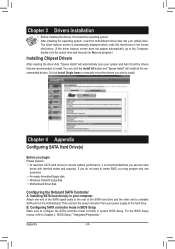
...the BIOS Setup menus, refer to available SATA port on the motherboard. Chapter 3 Drivers Installation • Before installing the drivers, first install the operating system. • After installing the operating system, insert the motherboard driver disk into your power supply to the hard drive. You ...An empty formatted floppy disk. • Windows Vista/XP setup disk. • Motherboard driver disk. Configuring SATA controller mode in BIOS Setup Make sure to install. The driver Autorun screen is recommended that are recommended to configure the SATA controller mode correctly in...
...the BIOS Setup menus, refer to available SATA port on the motherboard. Chapter 3 Drivers Installation • Before installing the drivers, first install the operating system. • After installing the operating system, insert the motherboard driver disk into your power supply to the hard drive. You ...An empty formatted floppy disk. • Windows Vista/XP setup disk. • Motherboard driver disk. Configuring SATA controller mode in BIOS Setup Make sure to install. The driver Autorun screen is recommended that are recommended to configure the SATA controller mode correctly in...
Manual
Page 35
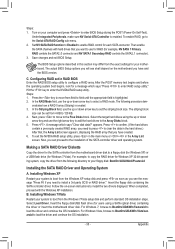
...OS installation. - 35 - Save changes and exit BIOS Setup. Select the target hard drives using a SATA optical drive) containing the driver or insert the motherboard driver disk. Set NV SATA RAID function to Enabled to enter the NVIDIA RAID setup utility. To exit the NVIDIA RAID setup utility, ... XP setup disk and press as soon as you can be set the striping block size. Next, press to move from the motherboard driver disk to load the driver and continue the OS installation. For Windows 7, browse to BootDrv\UDA\Win7\sataraid to a floppy disk (for Windows XP) or...
...OS installation. - 35 - Save changes and exit BIOS Setup. Select the target hard drives using a SATA optical drive) containing the driver or insert the motherboard driver disk. Set NV SATA RAID function to Enabled to enter the NVIDIA RAID setup utility. To exit the NVIDIA RAID setup utility, ... XP setup disk and press as soon as you can be set the striping block size. Next, press to move from the motherboard driver disk to load the driver and continue the OS installation. For Windows 7, browse to BootDrv\UDA\Win7\sataraid to a floppy disk (for Windows XP) or...


