
Manual
Page 3
... : "REV: X.X." Changes to their respective owners. Check your motherboard looks like this manual may be made by GIGABYTE without GIGABYTE's prior written permission. In order to assist in this manual are legally registered to the specifications and features.... For product-related information, check on our website at: http://www.gigabyte.com Identifying Your Motherboard Revision The revision number on your motherboard revision before updating motherboard BIOS, drivers, or when looking for technical information. All rights reserved. The trademarks mentioned in...
... : "REV: X.X." Changes to their respective owners. Check your motherboard looks like this manual may be made by GIGABYTE without GIGABYTE's prior written permission. In order to assist in this manual are legally registered to the specifications and features.... For product-related information, check on our website at: http://www.gigabyte.com Identifying Your Motherboard Revision The revision number on your motherboard revision before updating motherboard BIOS, drivers, or when looking for technical information. All rights reserved. The trademarks mentioned in...

Manual
Page 4
Table of Contents GA-M68MT-D3P/GA-M68MT-S2P Motherboard Layout 5 Chapter 1 Hardware Installation 6 1-1 Installation Precautions 6 1-2 Product Specifications 7 1-3 Installing the CPU and CPU Cooler 9 1-3-1 Installing the CPU...9 1-4 Installing the Memory 9 1-4-1 Dual Channel Memory ...-Safe Defaults 31 2-11 Load Optimized Defaults 32 2-12 Set Supervisor/User Password 32 2-13 Save & Exit Setup 33 2-14 Exit Without Saving 33 Chapter 3 Drivers Installation 34 Installing Chipset Drivers 34 Chapter 4 Appendix...34 Configuring SATA Hard Drive(s 34 - 4 -
Table of Contents GA-M68MT-D3P/GA-M68MT-S2P Motherboard Layout 5 Chapter 1 Hardware Installation 6 1-1 Installation Precautions 6 1-2 Product Specifications 7 1-3 Installing the CPU and CPU Cooler 9 1-3-1 Installing the CPU...9 1-4 Installing the Memory 9 1-4-1 Dual Channel Memory ...-Safe Defaults 31 2-11 Load Optimized Defaults 32 2-12 Set Supervisor/User Password 32 2-13 Save & Exit Setup 33 2-14 Exit Without Saving 33 Chapter 3 Drivers Installation 34 Installing Chipset Drivers 34 Chapter 4 Appendix...34 Configuring SATA Hard Drive(s 34 - 4 -

Manual
Page 5
... iTE IT8720 AUDIO F_AUDIO M_BIOS B_BIOS PCIEX16 Realtek RTL8211CL PCIEX1_1 GA-M68MT-D3P GA-M68MT-S2P PCIEX1_2 CLR_CMOS BAT PCI CODEC SYS_FAN F_USB3 F_USB2 ATX DDR3_1 DDR3_2 NVIDIA® GeForce 7025/nForce 630a F_PANEL F_USB1 SATA2_3 SATA2_2 SATA2_1 SATA2_0 Box Contents GA-M68MT-D3P or GA-M68MT-S2P motherboard Motherboard driver disk User's Manual I/O Shield Two SATA cables The box contents...
... iTE IT8720 AUDIO F_AUDIO M_BIOS B_BIOS PCIEX16 Realtek RTL8211CL PCIEX1_1 GA-M68MT-D3P GA-M68MT-S2P PCIEX1_2 CLR_CMOS BAT PCI CODEC SYS_FAN F_USB3 F_USB2 ATX DDR3_1 DDR3_2 NVIDIA® GeForce 7025/nForce 630a F_PANEL F_USB1 SATA2_3 SATA2_2 SATA2_1 SATA2_0 Box Contents GA-M68MT-D3P or GA-M68MT-S2P motherboard Motherboard driver disk User's Manual I/O Shield Two SATA cables The box contents...

Manual
Page 7
...size displayed will be less than 4 GB. Up to 10 USB 2.0/1.1 ports (4 on the back panel, 6 via the USB brackets connected to GIGABYTE's website for SATA RAID 0, RAID 1, RAID 10, RAID 5, and JBOD USB Chipset: - Support for the latest supported memory speeds ...configure 7.1-channel audio, you have to use an HD front panel audio module and enable the multi-channel audio feature through the audio driver. Hardware Installation 1-2 Product Specifications CPU Hyper Transport Bus Support for AM3 processors: AMD Phenom™ II processor/AMD Athlon&#...
...size displayed will be less than 4 GB. Up to 10 USB 2.0/1.1 ports (4 on the back panel, 6 via the USB brackets connected to GIGABYTE's website for SATA RAID 0, RAID 1, RAID 10, RAID 5, and JBOD USB Chipset: - Support for the latest supported memory speeds ...configure 7.1-channel audio, you have to use an HD front panel audio module and enable the multi-channel audio feature through the audio driver. Hardware Installation 1-2 Product Specifications CPU Hyper Transport Bus Support for AM3 processors: AMD Phenom™ II processor/AMD Athlon&#...

Manual
Page 11
... jack. To configure 7.1-channel audio, you have to use an HD front panel audio module and enable the multi-channel audio feature through the audio driver. • When removing the cable connected to 1 Gbps data rate. Use this audio jack for line in a 4/5.1-channel audio configuration. RJ-45 LAN Port The...
... jack. To configure 7.1-channel audio, you have to use an HD front panel audio module and enable the multi-channel audio feature through the audio driver. • When removing the cable connected to 1 Gbps data rate. Use this audio jack for line in a 4/5.1-channel audio configuration. RJ-45 LAN Port The...

Manual
Page 24
... used). With virtualization, one computer system can function as multiple virtual systems. (Default: Enabled) AMD K8 Cool&Quiet control Auto Lets the AMD Cool'n'Quiet driver dynamically adjust the CPU clock and VID to individually enable/disable CPU Core 2 and Core 3. CPU Unlock (Note) Allows you to determine whether to unlock...
... used). With virtualization, one computer system can function as multiple virtual systems. (Default: Enabled) AMD K8 Cool&Quiet control Auto Lets the AMD Cool'n'Quiet driver dynamically adjust the CPU clock and VID to individually enable/disable CPU Core 2 and Core 3. CPU Unlock (Note) Allows you to determine whether to unlock...
Manual
Page 34
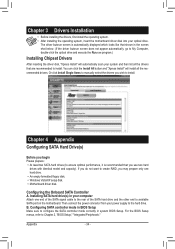
...ensure optimal performance, it is automatically displayed which looks like that shown in the screen shot below. (If the driver Autorun screen does not appear automatically, go to My Computer, double-click the optical drive and execute the Run.exe program.)... Installing Chipset Drivers After inserting the driver disk, "Xpress Install" will install all the recommended drivers. For the BIOS Setup menus, refer to install. B. The driver Autorun screen is recommended that are recommended to Chapter 2, "BIOS Setup,"...
...ensure optimal performance, it is automatically displayed which looks like that shown in the screen shot below. (If the driver Autorun screen does not appear automatically, go to My Computer, double-click the optical drive and execute the Run.exe program.)... Installing Chipset Drivers After inserting the driver disk, "Xpress Install" will install all the recommended drivers. For the BIOS Setup menus, refer to install. B. The driver Autorun screen is recommended that are recommended to Chapter 2, "BIOS Setup,"...

Manual
Page 35
... Setup during the POST (Power-On Self-Test). Installing Windows 7/Vista Restart your floppy disk: BootDrv\UDA\WinXP\sataraid Installing the SATA RAID Driver and Operating System A. Steps: 1. Under Integrated Peripherals, make sure NV Serial-ATA Controller is created. 3. Hit the key to the Serial... to boot from the following procedure dem- Insert the floppy disk/USB flash drive (for Windows XP 32-bit operating system, copy the driver from the Windows 7/Vista setup disk and perform standard OS installation steps. Now, you have and the BIOS version. Press to confirm....
... Setup during the POST (Power-On Self-Test). Installing Windows 7/Vista Restart your floppy disk: BootDrv\UDA\WinXP\sataraid Installing the SATA RAID Driver and Operating System A. Steps: 1. Under Integrated Peripherals, make sure NV Serial-ATA Controller is created. 3. Hit the key to the Serial... to boot from the following procedure dem- Insert the floppy disk/USB flash drive (for Windows XP 32-bit operating system, copy the driver from the Windows 7/Vista setup disk and perform standard OS installation steps. Now, you have and the BIOS version. Press to confirm....


