
Manual
Page 6
... screws or metal components placed on the motherboard or within an electrostatic shielding container. • Before unplugging the power supply cable from the power outlet before installing or removing the motherboard or other hardware components. • When connecting hardware components to the internal... break motherboard S/N (Serial Number) sticker or warranty sticker provided by unplugging the power cord from the motherboard, make sure the power supply has been turned off. • Before turning on the power, make sure they are connected. • To prevent damage to the motherboard...
... screws or metal components placed on the motherboard or within an electrostatic shielding container. • Before unplugging the power supply cable from the power outlet before installing or removing the motherboard or other hardware components. • When connecting hardware components to the internal... break motherboard S/N (Serial Number) sticker or warranty sticker provided by unplugging the power cord from the motherboard, make sure the power supply has been turned off. • Before turning on the power, make sure they are connected. • To prevent damage to the motherboard...

Manual
Page 13
... possesses a foolproof design. The 12V power connector mainly supplies power to the power connector in the correct orientation. Before connecting the power connector, first make sure the power supply is recommended that a power supply that does not provide the required power, the result can withstand high power consumption be used that can lead to an unstable or unbootable system. 21 43...
... possesses a foolproof design. The 12V power connector mainly supplies power to the power connector in the correct orientation. Before connecting the power connector, first make sure the power supply is recommended that a power supply that does not provide the required power, the result can withstand high power consumption be used that can lead to an unstable or unbootable system. 21 43...
Manual
Page 22
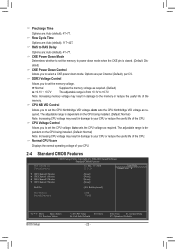
... the CKE pin is dependent on the CPU being installed. (Default: Normal) Note: Increasing CPU voltage may result in damage to select a CKE power down mode. Row Cycle Time Options are : Auto (default), 4T~7T. Auto sets the CPU voltage as required. ESC: Exit F1: General ...Control Allows you to set the memory voltage. Precharge Time Options are : Auto (default), 11T~42T. Options are : Auto (default), 4T~7T. Normal Supplies the memory voltage as required. (Default) +0.1V ~ +0.7V The adjustable range is dependent on the CPU being installed. (Default: Normal) Note: Increasing ...
... the CKE pin is dependent on the CPU being installed. (Default: Normal) Note: Increasing CPU voltage may result in damage to select a CKE power down mode. Row Cycle Time Options are : Auto (default), 4T~7T. Auto sets the CPU voltage as required. ESC: Exit F1: General ...Control Allows you to set the memory voltage. Precharge Time Options are : Auto (default), 11T~42T. Options are : Auto (default), 4T~7T. Normal Supplies the memory voltage as required. (Default) +0.1V ~ +0.7V The adjustable range is dependent on the CPU being installed. (Default: Normal) Note: Increasing ...

Manual
Page 28
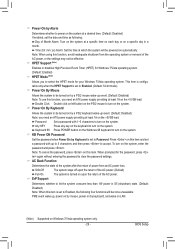
...from an ACPI sleep state by Alarm x Day of Month Alarm x Time (hh:mm:ss) Alarm HPET Support (Note) HPET Mode (Note) Power On By Mouse Power On By Keyboard x KB Power ON Password AC Back Function ErP Support [S3(STR)] [Instant-Off] [Enabled] [Enabled] [Enabled] [Disabled] Everyday 0 : 0 : 0 ... the ACPI sleep state when the system enters suspend. Note: To use this function, you need an ATX power supply providing at any time. Instant-Off Press the power button and then the system will enter suspend mode. S1(POS) Enables the system to turn off .
...from an ACPI sleep state by Alarm x Day of Month Alarm x Time (hh:mm:ss) Alarm HPET Support (Note) HPET Mode (Note) Power On By Mouse Power On By Keyboard x KB Power ON Password AC Back Function ErP Support [S3(STR)] [Instant-Off] [Enabled] [Enabled] [Enabled] [Disabled] Everyday 0 : 0 : 0 ... the ACPI sleep state when the system enters suspend. Note: To use this function, you need an ATX power supply providing at any time. Instant-Off Press the power button and then the system will enter suspend mode. S1(POS) Enables the system to turn off .
Manual
Page 29
... By Mouse Allows the system to be turned on by a PS/2 mouse wake-up event. (Default: Disabled) Note: you need an ATX power supply providing at least 1A on the +5VSB lead. HPET Support (Note) Enables or disables High Precision Event Timer (HPET) for Windows 7/Vista operating system. (...Default: Enabled) HPET Mode (Note) Allows you need an ATX power supply providing at least 1A on upon the return of the AC power, or the settings may not be effective. Password Set a password with up , power on by mouse, power on by keyboard, and wake on LAN. (Note) Supported on Windows 7/...
... By Mouse Allows the system to be turned on by a PS/2 mouse wake-up event. (Default: Disabled) Note: you need an ATX power supply providing at least 1A on the +5VSB lead. HPET Support (Note) Enables or disables High Precision Event Timer (HPET) for Windows 7/Vista operating system. (...Default: Enabled) HPET Mode (Note) Allows you need an ATX power supply providing at least 1A on upon the return of the AC power, or the settings may not be effective. Password Set a password with up , power on by mouse, power on by keyboard, and wake on LAN. (Note) Supported on Windows 7/...
Manual
Page 34
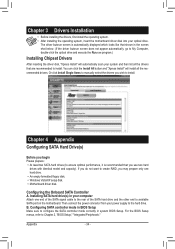
You can click the Install All button and "Xpress Install" will automatically scan your power supply to create RAID, you do not want to the hard drive. If you may prepare only one end of the SATA signal cable to the ... drive and the other end to ensure optimal performance, it is automatically displayed which looks like that shown in system BIOS Setup. Then connect the power connector from your system and then list all the recommended drivers. Configuring the Onboard SATA Controller A. B. Chapter 4 Appendix Configuring SATA Hard Drive(s) Before you wish...
You can click the Install All button and "Xpress Install" will automatically scan your power supply to create RAID, you do not want to the hard drive. If you may prepare only one end of the SATA signal cable to the ... drive and the other end to ensure optimal performance, it is automatically displayed which looks like that shown in system BIOS Setup. Then connect the power connector from your system and then list all the recommended drivers. Configuring the Onboard SATA Controller A. B. Chapter 4 Appendix Configuring SATA Hard Drive(s) Before you wish...


