Manual
Page 3
... 1.0. Copyright © 2009 GIGA-BYTE TECHNOLOGY CO., LTD. For product-related information, check on our website at: http://www.gigabyte.com.tw Identifying Your Motherboard Revision The revision number on your motherboard revision before updating motherboard BIOS, drivers, or when looking for ... of this manual are legally registered to use GIGABYTE's unique features, read or download the information on/from the Support&Downloads\Motherboard\Technology Guide page on how to their respective owners. Changes to the specifications and features in this manual may be made ...
... 1.0. Copyright © 2009 GIGA-BYTE TECHNOLOGY CO., LTD. For product-related information, check on our website at: http://www.gigabyte.com.tw Identifying Your Motherboard Revision The revision number on your motherboard revision before updating motherboard BIOS, drivers, or when looking for ... of this manual are legally registered to use GIGABYTE's unique features, read or download the information on/from the Support&Downloads\Motherboard\Technology Guide page on how to their respective owners. Changes to the specifications and features in this manual may be made ...
Manual
Page 4
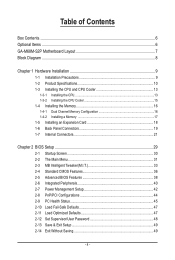
Table of Contents Box Contents...6 Optional Items...6 GA-M68M-S2P Motherboard Layout 7 Block Diagram...8 Chapter 1 Hardware Installation 9 1-1 Installation Precautions 9 1-2 Product Specifications 10 1-3 Installing the CPU and CPU Cooler 13 1-3-1 Installing the CPU 13 1-3-2 Installing the CPU Cooler 15 1-4 Installing the Memory 16 1-4-1 Dual Channel Memory Configuration ...
Table of Contents Box Contents...6 Optional Items...6 GA-M68M-S2P Motherboard Layout 7 Block Diagram...8 Chapter 1 Hardware Installation 9 1-1 Installation Precautions 9 1-2 Product Specifications 10 1-3 Installing the CPU and CPU Cooler 13 1-3-1 Installing the CPU 13 1-3-2 Installing the CPU Cooler 15 1-4 Installing the Memory 16 1-4-1 Dual Channel Memory Configuration ...
Manual
Page 10
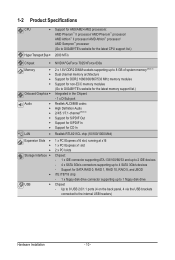
1-2 Product Specifications CPU Hyper Transport Bus Support for AM3/AM2+/AM2 processors: AMD Phenom™ II processor/ AMD Phenom™ processor/ AMD Athlon™ II processor/ AMD Athlon™ processor/ AMD Sempron™ processor (Go to GIGABYTE's website for the latest CPU support list...Note 1) Dual channel memory architecture Support for DDR2 1066/800/667/533 MHz memory modules Support for non-ECC memory modules (Go to GIGABYTE's website for the latest memory support list.) Integrated in the Chipset: - 1 x D-Sub port Realtek ALC888B codec High Definition Audio ...
1-2 Product Specifications CPU Hyper Transport Bus Support for AM3/AM2+/AM2 processors: AMD Phenom™ II processor/ AMD Phenom™ processor/ AMD Athlon™ II processor/ AMD Athlon™ processor/ AMD Sempron™ processor (Go to GIGABYTE's website for the latest CPU support list...Note 1) Dual channel memory architecture Support for DDR2 1066/800/667/533 MHz memory modules Support for non-ECC memory modules (Go to GIGABYTE's website for the latest memory support list.) Integrated in the Chipset: - 1 x D-Sub port Realtek ALC888B codec High Definition Audio ...
Manual
Page 13
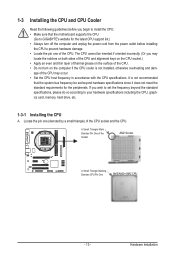
.... It is not installed, otherwise overheating and dam- If you may occur. • Set the CPU host frequency in accordance with the CPU specifications. A Small Triangle Mark Denotes Pin One of the Socket AM2 Socket A Small Triangle Marking Denotes CPU Pin One AM3/AM2+/AM2 CPU - 13...support list.) • Always turn on the computer if the CPU cooler is not recommended that the motherboard supports the CPU. (Go to GIGABYTE's website for the peripherals. 1-3 Installing the CPU and CPU Cooler Read the following guidelines before installing the CPU to prevent hardware damage. •...
.... It is not installed, otherwise overheating and dam- If you may occur. • Set the CPU host frequency in accordance with the CPU specifications. A Small Triangle Mark Denotes Pin One of the Socket AM2 Socket A Small Triangle Marking Denotes CPU Pin One AM3/AM2+/AM2 CPU - 13...support list.) • Always turn on the computer if the CPU cooler is not recommended that the motherboard supports the CPU. (Go to GIGABYTE's website for the peripherals. 1-3 Installing the CPU and CPU Cooler Read the following guidelines before installing the CPU to prevent hardware damage. •...
Manual
Page 16
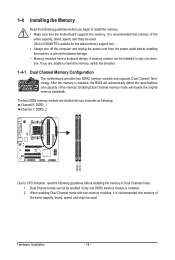
After the memory is installed. 2. Enabling Dual Channel memory mode will automatically detect the specifications and capacity of the memory. Hardware Installation - 16 - The two DDR2 memory sockets are unable to insert the memory, switch the direction. 1-4-1 Dual Channel ...enabling Dual Channel mode with two memory modules, it is recommended that memory of the same capacity, brand, speed, and chips be used . (Go to GIGABYTE's website for the latest memory support list.) • Always turn off the computer and unplug the power cord from the power outlet before installing the...
After the memory is installed. 2. Enabling Dual Channel memory mode will automatically detect the specifications and capacity of the memory. Hardware Installation - 16 - The two DDR2 memory sockets are unable to insert the memory, switch the direction. 1-4-1 Dual Channel ...enabling Dual Channel mode with two memory modules, it is recommended that memory of the same capacity, brand, speed, and chips be used . (Go to GIGABYTE's website for the latest memory support list.) • Always turn off the computer and unplug the power cord from the power outlet before installing the...

Manual
Page 19
... Use the parallel port to this port for USB devices such as a mouse, modem or other peripherals. USB Port The USB port supports the USB 2.0/1.1 specification. The following describes the states of the LAN port LEDs. Connection/ Speed LED Activity LED LAN Port Connection/Speed LED: State Description Orange 1 Gbps data...
... Use the parallel port to this port for USB devices such as a mouse, modem or other peripherals. USB Port The USB port supports the USB 2.0/1.1 specification. The following describes the states of the LAN port LEDs. Connection/ Speed LED Activity LED LAN Port Connection/Speed LED: State Description Orange 1 Gbps data...

Manual
Page 27
... installing the USB bracket, be sure to turn off your computer and unplug the power cord from the power outlet to prevent damage to USB 2.0/1.1 specification. Hardware Installation 11) SPDIF_IO (S/PDIF In/Out Header) This header supports digital S/PDIF In/Out.
... installing the USB bracket, be sure to turn off your computer and unplug the power cord from the power outlet to prevent damage to USB 2.0/1.1 specification. Hardware Installation 11) SPDIF_IO (S/PDIF In/Out Header) This header supports digital S/PDIF In/Out.
Manual
Page 37
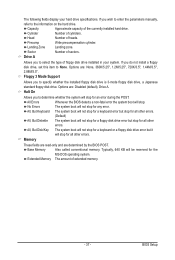
... standard floppy disk drive. Precomp Write precompensation cylinder. The following fields display your system. Cylinder Number of floppy disk drive installed in your hard drive specifications. Base Memory Also called conventional memory. BIOS Setup Floppy 3 Mode Support Allows you to None.
... standard floppy disk drive. Precomp Write precompensation cylinder. The following fields display your system. Cylinder Number of floppy disk drive installed in your hard drive specifications. Base Memory Also called conventional memory. BIOS Setup Floppy 3 Mode Support Allows you to None.

Manual
Page 43
... Password Set the password when Power On by Keyboard is set to accept. Time (hh: mm: ss) Alarm: Set the time at a specific time on each day or on a specific day in S5 (shutdown) state. (Default: Disabled) Note: When this function. (Default) Double Click Double click on left button on the PS...
... Password Set the password when Power On by Keyboard is set to accept. Time (hh: mm: ss) Alarm: Set the time at a specific time on each day or on a specific day in S5 (shutdown) state. (Default: Disabled) Note: When this function. (Default) Double Click Double click on left button on the PS...

Manual
Page 62
...wav file). (Note) Before enabling Easy Boost, right-click the EasyTune 6 icon in Windows environment. You can select memory module on a specific slot to -use auto-overclocking function . (Note) When activated, the system automatically experiments all sorts of overclocking configurations till it hangs. ... changed linearly based on the installed CPU and motherboard. Select Auto overclock last tune on the installed memory module(s). 4-3 EasyTune 6 GIGABYTE's EasyTune 6 is not supported. The Memory tab provides information on the next reboot to allow the system to work with the ...
...wav file). (Note) Before enabling Easy Boost, right-click the EasyTune 6 icon in Windows environment. You can select memory module on a specific slot to -use auto-overclocking function . (Note) When activated, the system automatically experiments all sorts of overclocking configurations till it hangs. ... changed linearly based on the installed CPU and motherboard. Select Auto overclock last tune on the installed memory module(s). 4-3 EasyTune 6 GIGABYTE's EasyTune 6 is not supported. The Memory tab provides information on the next reboot to allow the system to work with the ...